Ka-50 Basic Course (DCS)
Keyboard and Hotas Assignments
These axes and functions should be assigned or known for this course.
To do this, please call up the settings in the main menu or use the Esc key to open the menu and select the controller there. Both lead to the same control settings.

Required Axes
In the options, select the CONTROLS tab (1), below on the left KA-50 Sim (2) and the Axis Commands (3), as shown in the screenshot below. Your listed input devices are of course named differently than in the image. There are certainly some strange assignments in it. To delete all of them, select a field in a column (e.g. on the screenshot MFG Crosswinds... (4), Saitek... (5), Joystick... (6) etc. and then delete the whole column using Clear category (7).
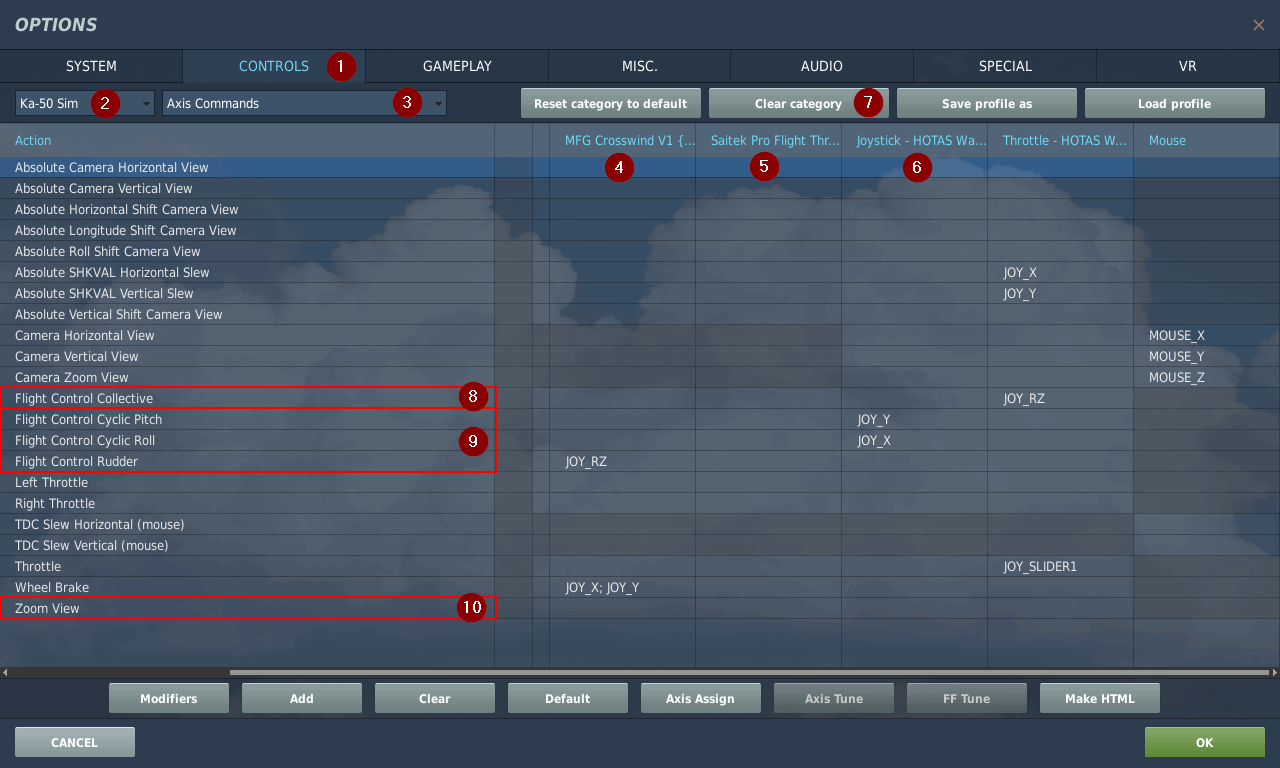
Then assign the red framed axis (8), (9) and (10). Zoom View (10) is optional, but really handy on one axis.
You should occupy the following axes:
| Action | Description | Remark |
| Flying: Control Stick, Aileron | Roll Axis - Aileron Axis | Recommendation: 0-20 Curvature |
| Flying: Control Stick, Elevator | Pitch Axis - Elevator | Recommendation: 0-20 Curvature |
| Flying: Rudder | Yaw Axis - Rudder | Recommendation: 0-20 Curvature |
| Flying: Collective Lever, Blade adjustment | More or less lift | Collective thrust also controls speed in a helicopter. No curvature Adjustment |
If you don't have flight pedals or a joystick with twist grip, you can't use the rudder axis. The control of the speed in the helicopter is done with Collective and Pitch. The engine fuel control system adjusts fuel flow automatically to maintain rotor speed, so are not necessary to assign to axes. Only those who have enough free axles may do so. As it is only necessary to advance the throttles fully once at the beginning of the flight, these controls can be done well with keyboard assignments. Therefore we have not framed the ones in the picture above.
With the button Axis Tune below you can change the course of the axis curves:

In the table above you will find recommendations for the setting. However, this is also a matter of taste. You should try other settings later to find the right one for you.
Optional Axes
You should assign the following axes, if you have the possibility:
| Action | Description | Alternative Keys |
Remark |
| Both throttle controls together, Up (Down) | Engine - Power Control | [Up Arrow] ([Down Arrow]) | |
| Throttle Left, Up (Down) | Engine - Power Control | [AltGr + Up Arrow] ([AltGr + Down Arrow]) | |
| Throttle Right, Up (Down) | Engine - Power Control | [RShift + Up Arrow] ([RShift + Down Arrow]) | |
| Wheel Brake | Allows fine adjustment of the braking | [W] |
Necessary Switches
You should know the following keyboard assignmentss:
| Action | Description | Default Keys |
| Wheel Brakes On | Emergency Braking on both Rear Wheels | [W] |
| Parking Brake | Pulls the Brake Level Permanently On | [LShift + W] |
| Gear Retraction / Extension | Alternates between retracted and extended gear | [G] |
| Trimer | Neutralises steering forces and temporarily overrides autopilots. This is the most important button in the Black Shark. Please make sure that this stick switch can be pressed often and for a long time while flying. |
[T] |
| Trim Reset | Resets the trim settings. | [LCtrl + T] |
| Flight Director | Turns the Flight Director On / Off. | [LCtrl + A] |
| Bank Hold | Autopilot - Roll Angle Holding Function | [LShift + B] |
| Pitch Hold | Autopilot - Pitch Angle Hold Function | [LShift + P] |
| HDG Hold | Autopilot - Steering Course or Heading Hold Function | [LShift + H] |
| Alt Hold | Autopilot - Altitude Hold Function | [LShift + A] |
| Collective Clutch | Height Assignment for Autopilot Height Hold Function | [F] |
| Ejection Seat | Ejection Seat! | [LCtrl + E] (3 x presses) |
| Battery 1 | Opens the Battery Switch Cover ad Switches Battery 1 On. | [LCtrl + LShift + E] |
| Cockpit Interior Lighting | Switches On the Main Cockpit Lighting. Together with Battery 1 you will be able find the rest of the switches in darkness. | [K] |
There are many more keyboard commands, but you can also operate all switches in the cockpit with mouse clicks etc. So this should be enough for this course.