ALE-47 Chaff and Flares
| Site: | Open Flight School |
| Course: | F/A-18C Hornet Weapon Basic Course (DCS) |
| Book: | ALE-47 Chaff and Flares |
| Printed by: | Guest user |
| Date: | Wednesday, 18 March 2026, 10:40 PM |
1. Countermeasures Selection
You can set the amount of chaff and flares carried or have them changed by the ground crew (see above Armament Dialog).
You will find two sliders in the upper right corner. Standard load out is 60 flares and 60 chaffs. If you want to take more flares with you, you will have to do without some of the chaff and vice versa.
2. Bypass Mode
Bypass is the simplest mode. Once the MASTER ARM is activated and the DISPENSER is set to BYPASS, you can manually eject defenses using the eject switch on the thrust lever. When the switch is pushed forward, a charge of chaff is ejected, and when it is pulled backward, a flare is ejected.
Although the BYPASS mode is the easiest to use, we cannot recommend it. Because you have to pay attention to triggering the countermeasures at the right intervals and quantities. In the adrenalin of an attack profile you may easily forget this, because you have to concentrate on other things. For this reason, there are integrated functions providing defensive programs, which we will introduce in the next section.
For this purpose open MISSION > F/A-18C > Training Mission - Defensive Systems.
You can use the BYPASS mode if the other modes have malfunctioned or if you forgot to boot and configure the ALE-47 in time. Here is a list of all necessary steps for using it:
- Weapon main switch to ARM. (MASTER ARM)
- Set the DISPENSER switch (2 x right click) to the top for BYPASS. (DISPENSER BYPASS)
- You can now immediately release flares (backwards AFT or [D]) and chaff (forward FWD or [E]) with the eject switch on the thrust lever. (FLARE DISP AFT / CHAFF DISP FWD)
With each press of the corresponding key a defensive measure is released.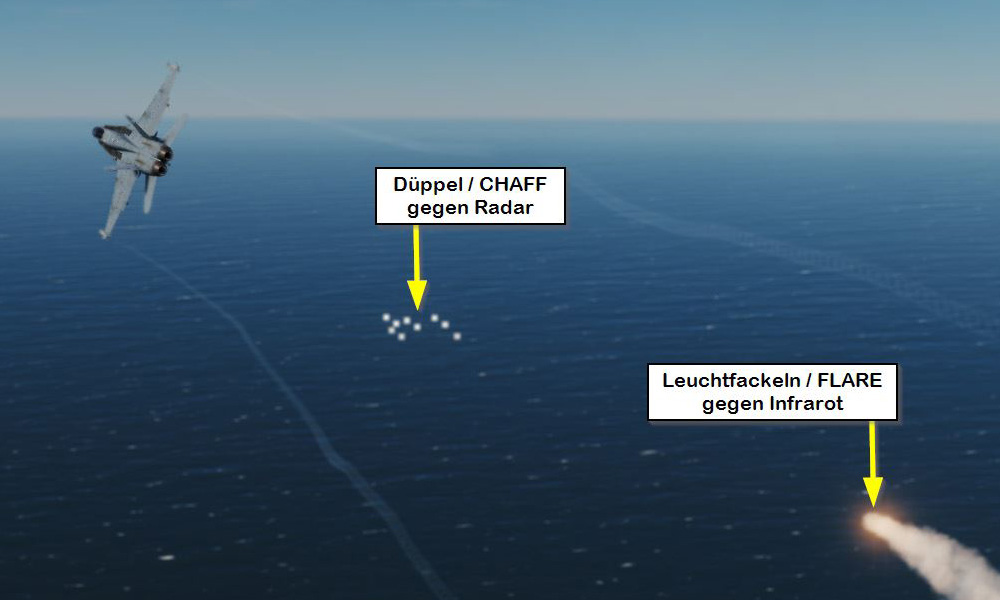
3. Other EW Modes
 There are several EW modes to help you concentrate on air combat or ground strike without having to think about launching a countermeasure at regular intervals:
- STBY - Standby
The ALE-47 has passed all tests and is ready for use.
You still have to switch to one of the other modes if you want to use countermeasures. - AUTO - Automatic
The system recognizes the type of danger and automatically ejects countermeasures.
The advantage is that you do not have to do anything. Everything is fully automatic.
But this mode is extremely wasteful of your countermeasure stores. These will be used up quickly. That's why we don't recommend this mode to you! - S/A - Semi-Automatic
The system recognizes the type of threat, just like AUTO, and selects the appropriate sequence of countermeasures.
However, you have to manually trigger the drop at the push of a button. To do this, you have to pull the countermeasure switch AFT.
This mode is not as wasteful as AUTO, but often uses significantly more than self-created manual programs. - MAN - Manual
You can program, save and trigger your own release sequences.
You should learn and use this mode.
We will explain the creation of maunal programs in the next section. - However, the ALE-47 must be prepared beforehand.
Preparation
To get started right away, the steps listed below are necessary.
If the MASTER ARM is off, you can still create the programs, but you cannot drop countermeasures.
If you prepare everything on the ground before the launch (and we advise you to do so), the MASTER ARM will stay off until you "Fence In" to enemy territory.
If the mission starts near the point of take-off, the MASTER ARM will be switched on directly.
- Arm main switch to ARM if necessary. (MASTER ARM)

- Switch a DDI to the EW side. (DDI EW)

- Set the DISPENSER switch to ON. (DISPENSER ON)
When OFF the ALE-47 is crossed out. Once selected (PB08) it will now boot up and run through a series of self tests. Firstly, it will be set to SF TEST, then to PBIT GO, and when ready, it will be set to STBY for standby.
- When ALE-47 is in standby, press PB08 beside ALE-47 (PB ALE-47)
A box around ALE-47 indicates that it is selected.
- Press the PB19 under MODE until the desired mode is set. (PB MODE)
3.1. Manual Mode Settings
In this section we will show you how to customize a program.
After that we will explain how to set up the programs, why and how to activate them.
- Press PB08 Mode until the top center of the screen reads MAN 1. (MODE MAN 1)
The number can be 2, 3, 4 or 5, depending on the selected program.
Using the PB20 STEP in the lower left corner you can switch through the programs.
- Press PB09 ARM, to open the program for editing. (PB ARM)
In the middle of the diplay some information is displayed:
- CHAFF: Number of chaff skillets to be released per program run.
- FLARE: Number of flares to be released per program run.
- OTH1 & OTH2: These are decoys. However, they are not yet available in the Early Access version.
- RPT: Number of repetitions the program is to execute.
- INT: Interval, in seconds, between each repetition.
- Use the PB05 CHAF on the left side to select Chaff for configuration. (PB CHAF)
CHAF is then displayed boxed.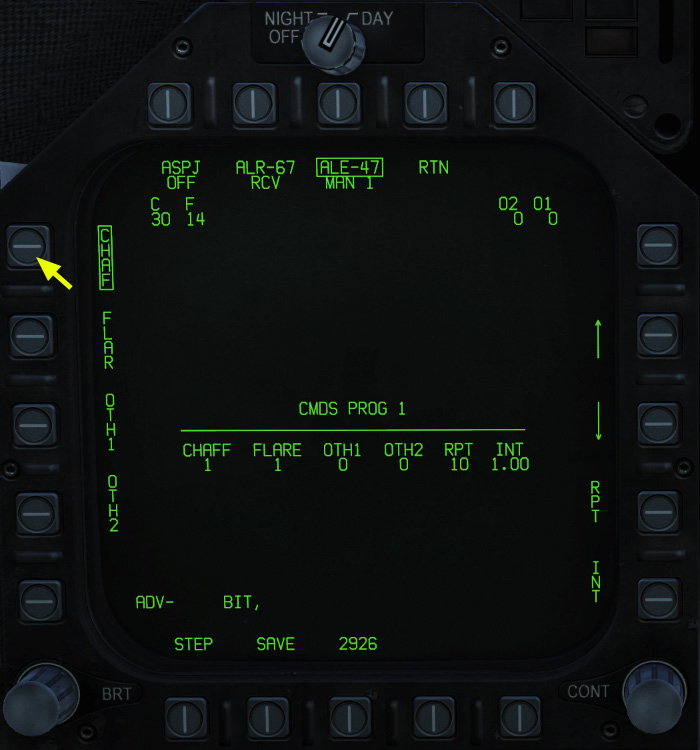
- Using the arrows on the right side you can increase (PB12) or decrease (PB13) the number. (SET CHAF)
For the program MAN 1, set the number CHAFF to 0.
- Use the PB04 FLAR on the left side to select Flares for configuration. (PB FLAR)
FLAR is then displayed boxed.
- Using the arrows on the right side you can increase (PB12) or decrease (PB13) the number. (SET FLAR)
For the program MAN 1 set the number of FLAR to 2.
- With the PB14 RPT on the right side you select the number of repetitions for the configuration. (PB RPT)
- Using the arrows on the right side you can increase (PB12) or decrease (PB13) that number. (SET RPT)
Position for the program MAN 1 RPT to 3.
- With the PB15 INT on the right side you select the interval between repetitions to the configuration (PB INT)
- Using the arrows on the right side you can increase (PB12) or decrease (PB13) the spacing (SET INT).
Position for the program MAN 1 INT to 0.50.
- If everything is set up correctly, you have to press PB19 below SAVE to save the changes (PB SAVE).
This step is very important. If SAVE is not pressed, the changes will be lost!
- Press the PB20 STEP repeatedly until MAN 5 is in the top center. (PB STEP MAN 5).
With STEP you can switch through programs 1-5.
- Using the same procedure as described above, set program 5 as follows (SET MAN 5):
CHAFF FLARE OTH1 OTH2 RPT INT 2 0 0 0 4 1.50
- Also, select program 2 and set the following (SET MAN 2):
CHAFF FLARE OTH1 OTH2 RPT INT 0 1 0 0 10 1.00
- Select program 1 again (CHOOSE MAN 1).
- Return to the EW main page with the PB09 RTN (PB RTN)

Now you have set the programs MAN 1, 2 and 5 without knowing why you have set these programs this way.
However, this will become clear in the next section when we explain how to use the programs.
3.2. Using Manual Progams
In the last section you programmed the Manual Programs 1, 2 and 5 to specific values.
Now we want to explain why. The EW page on the DDI now looks like this:
In Manual mode (MAN 1-5) the eject switches on the thrust lever function differently than in Bypass mode.
If the switch is pulled back, the preset program is triggered. This is currently MAN 1.
When you push the switch forward, program 5 (MAN 5) is always triggered.
Programs MAN 1 and MAN 5 are designed for you to use them if you are attacked on the way to your target, no matter if it is an air-to air or surface-to-air attack.
It is only important that you can see if the approaching missile is controlled by infrared or radar.
With an IR controlled missile use program MAN 1, i.e. pull the switch to the rear (DISP AFT).
With a radar controlled missile use program MAN 5, i.e. push the switch to the front (DISP FWD).
How to recognize the type of missile that is approaching will be discussed in the next section.
Now there remains program MAN 2. This program is intended for the attack of ground targets.
If you descend using unguided bombs in the CCIP mode, attack ground targets with unguided rockets or the aircraft's cannon, then you are likely to descend relatively low.
Therefore you may come into the range of MANPADS or AAA. These are difficult to detect and since approaching IR missiles are not detected by thhe aircraft, an approach where you are concentrating on the target can be abruptly ended by an unseen IR missile.
However, if you switch to the MAN 2 program during the approach using STEP and activate it, IR flares are ejected every second. This prevents a Grail or Stinger, for example, from locking to you, or may deflect an IR missile that is already in flight.
It is therefore a precautionary defensive measure.
Of course you can adjust the values of the programs as you like and you can also use the programs in a completely different ways. This is entirely up to you. But for starters you have here a practical set of defense programs.
We took this structure and the configuration of the programs from the very good YouTube video by Growling Sidewinder.