The Airfield: Structure, Traffic Rules and Procedures
2. Airport Procedures
2.6. Circuit Pattern
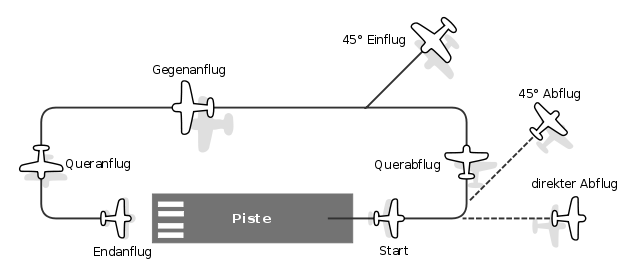
The aerodrome circuit is a standardised procedure for the arrival and departure of aircraft flying under Visual Flight Rules (VFR) and landing at an aerodrome which does not have air traffic control (air traffic controller). The following is achieved with the aerodrome circuit:
- The traffic flow for taking off and landing aircraft is orderly.
- The pilot gets an overview of the airfield, its status, environment and other airspace participants.
- He uses a known procedure that gives him time to make all the preparations for landing, and the sequence become natural after some practice.
- The radio messages made by other airspace users make him aware and allow him to react accordingly.
The International Civil Aviation Organization (ICAO) has defined the Standard Aerodrome Circuit. In foreign countries, this is usually regarded as the standard. In some countries airfields usually have special approach charts in addition to the normal approach charts on which the flight path and the height of the aerodrome circuit are marked.
For a beginner flying the circuit well is a challenge, because many steps have to be conducted. However, this course circuit training is an important part of the overall pilot training. All the important flying skills need to be used. When a pilot familiarizes himself with a new aircraft, the first flight exercise is always to fly circuits. The routine learned there can save your life in an emergency.
If there is no other explicit arrangement, the course usually flown anticlockwise (actually it is generally away from habitation). The shape is rectangular ashore and race track at sea.
The circuit consists of five parts:
- Take-off and Up Wind
- Cross Wind
- Downwind
- Base
- Final
Start and Up Wind
This is the first phase of the circuit. As soon as the landing gear breaks contact with the ground, the climb begins. The runway track is maintained on the Up Wind leg.
- When at a safe climbing speed the landing gear is retracted. This reduces the drag and leads to an improved climb.
- At a height of 500 ft AGL (Above Ground Level), i.e. approx. 150 m above ground, the flaps are retracted and the landing light switched off.
- The minimum distance to the runway before turning into cross take-off is 1.5 km. However, this is not enough for fast aircraft. Therefore maintain Up Wind for at least 30 seconds. Then turn Cross Wind or, if departing, turn on heading for your destination airport.
Cross Wind
The Cross Wind course is 90° to the runway course. Hence it’s name. One flies across the oncoming wind for that runway. You continue to climb to the given circuit altitude (usually 1,000 ft AGL, approx. 300 m). The course in Cross Wind is maintained until the airfield in your 8’Oclock (or 4 O’clock) (for approx. 1.5 km). Then turn into the Downwind.
Downwind
Downwind is the direction opposite to the runway approach, the circuit height is maintained and the speed normally between 60 and 150 kts depending upon the type of aircraft. This should be well within the limiting speed for the flaps and landing gear. Those limits depends on the aircraft type. Also the indication, how far the flaps should be extended, is different depending on the aircraft. By extending the flaps the lift is increased, but also the drag is increased. The upward movement may have to be counteracted in order to maintain circuit altitude so adjust attitude and trim. Depending on the speed, the higher air resistance can be used for braking or must be compensated by more engine power. During the Downwind the Before Landing checks are completed including:
- Landing gear ... Down
- Flaps ... As Required
- Landing Lights ... On
The Downwind is parallel to the runway on the opposite direction (i.e. 90° offset from the Cross Wind and 180° offset from the runway course). This course is maintained until the runway is visible at about 45° angle (7 to 8 O’clock) to the rear (left shoulder of the pilot). Now make a descending turn into the Base Leg.
Base Leg
On the Base Leg reduce altitude (and reduced speed to the approach speed - this may be weight related). Select flaps to fully Down (if not already). Then continue descending and turn by 90° To be at to approximately 500ft (to 150 m) on the Final Approach.
Final Approach
In the Final Approach, begin a continuous descent to the touchdown point. This is judged by noticing that the threshold stays in the same place in the windscreen. Maintain the approach speed so that the aircraft does not become too slow and unstable or too fast at touching down. This is achieved by maintaining a steady attitude. The descent rate must be suitable for the aircraft not touch down too hard or overshoot the touch down point. This is achieved by adjusting power.
Some airfields have an optical device that provides information for the correct glide path angle. The final approach leads to touchdown.
Touch-and-Go
If you want to do more than one circuit in a row, Touch-and-Go by not braking the aircraft once the landing gear touches down. Instead, roll for about 5 seconds and then increase the throttle to takeoff power, retract the flaps to the take-off position and, without stopping, the aircraft can takeoff again.
Joining an Airfield
Five minutes before arriving in the airspace of the destination airfield, announce yourself by radio. As soon as you arrive, you will enter the Downwind.
Special Features
Fast aircraft maintain their course longer after take-off until they turn into cross take-off. This also applies in the Downwind until turning into the Base Leg. As a rule, approx. 30 seconds after passing the runway threshold is sufficient distance from the runway.

