AGM-88 HARM
| Site: | Open Flight School |
| Course: | F/A-18C Hornet Weapon Training Course (DCS) |
| Book: | AGM-88 HARM |
| Printed by: | Guest user |
| Date: | Sunday, 15 February 2026, 11:43 AM |
1. Description
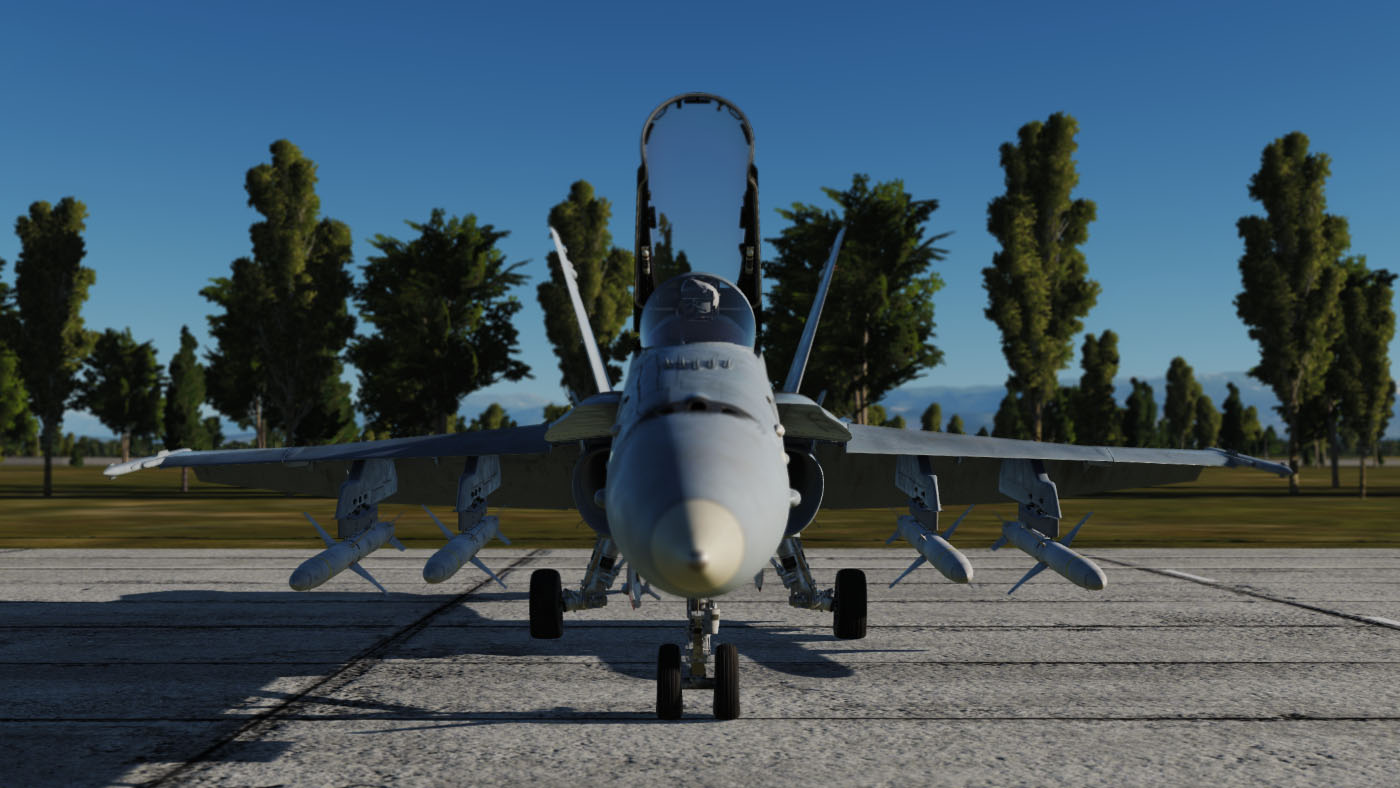
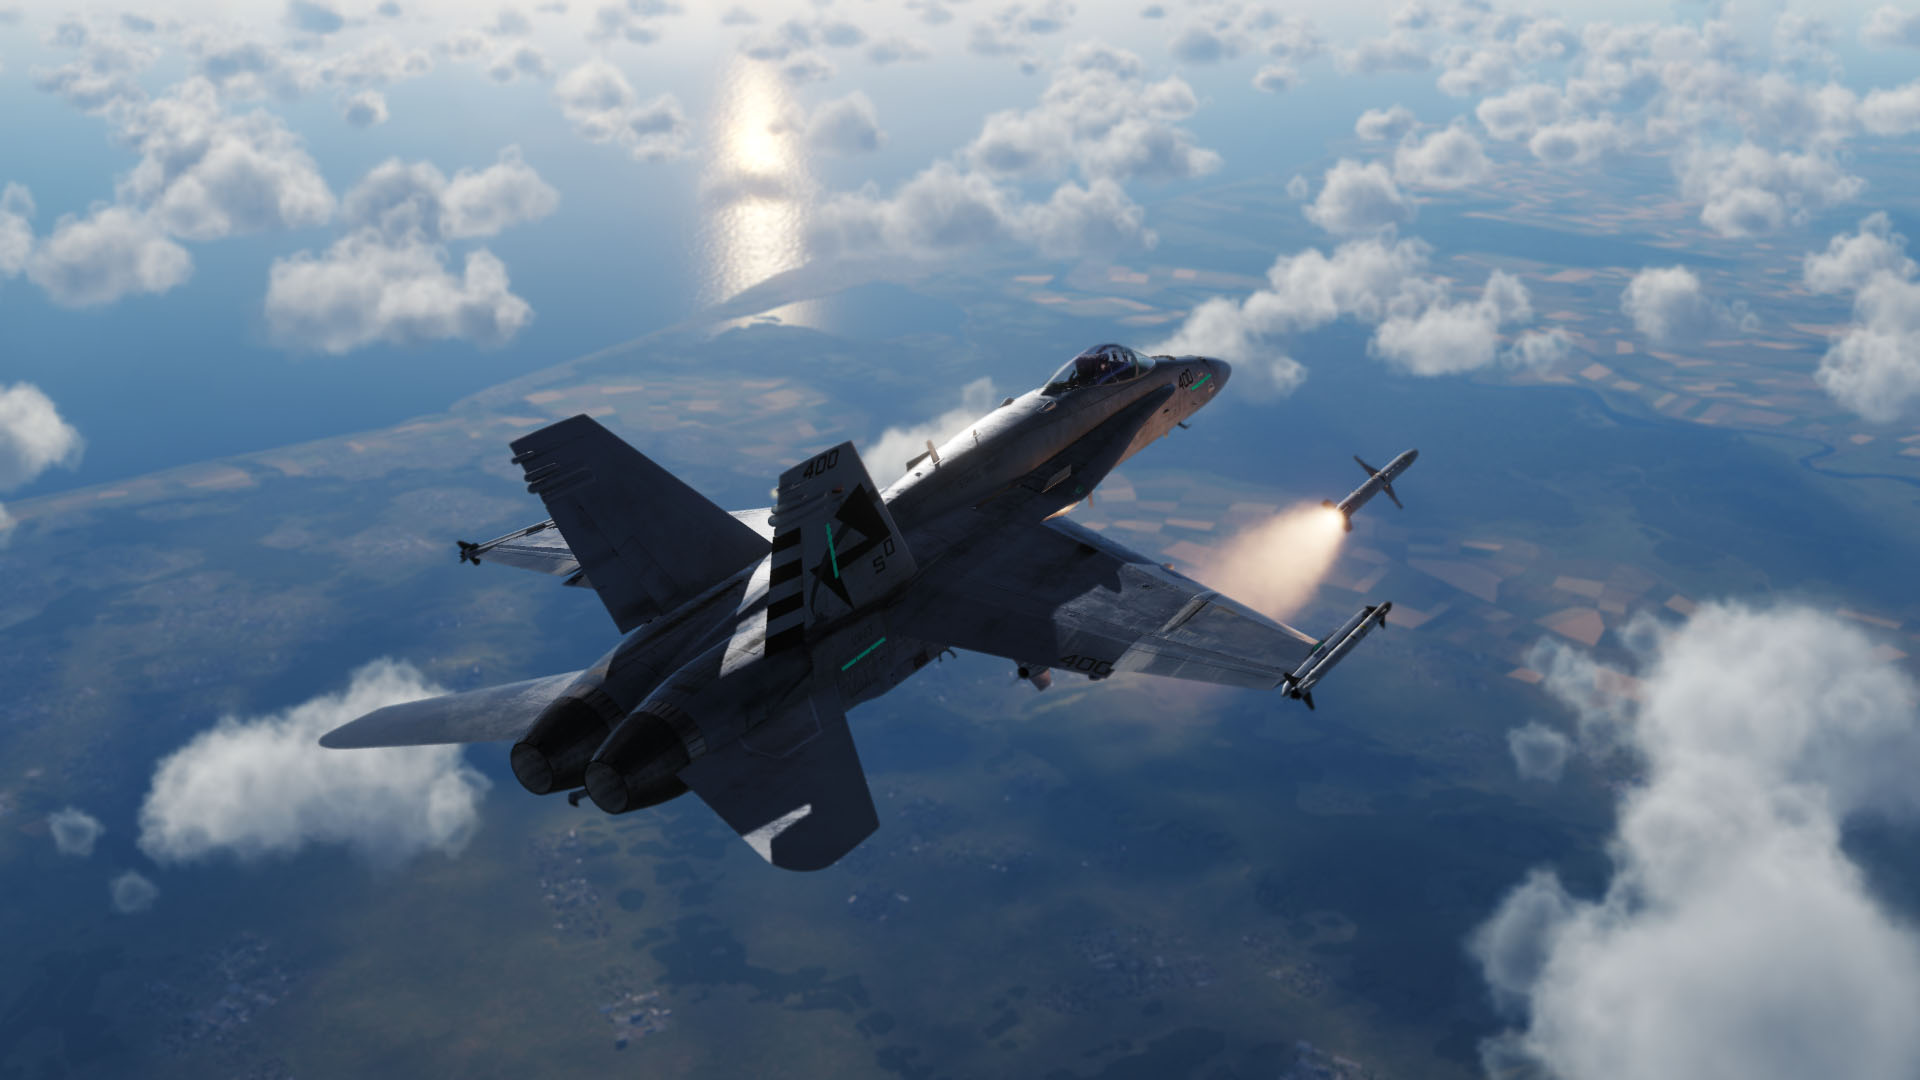
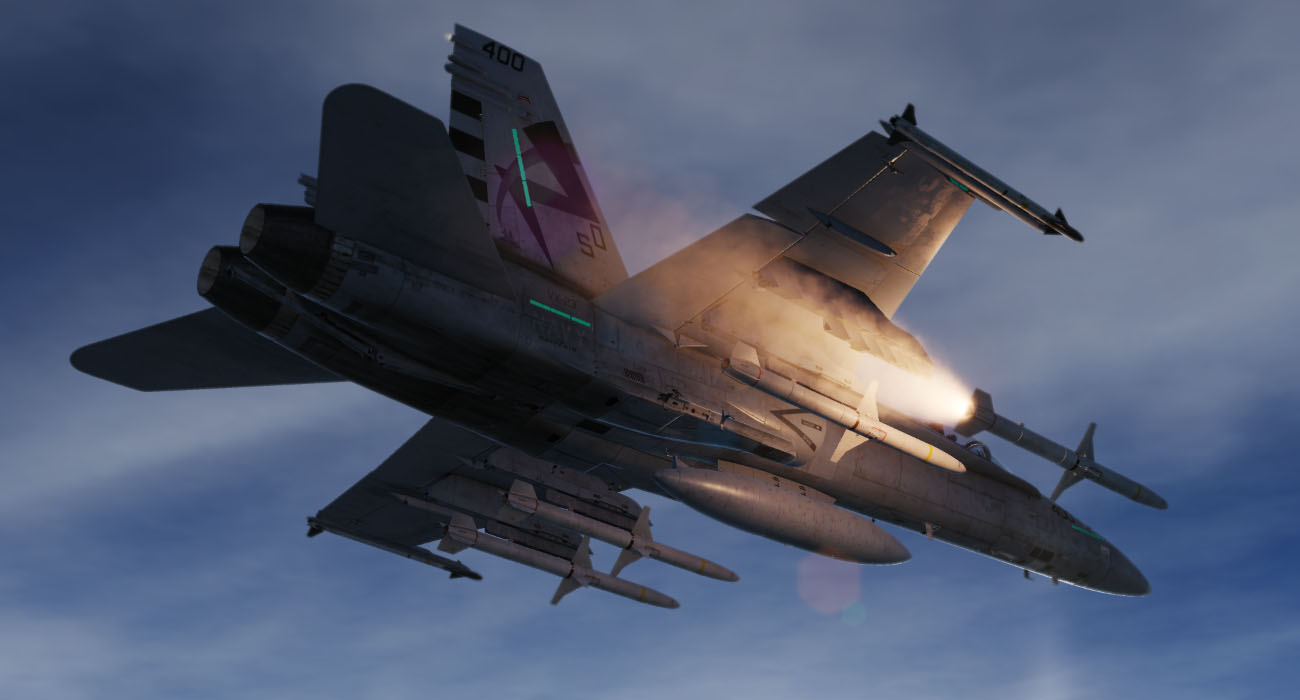
![U.S. Navy Photo by Photographer's Mate 3rd Class Brian Fleske. Public domain], via Wikimedia Commons](https://commons.wikimedia.org/wiki/File:AGM-88_HARM_on_FA-18C.jpg) The AGM-88C HARM (High-Speed Anti-Radiation Missle) is an airborne guided missile that searches for and destroys radar transmitters. It is used to combat enemy SAM positions (Surface-to-Air Missle). Depending on the altitude from which it is fired, it can achieve a range of up to 80 nautical miles (see table below).
The AGM-88C HARM (High-Speed Anti-Radiation Missle) is an airborne guided missile that searches for and destroys radar transmitters. It is used to combat enemy SAM positions (Surface-to-Air Missle). Depending on the altitude from which it is fired, it can achieve a range of up to 80 nautical miles (see table below).
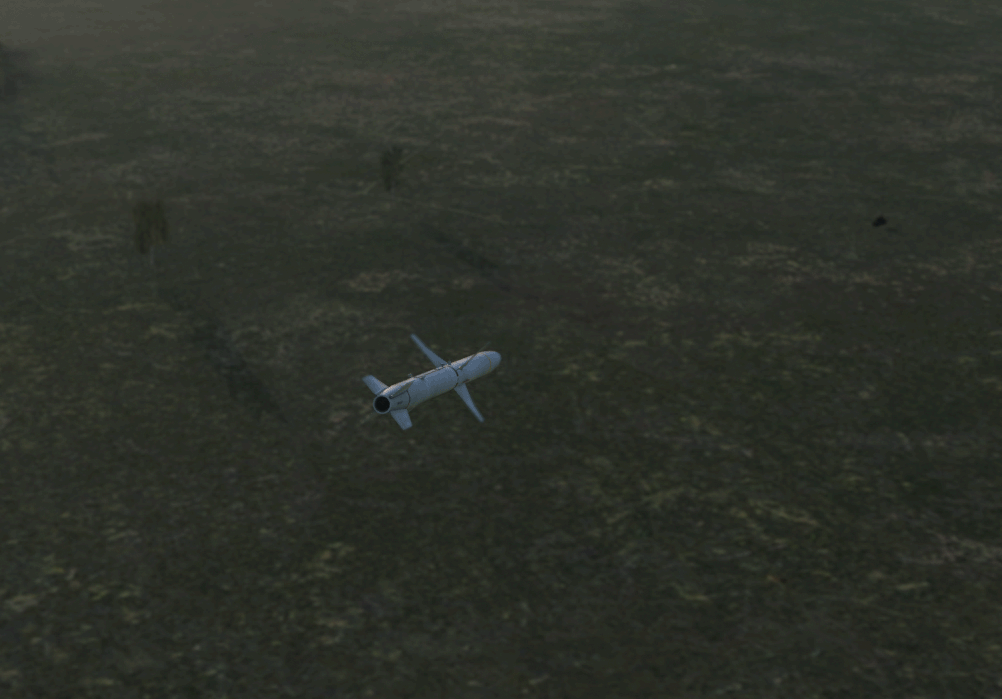
It is designed to explode near the radar antenna, still in the air, to achieve the highest possible damage from the fragmentation effect.
It can be used in three different modes:
- Self-Protection (SP)
- Target of Opportunity (TOO)
- Pre-Briefed (PB)
The SP mode was the first to be introduced in the early access phase of the F/A-18C. The TOO mode followed as the second and the PB mode has not yet been implemented in DCS at the time of this writing. It will be described later, as soon as it is available in the game.
Tactics
The HARM is a fire-and-forget weapon. This means that after firing it will steer itself into the target and you can turn.
In SEAD missions (Suppression of Enemy Air Defenses) you move within the range of the SAM positions. This means that the programming of the countermeasures must be set correctly and you should turn off after firing the HARM to avoid entering the danger zone. One method is to make good use of the terrain to prevent your own detection and then fire the missile at the last moment and turn away.
.
The HARM cannot determine whether it is already in range. If the position of the SAM is known, it makes sense to set a waypoint on it. Then you can display the distance and estimate when the HARM should be fired. If the position is not known there are two methods:
- Estimate and fire at good luck or better
- get switched on by the SAM, select this SAM position and fire the HARM as soon as the first rocket has been fired at you from the SAM position. Then you are safely in range.
Of course you have to perform a defensive maneuver (Split-S, i.e. downswing, to significantly reduce height and escape) and use countermeasures (chaffs).
.
HOTAS
On the HOTAS the function "RAID/FLIR FOV - Selector" (keyboard I) should be assigned. It is used to switch through the individual targets on the HARM.
.
Range
The following table is from the HARM-Tutorial-Video from RedKite:
| height (ft) | speed (kts IAS) | Range (nm) |
| 40,000 | 380 | 70 |
| 30,000 | 400 | 50 |
| 20,000 | 400 | 35 |
| 10,000 | 400 | 25 |
| 1,000 | 550 | 15 |
As you can clearly see, the range increases significantly with the altitude and speed of your F/A-18C. On the other hand, the higher the altitude, the better the enemy radar can detect you. This increases the danger of being chased by interceptors. And the range of the SAM also increases, so that some YouTuber recommend attacking at medium altitude (approx. 15,000 ft).
Even though you can fire the HARM from any angle to the target (360°), large correction movements will significantly limit the range of the missile!
3. Self-Protection (SP)
The use of the HARM in SP mode is relatively simple.
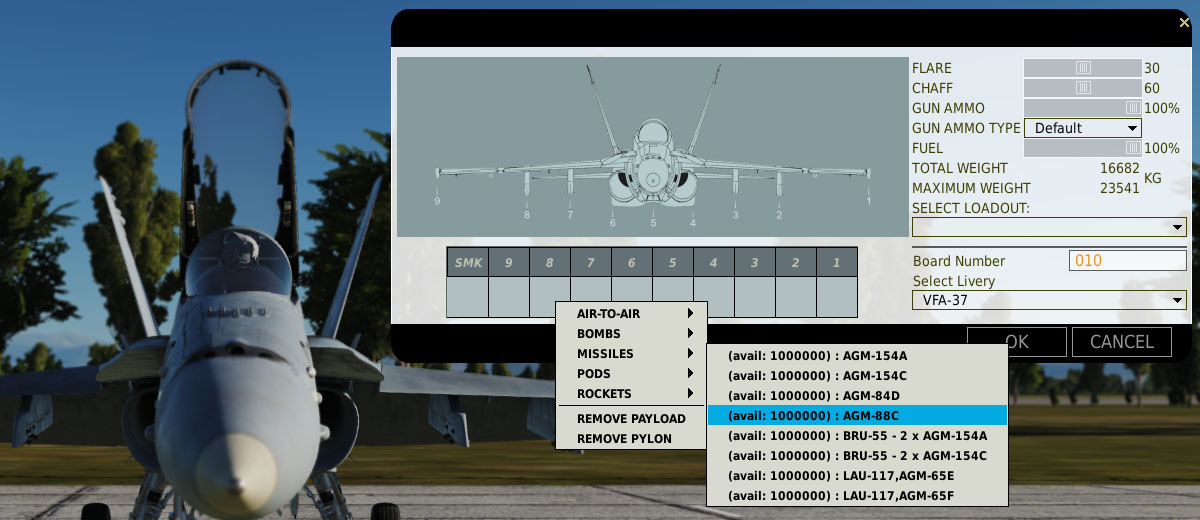
To do this, open MISSION > F/A-18C > Weapon qualification - AGM-88C HARM.
Perform the following steps:
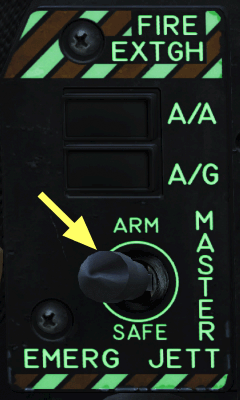
- Activate weapon main switch MASTER ARM VI-L.

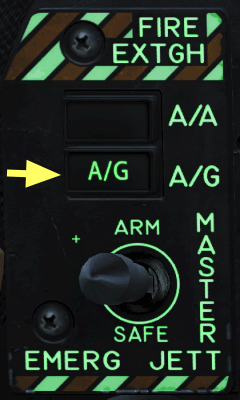
- Main mode set to air/ground MASTER MODE A/G VI-L.

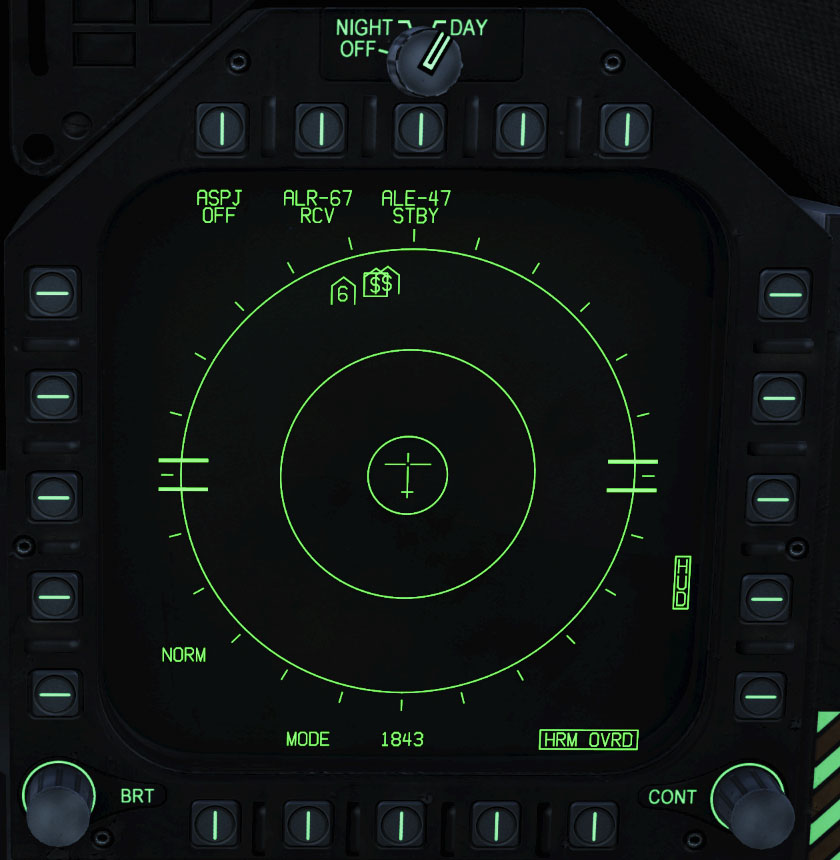
- On the right DDI select the EW page (Early Warning) from the TAC page to EW-PAGEVI-R
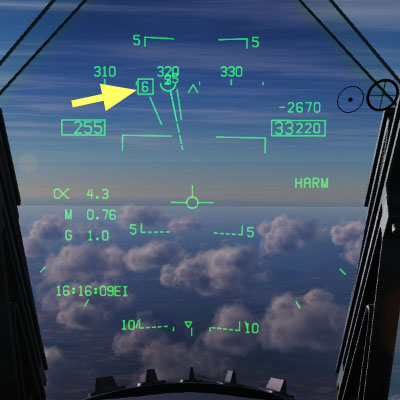
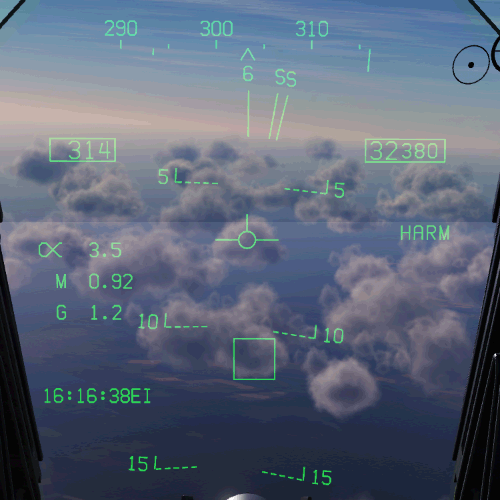
- By default the HUD is activated on the right side (PB14) (see image). If this is deactivated, the threats will no longer be displayed on the HUD (see below).
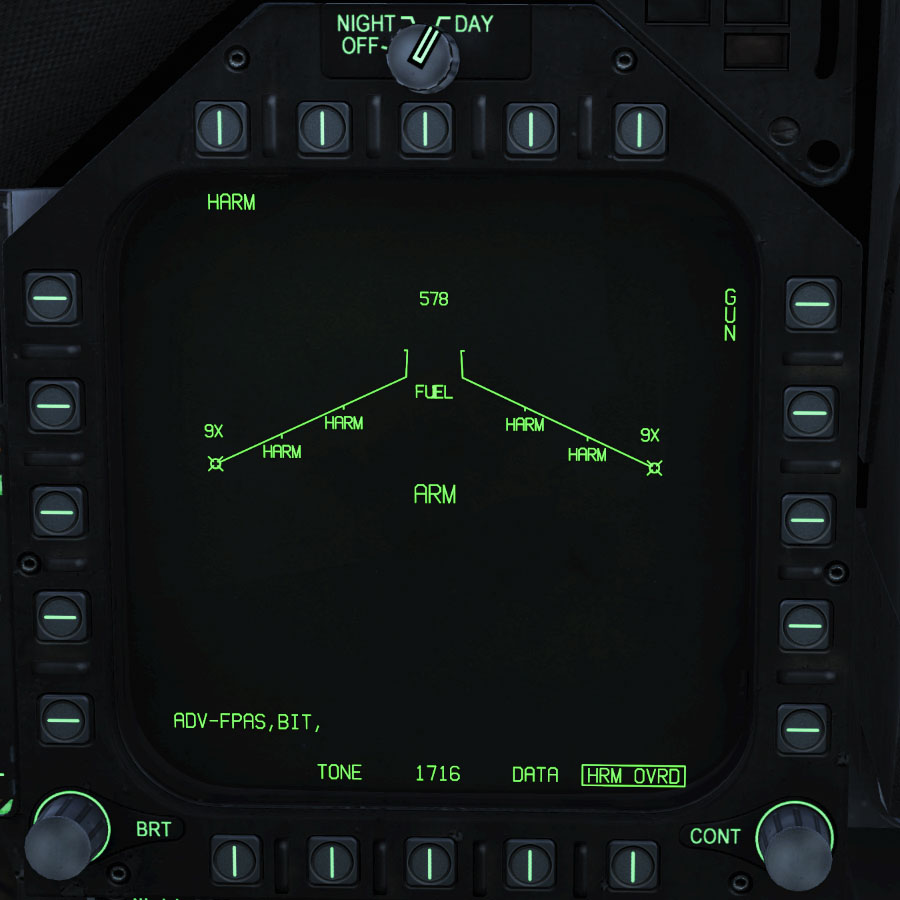
- On the SMS page you select HARM via a PB at the top PB HARM VI-L. The HARM settings page opens automatically:

- You can change the mode on the left side of the screen. RSET resets the selection of the target. This means that the most dangerous target will be selected automatically. Select STEP you switch to the next missile.
- Check out all radar emitters on the EW page or top 6 on the HUD now.
 =
= 
The system automatically selects the biggest threat.
You can recognize the selected threat by a square border. If you want to change the selection press .
No range indicator is displayed. So you have to know yourself if the missile can reach the target at your current altitude and speed.

On the EW DDI page (or EW Independant screen) all threats are displayed. However, there is the DISPLAY switch, which when activated ensures that only the 6 most dangerous threats are displayed on the EW side (see EW page).
- Fire the rocket with the weapon trigger button or FIRE WEAPON HOTAS-J.
4. Target of Opportunity (TOO)
The Target of Opportunity is similar to the SP mode. However, the target is identified and selected via the HARM missile's seeker head.
To do this, open MISSION > F/A-18C > Weapon qualification - AGM-88C HARM.
Perform the following steps:
- Activate weapon main switch MASTER ARM VI-L.
- Main mode set to Air/Ground MASTER MODE A/G VI-L.
- On the left DDI, select the SMS (Stores Mmanagement Ssystem) on SMS-PAGE VI-L.

- On the SMS page, select HARM via a PB on the top row PB HARM VI-L.
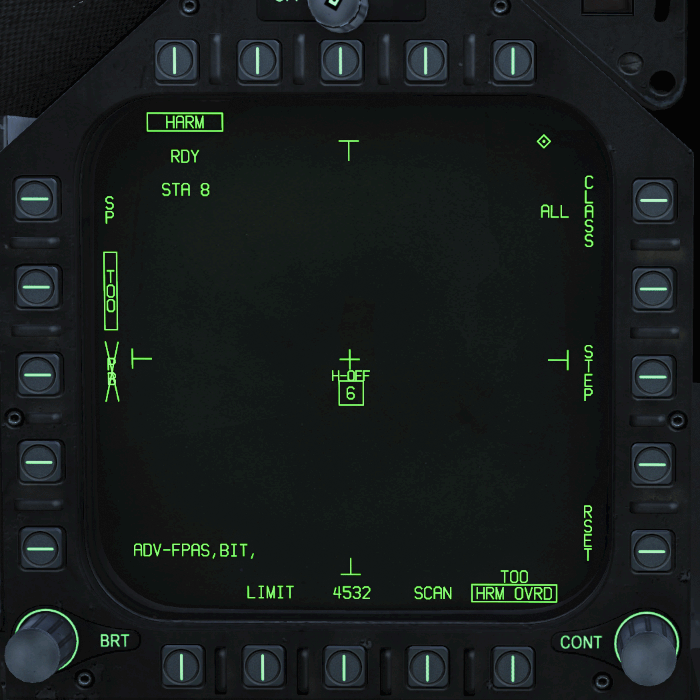
The HARM page opens automatically.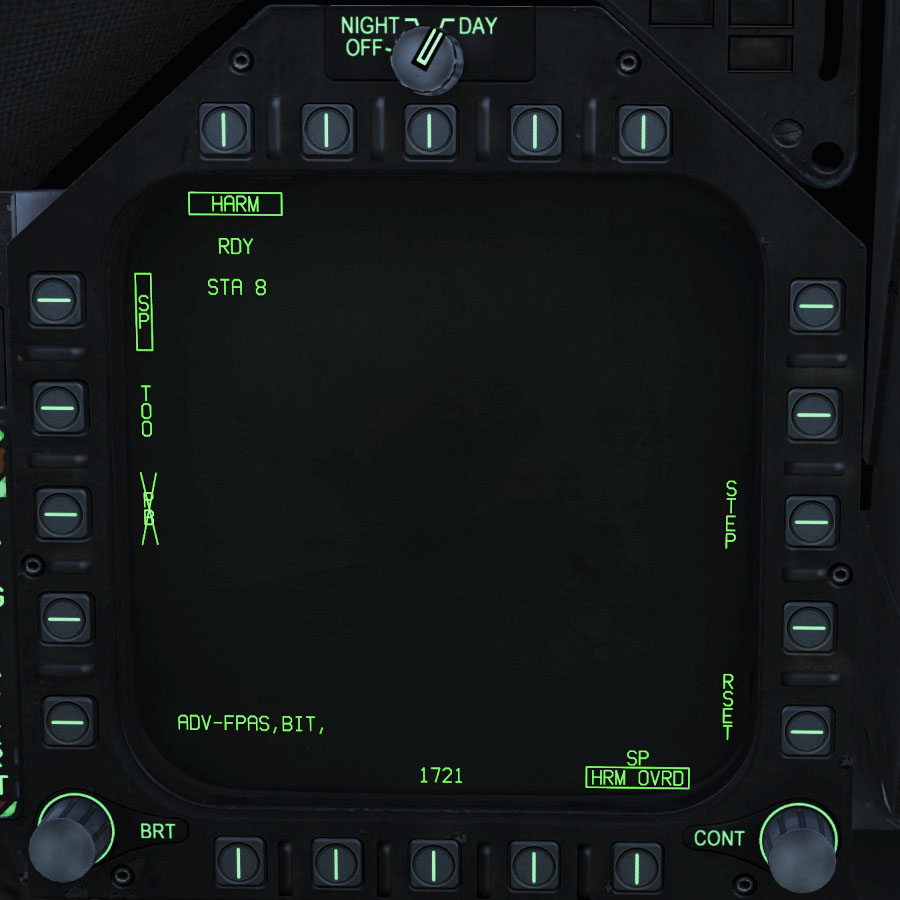
- Select the TOO mode using PB here PB TOO VI-L.
The HARM page changes: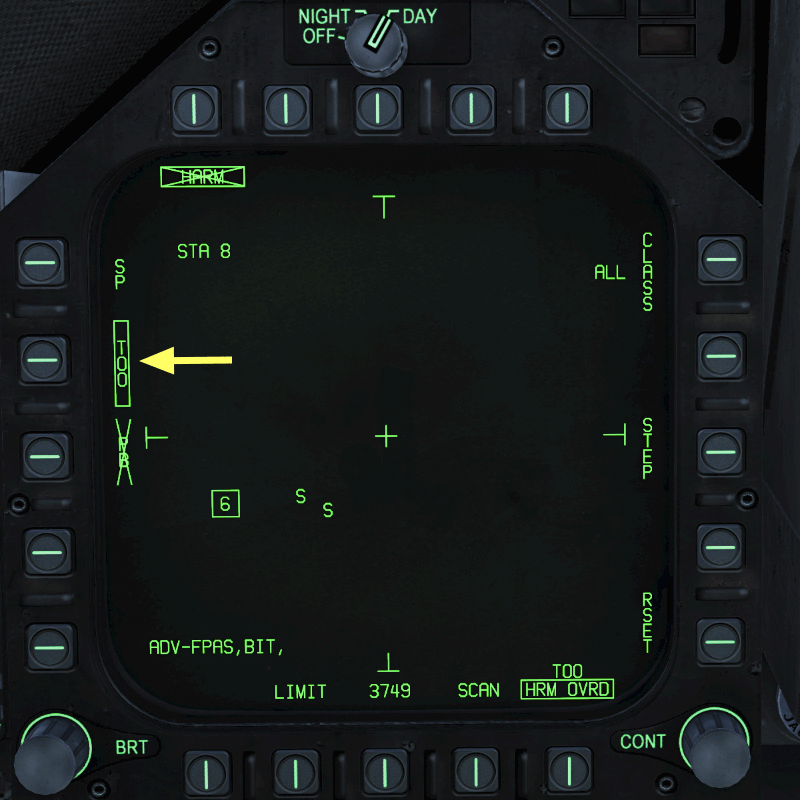
- Activate the left DDI (with the HARM side) via sensor control switch-left SET DDI as SOI VI-L.
A diamond appears in the upper right corner of the DDI to symbolize that the DDI is the active sensor.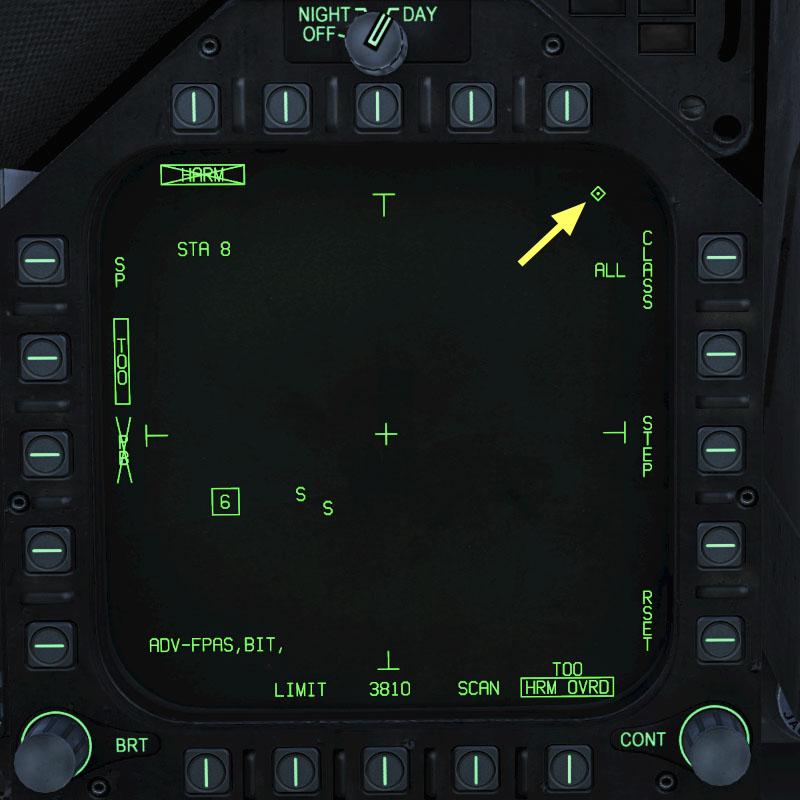
- Here's an explanation of what can be seen on the HARM TOO page:
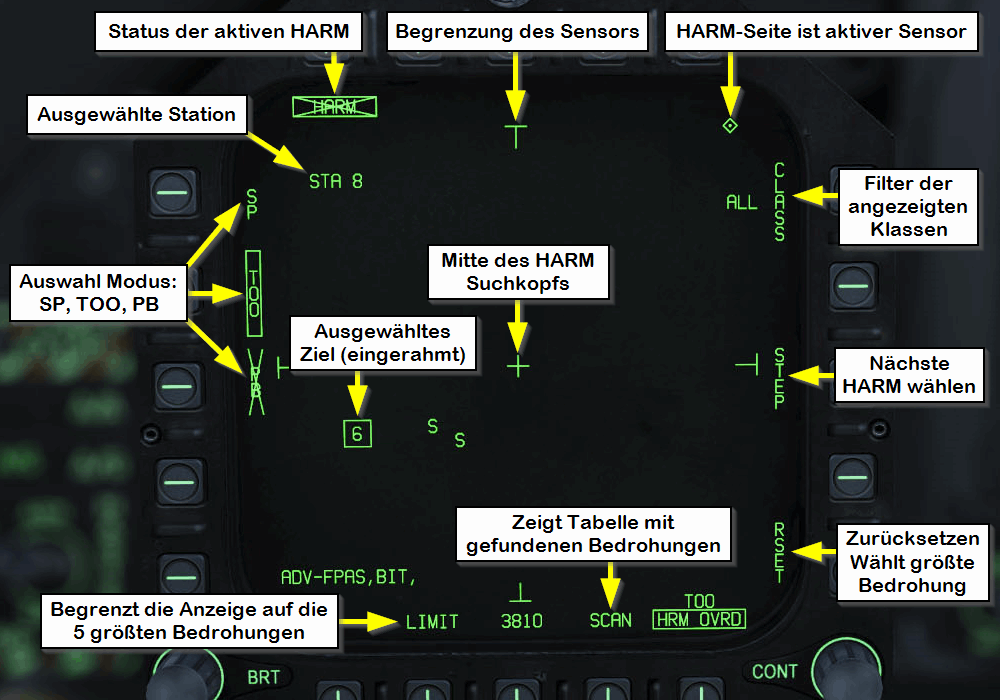
- If you press the PB CLASS button, you can set a filter to display only the one you want.
Here is an explanation of the CLASS subpage: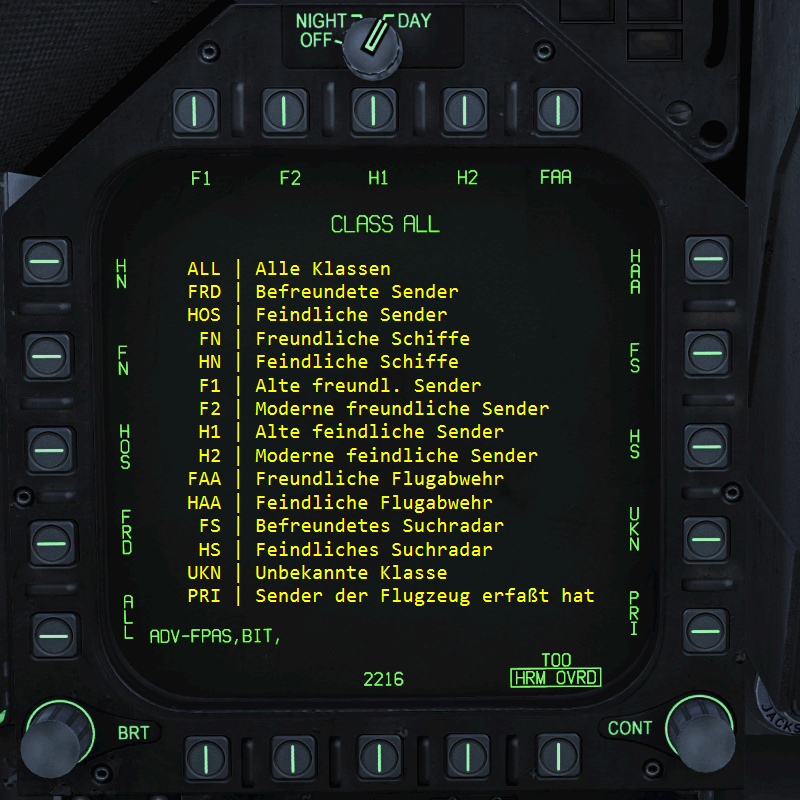
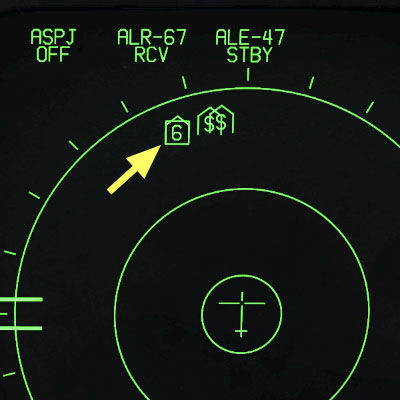
Abbreviation Description ALL All classes FRD Friendly Emitters HOS Hostile Emitters FN Friendly Ships HN Hostile Ships F1 Old Friendly Emitters F2 Modern Friendly Emitters H1 Old Hostile Emitters H2 Modern Hostile Emitters FAA Friendly Air Defence HAA Hostile Air Defence FS Friendly Search Radar HS Hostile Search Radar UKN Unknown Class PRI Emitter that has registered our aircraft - With the PB SCAN you can display a list of detected threats.
Here is an explanation of the SCAN subpage:
In the margin are the same filter buttons as on the CLASS subpage.
Left of the labels the direction is displayed.
The dot says the station is in front of you and arrows indicate the direction if the station is not in front of you (see second picture).
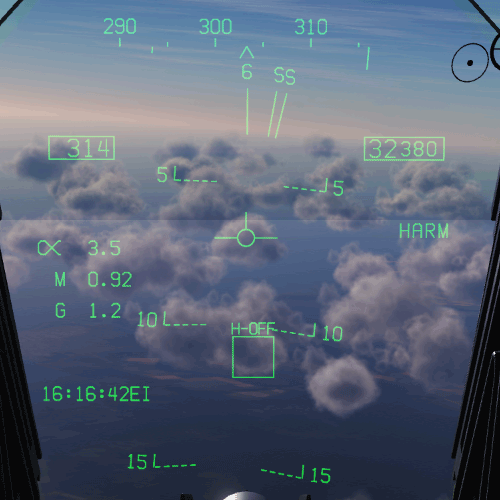
- As in TOO mode, select the desired destination with the (the RAID/FLIR FOV selector) SELECT TARGET HOTAS-J.
The selected emitter is displayed boxed. Both on the HARM page in the DDI and on the HUD.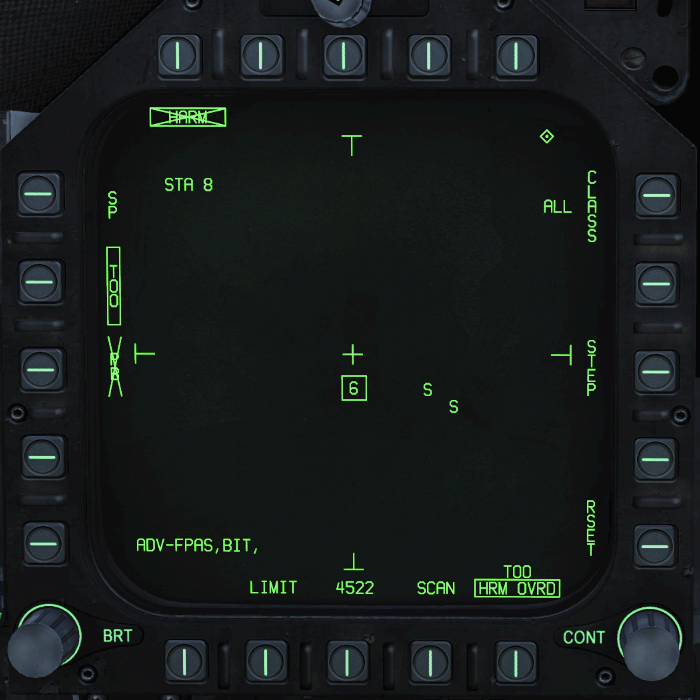


5. Pre-Briefed (PB)
The pre-briefed mode is not yet implemented in the game at the time this text was created.
As soon as it is available, we will add the description here.

6. Further Information
Our manual for the HARM is based on the English manual, Chuck's Guide and the following YouTube tutorials listed below. You can use this material for further familiarization.
- Matt Wagner:
- RedKit:
- Grim Reapers:
- Spudknocker: