Simplified Procedures in Detail
| Site: | Open Flight School |
| Course: | MB-339 Aermacchi Basic Course (DCS) |
| Book: | Simplified Procedures in Detail |
| Printed by: | Guest user |
| Date: | Wednesday, 25 March 2026, 12:10 PM |
1. General Information
 Here you'll find detailed and illustrated step-by-step instructions to operate the MB-339 for the following procedures:
- Start Systems and Engine
- Before Taxi Checks
- Taxi
- Before Take-off Checks
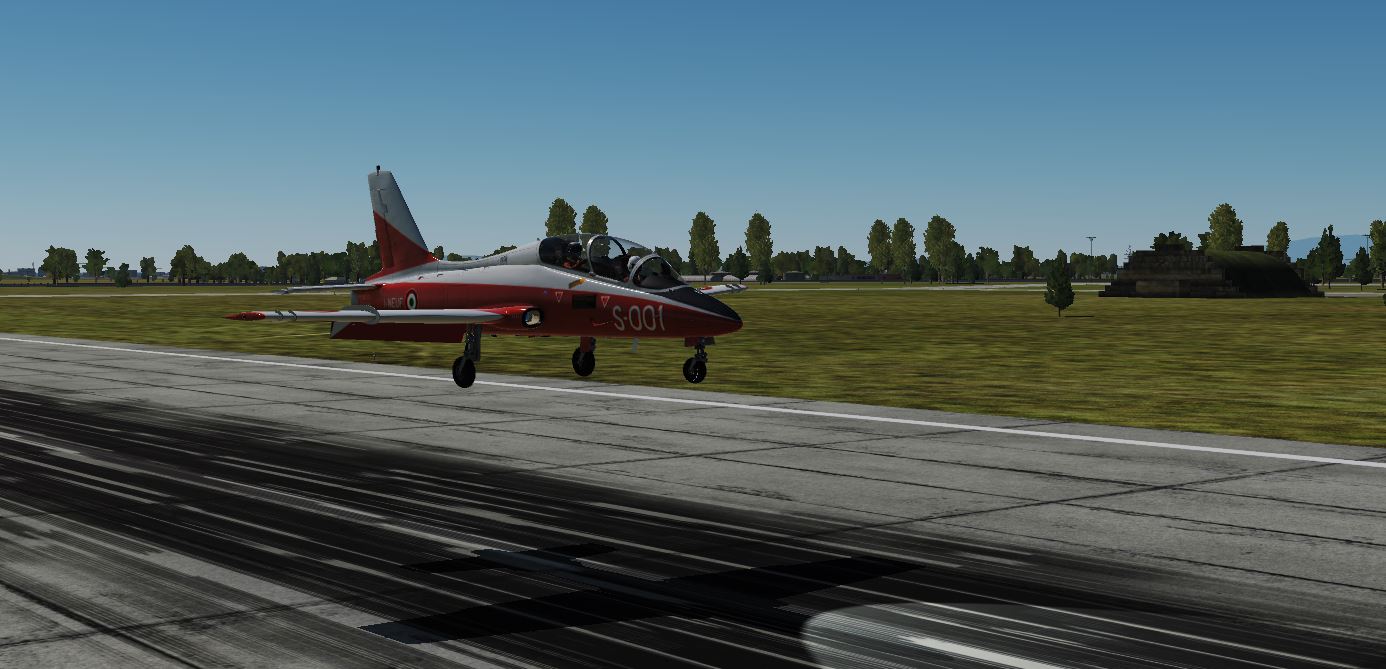
- Normal Take-off and Climb
- Flight Characteristics
- Normal Landing
- Park and Shutdown
- Flying the Circuit Pattern
In the Course Download Area you will find the practice missions, briefings and checklists. Start the appropriate mission and work your way through the manual(s).
As soon as the radios are implemented, the missing radio actions will be added.
Conventions Used
- Explanation of how to complete the checklist item. e.g. Switch on the Battery with a left mouse click.
- Kneeboard Checklist Item e.g. BATT ON
- Position in Cockpit e.g. RLP
- Animated or static image and location image
- Additional remarks if necessary.
Generally, key abbreviations / combinations are rarely used and so not specified here. We mainly click on the switches in the cockpit using the mouse. This is because you can assign your own keys. This has to be done for some controls they are unassigned by default.
If not otherwise mentioned, the item is activated by left-clicking with the mouse.
Switch positions are specified as text abbreviations of cockpit location and displayed as images:
Animated Images
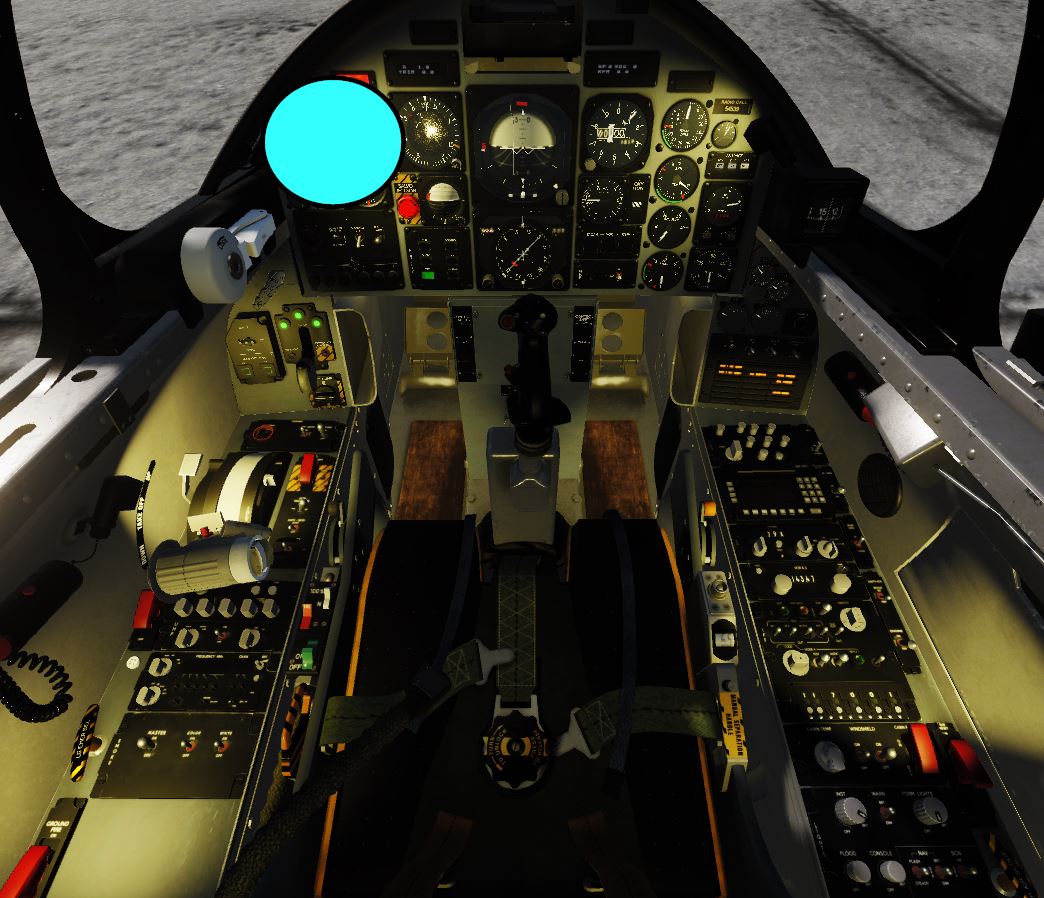
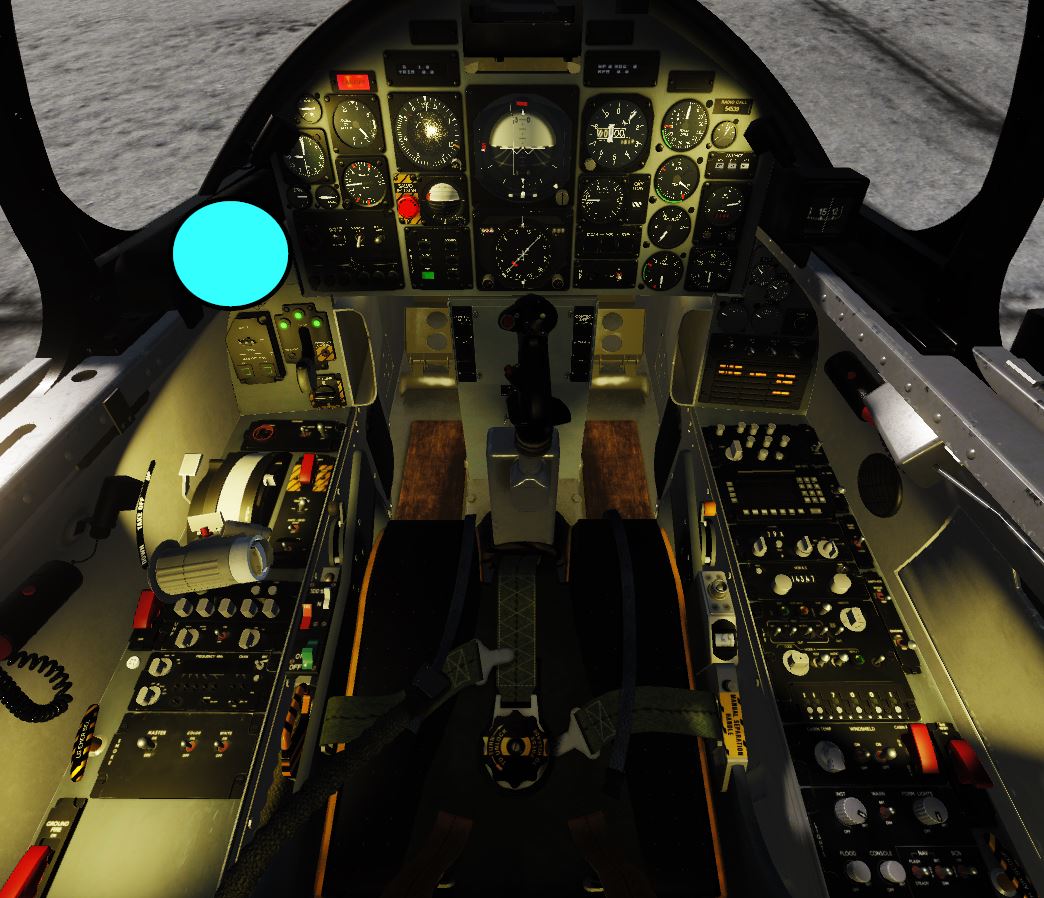
In this manual we will use some animated GIFs. These are images that display a sequence of images one after the other and run in an infinite loop. So that something can also be seen when printing, the animation starts with the target state and, if necessary, the elements are additionally marked (e.g. by an arrow).
Here is an example:
- Switch on the Battery with a left mouse click (This applies electrical power to the aircraft) BATT ON RLP.
- Switch on both Generator 1 and 2 (neither generate power yet), GEN1 & 2 ON RLP
 |
 |
Flying Techniques
Here at OFS we understand that many "gamers" wish to just get airborne and fly for fun. Our courses are designed for just that, but we also design courses to assist those "enthusiasts" who want to really learn like the professionals.
For this we are developing Basic and Advanced Flying Training courses. These courses will use the MB-339 as the primary training aircraft, however they are generic courses which include general Flying Techniques and Procedures that can be applied to almost any aircraft. There will be additional courses for Propeller and Rotary aircraft in due course. A student try to absorbed these good flying techniques and procedures until they become embedded as habits. They will greatly assist with all flying.
2. System and Engine Start
In this Checklist we will start the engines and boot the systems.
You can practice using our Mission: 01 System Start.
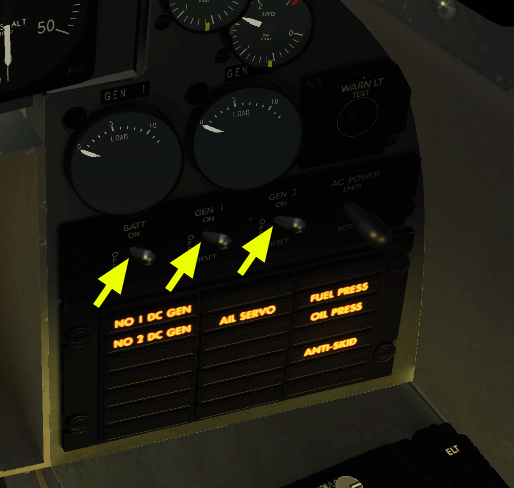
Battery and Generators Power Up
- Turn on the battery switch, by 1 x left click on the switch BATT ON RSP
- Switch on Generator1 and Generator 2 GEN1 ON GEN2 ON RSP
 |
 |
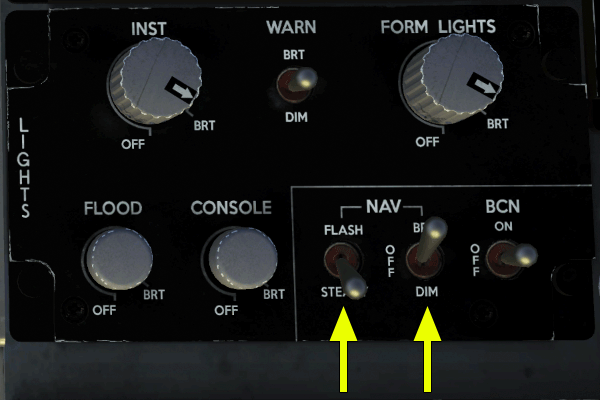
As soon as there is electricity on the aircraft, the navigation lights should be switched on so that the condition of the aircraft can also be seen from the outside by the ground crew.
- Turn navigation lights on NAV LIGTHS STEADY, NAV LIGHTS BRT RSP-H.
 |
 |
Prepare for engine start
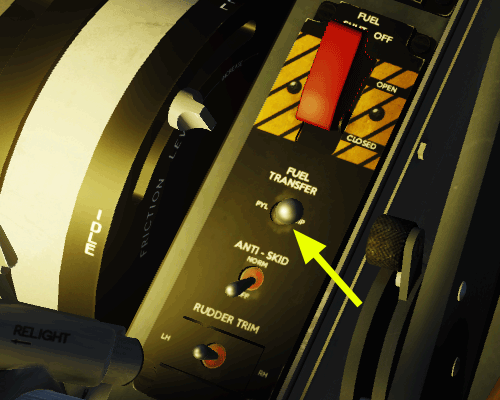
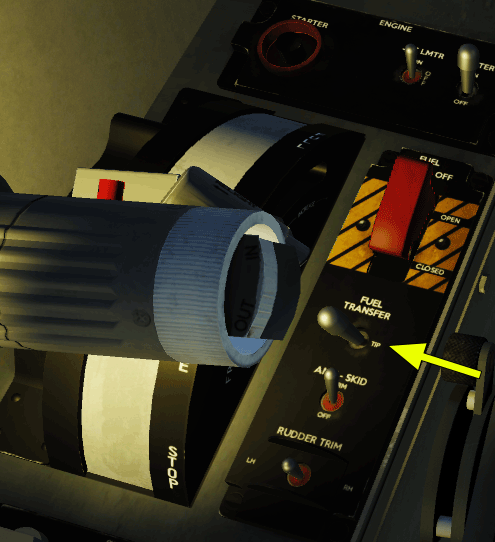
If the aircraft is equipped with wing tip tanks and wing pylon tanks:
- Set Fuel Transfer to TIP, otherwise PYL FUEL TRANSFER SET LSP-F.
 |

|
-
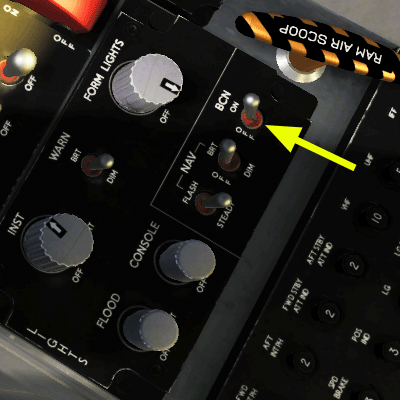
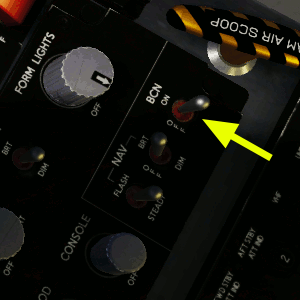
Turn on the beacon, BCN ON RSP-A.
 |
|
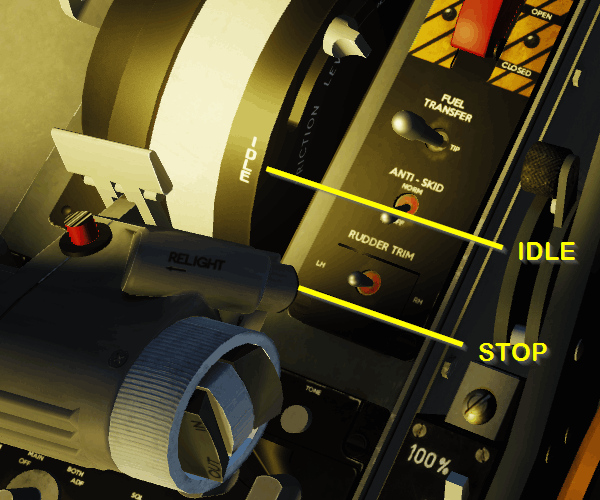
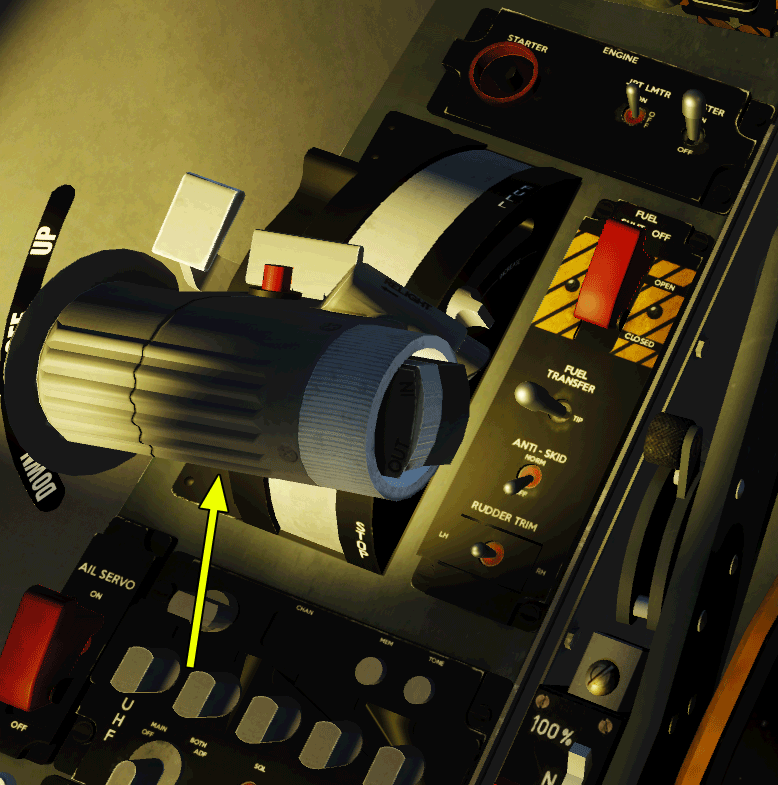
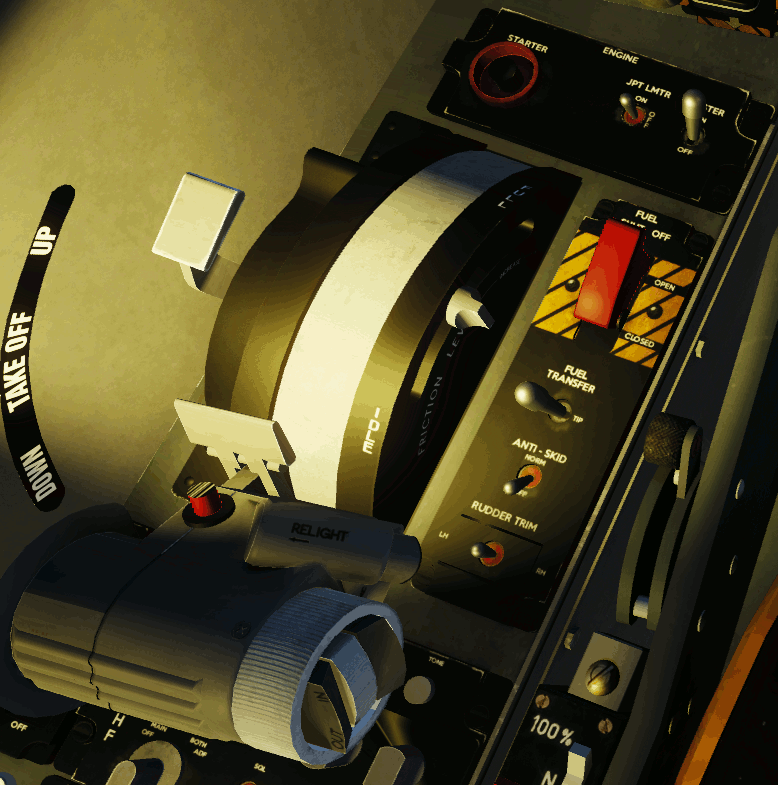
- Check that the throttle lever is at STOP, THROTTLE STOP HOTAS.
 |
|
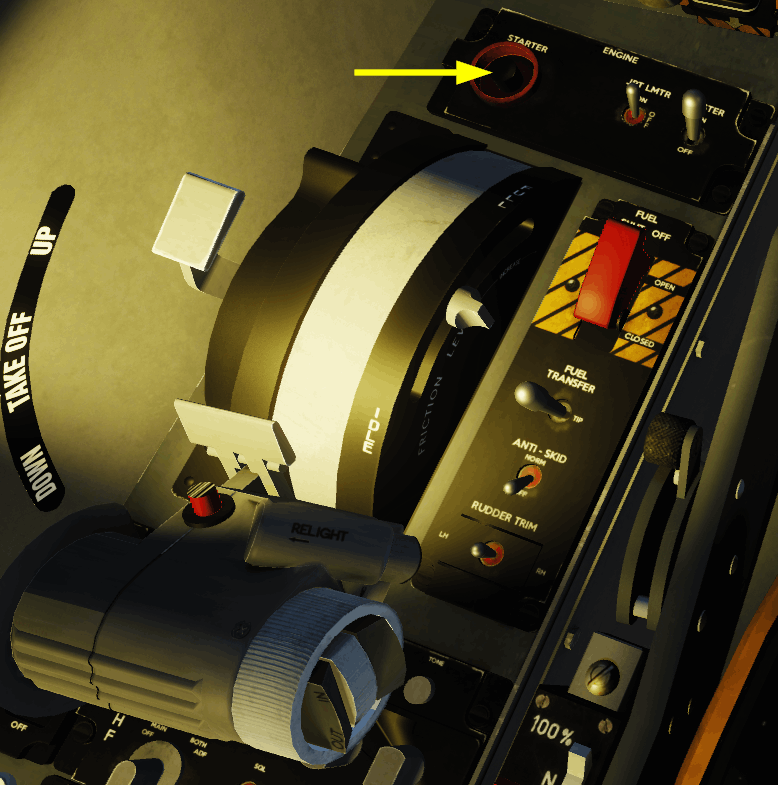
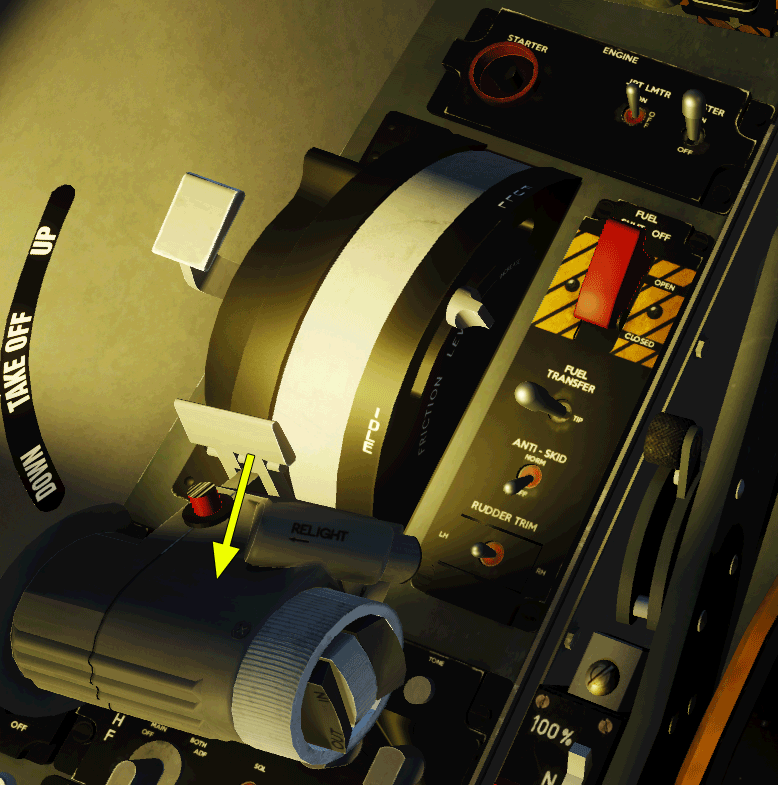
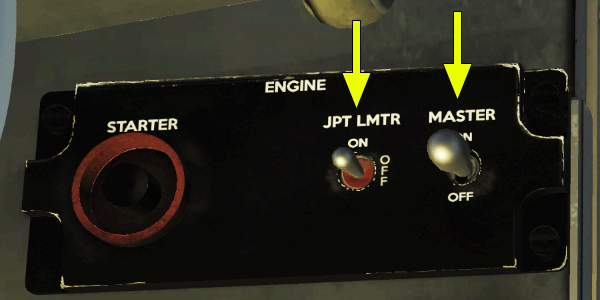
- Turn on Engine Master and enable Jet Pipe Temperature Limiter, ENG MSTR ON, JPT LMTR ON LSP-V.
 |
|
- Hold down Engine Starter for 2 seconds, ENG START 2 SEC LSP-V.
 |
|
- The starter will now switch on the ignition and bring the engine to a speed from which the engine start is possible.
 |
 |
- If the starter has brought the engine to 10% RPM, set the throttle RShift + End to IDLE, THROTTLE IDLE HOTAS.
 |
|
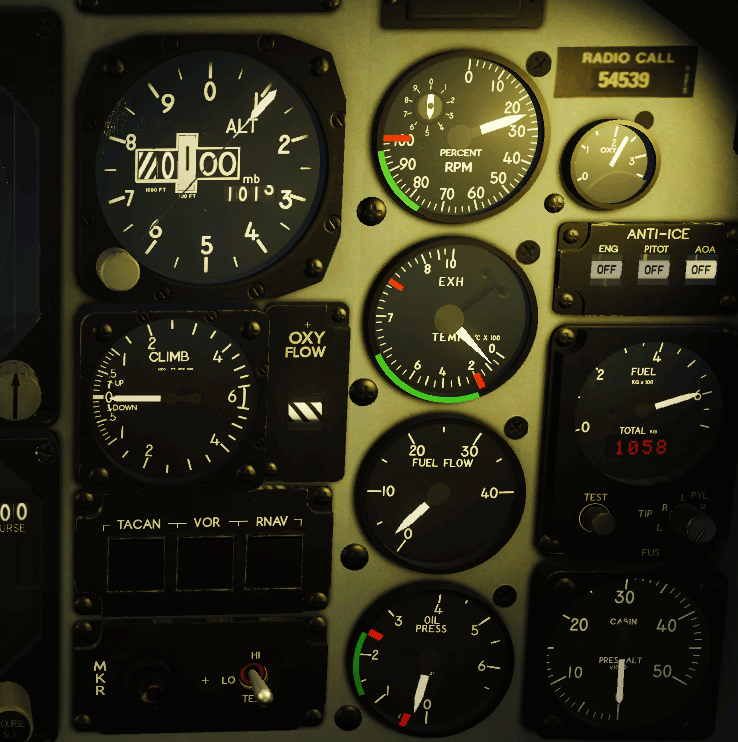
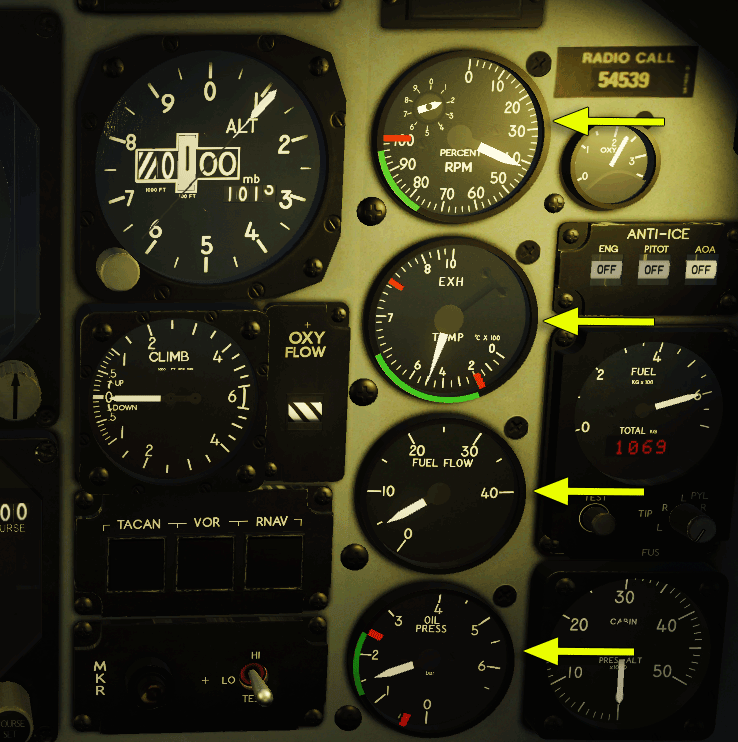
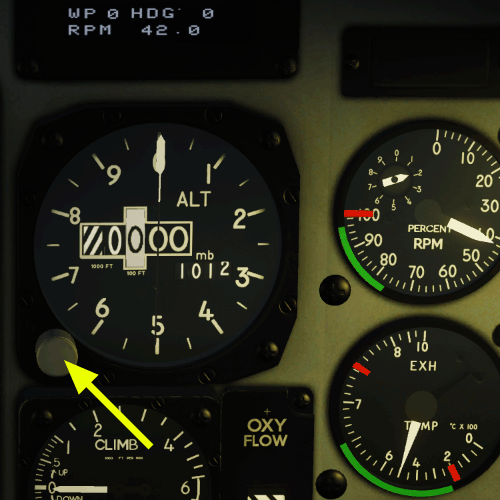
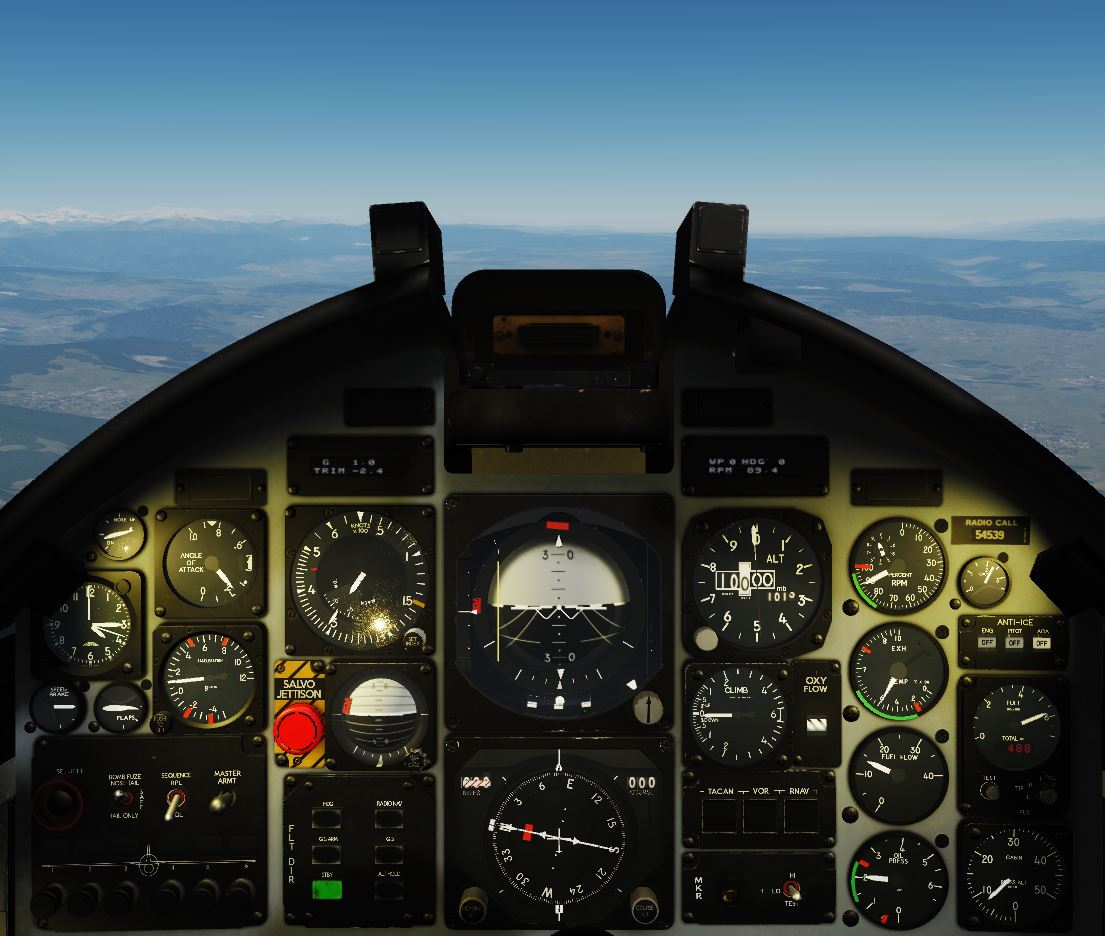
- Check the correct engine start FUEL FLOW CHECK), (EXH TEMP CHECK), (RPM CHECK), (OIL PRESS CHECK IP -R
The figures in the following figure show the respective values after a stabilised start (see arrows).
| Parameter | Figures |
"Thought / Say"
|
| FUEL FLOW | Approximately 5 kg/min (Consumption varies between 5kg/min at 40% RPM and 29kg/min at 100% RPM) |
"Fuel - Flowing"
|
| EXH TEMP | Approximately 500°C (Green Range 200°C-650°C) |
"Light Up"
|
| RPM IDLE | Approximately 42% |
"Eng - Running Up"
|
| OIL PRESS | Approximately 1,5 bar (Green Range 1,2 bar - 2,2 bar) |
"Oil - Rising"
|
 |
|
This completes the engine start.
Up Next
In the next section we prepare the MB-339 for Taxi.
3. Before Taxi Checks
 |
 |
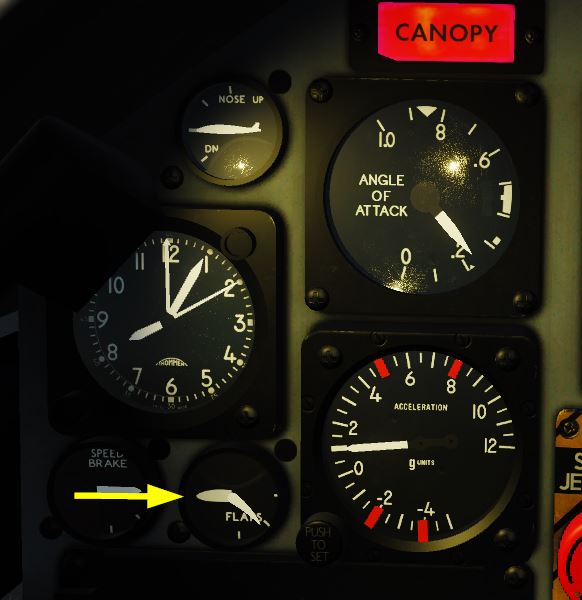
- Check that the Air Brake is Retracted and set the Trim to Neutral for Take-off, SPDBRK RETRACTED HOTAS
 |
 |
- Extend the Flaps Fully Down and then to Take-off position, FLAPS FULL DN THEN T/O IP-L
 |
|
- Check stick and rudder for freedom of movement, CONTROLS CHECK HOTAS
- Stick ... Aft, (Check Elevator Up)
- Stick ... Forward, (Check Elevator Down)
- Stick ... Left, (Check Ailerons, Left Up, Right Down)
- Stick ... Right, (Check Ailerons, Right Up, Left Down)
- Pedals ... Left Forward, (Check Rudder Left)
- Pedals ... Right Forward, (Check Rudder Right)
 |
 |
- Close the Canopy, CANOPY CLOSE IP-L
 |
 |
Up Next
Our plane is now ready to taxi. This will be covered in the next chapter.
4. Taxi
Please read the No Exercise Without Permission section in the theory-based course before you start rolling on the ground. The pilot knows the place or he looks at the map (kneeboard, big map F10 or printed airfield charts) and orients himself there. As a further help, you can use the article Kutaisi taxiway
- Before we start taxiing, we first turn on the anti-skid system, ANTI-SKID NORM LSC-M
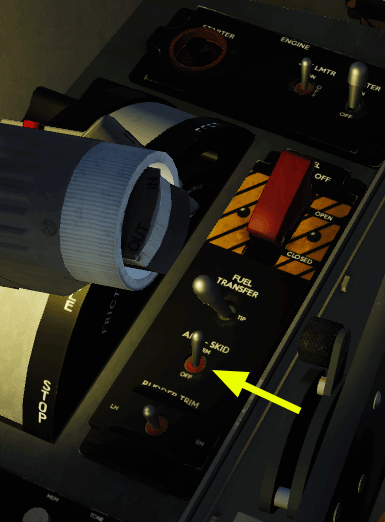 |
 |
- Activate the Nose Wheel control with LAlt + Q. The display in the upper right instrument panel will then show STEER, LAlt + Q NWS ON HOTAS
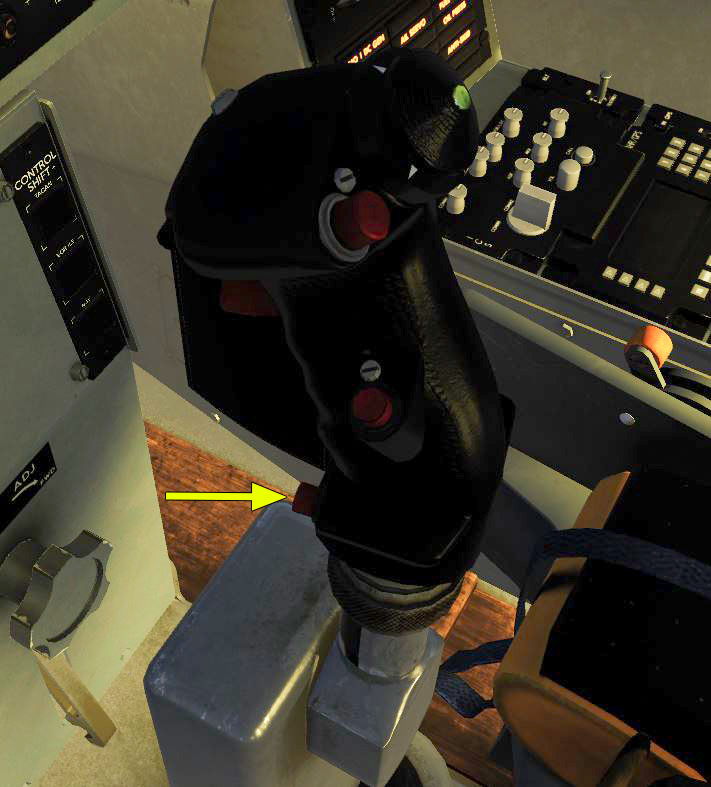 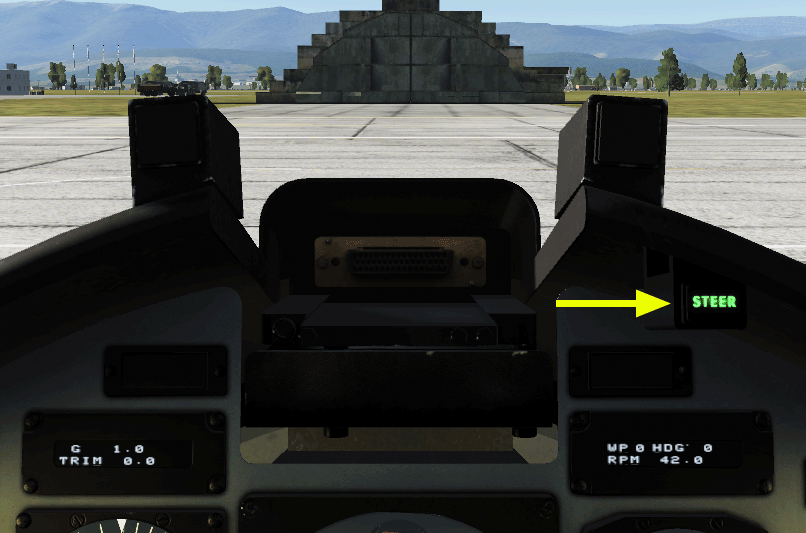 |
 |
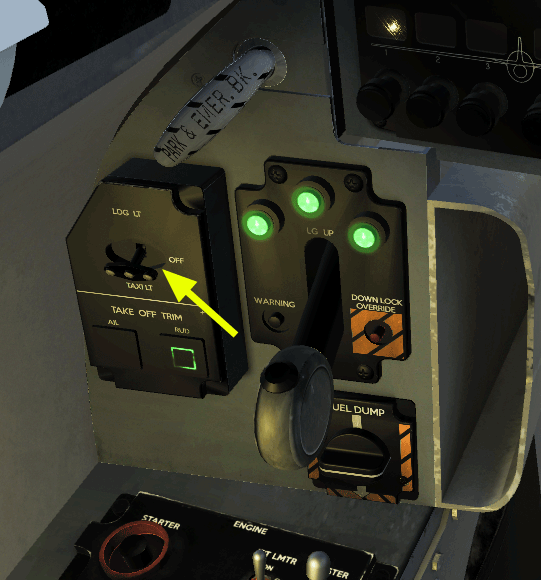
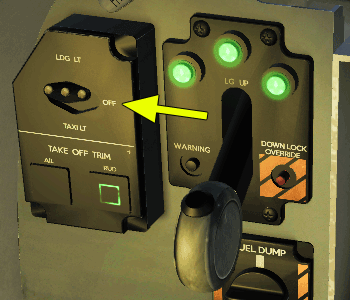
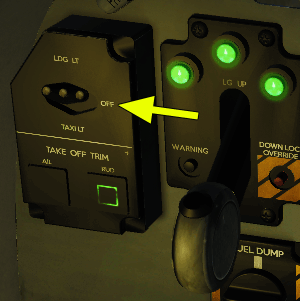
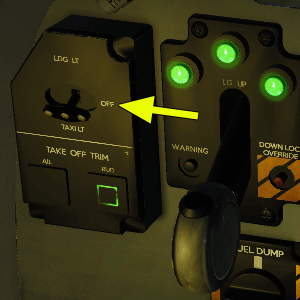
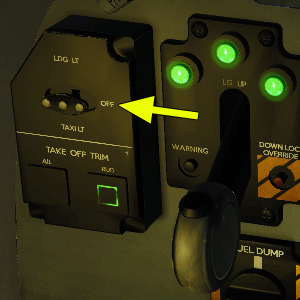
- Turn on the Taxi Light LDG / TAXI-LIGHT TAXI LSP
 |
 |
- Finally we Release the Parking Brake, PARK BRK RELEASE LSP
 |
|
- To initiate the taxi, the pilot makes a slight boost (about 50% RPM) by slowly pushing the throttle forward.
- As soon as the aircraft moves significantly, a brake test is performed, BRK TEST PEDAL
So, in case of emergency, you can come to a standstill and in case of brake failure (incorrect assignment of the brake axle, or defect) by reducing the thrust. To do this, press the pedals or the W key.
 |
|

Once the aircraft reaches the Hold, STOP.
Up Next
We'll continue with the remaining checks before Line Up in the next chapter.
5. Before Take-off Checks
Having stopped at the Hold, the following checks are carried out:
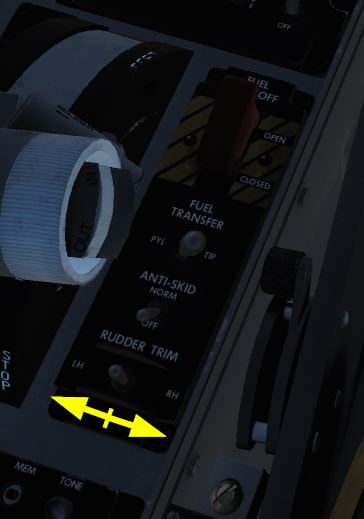
- Set the fuel transfer switch according to the refuelling of your aircraft, FUEL TRANSFER SET LSC-F
- Select Pylon Tank (PYL) during engine start, to leak test the system
- Select Tip Tanks (TIP) during take-off and climb up to approx. 300 kg residual fuel
- Select Pylon Tanks (PYL) until empty
- Select Tip Tanks (TIP) until empty
 |
 |
- Landing Light ON, LDG LIGHTS ON LSP
 |
 |
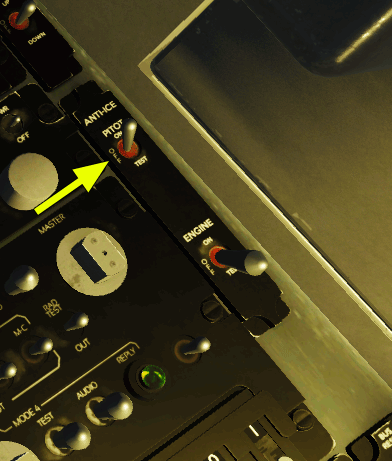
- Switch on Pitot Heater, ANTI-ICE / PITOT ON RSC-M
 |
 |
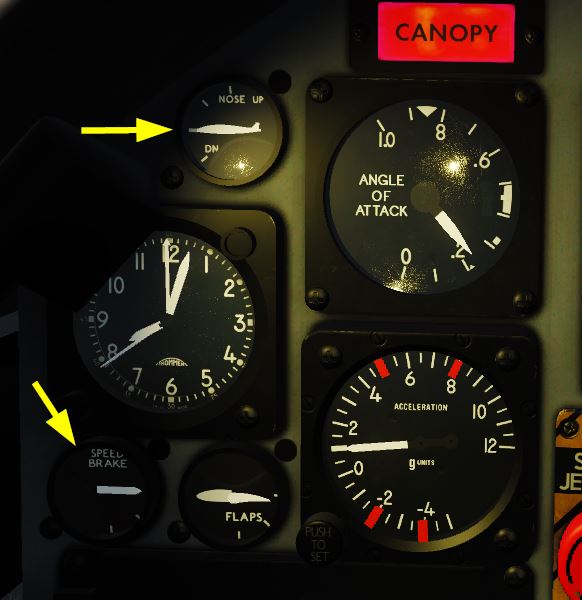
- Set the Trims to Neutral HOTAS and RUDDER TRIM IP-L
|
|
|
|
|
|

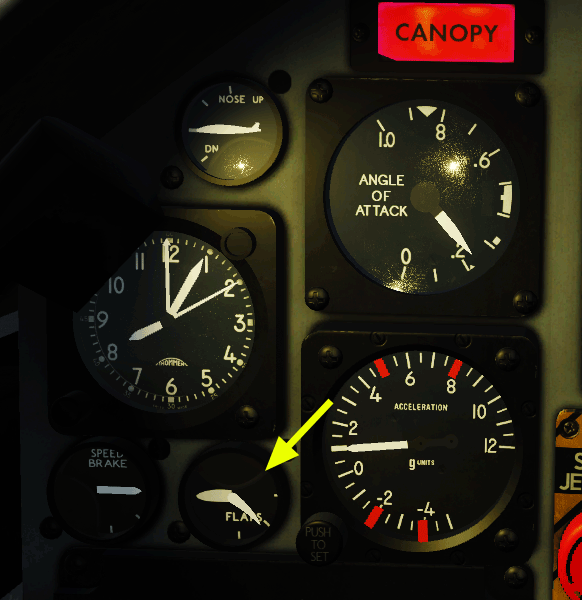
- Verify / Set the Flaps to Take-off FLAPS T/O IP-L
 |
 |
- Check the Canopy is Closed and Locked. CANOPY CLOSE and LOCK IP-L
|
|
 |
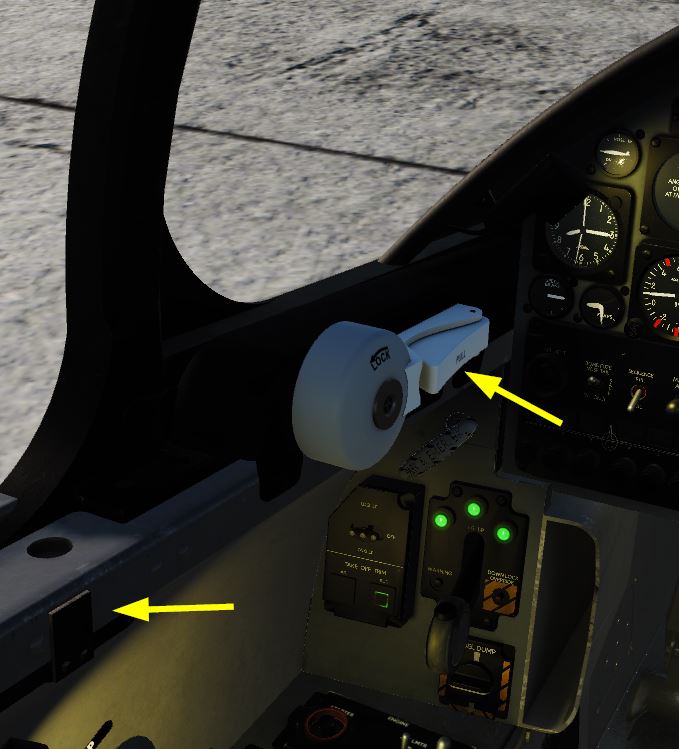
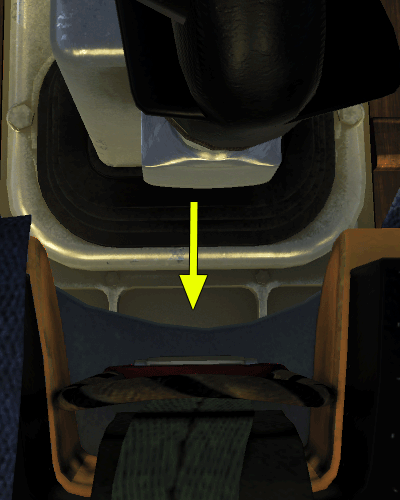
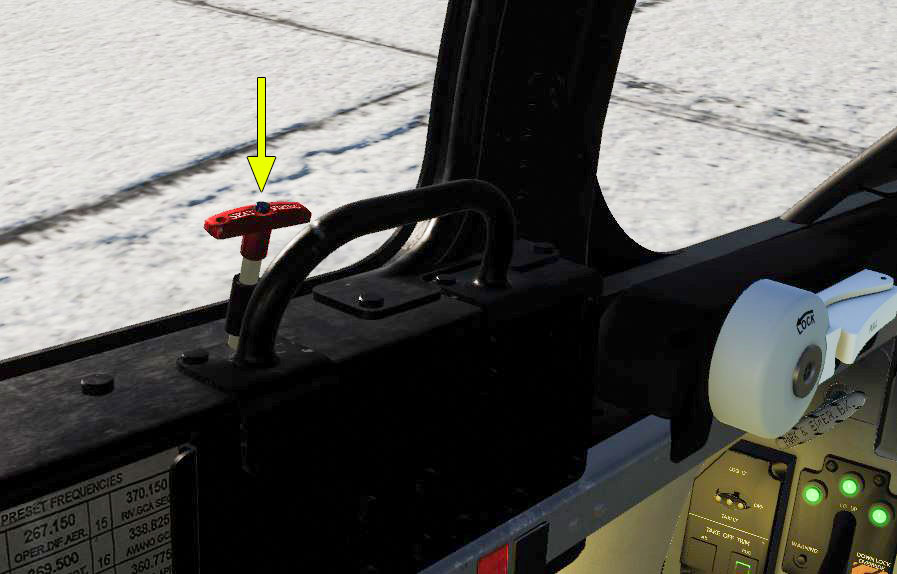
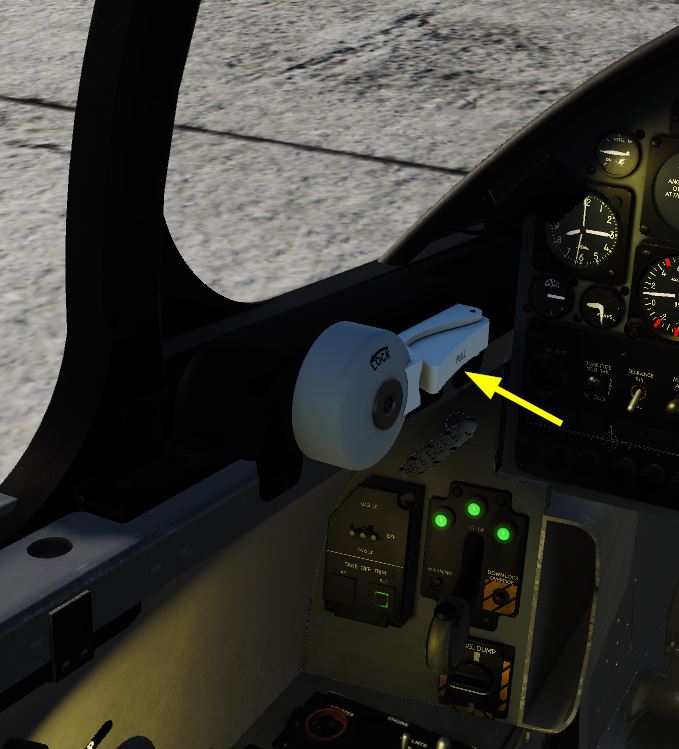
- Activate the Ejection Seat, SEAT SAFETY PIN REMOVE SEAT. To arm the ejection seat, pull the Seat Safety Pin out of the seat (between the seat and the joystick). It will automatically be stowed by the game in the Bracket
  |
 |
- One last time before lining up, check all instruments for faulty displays or values outside the normal operating range, INSTRUMENTS CHECK IP and RSP
- Check that all warning and caution lights are off, CAUTION WARNING LIGHTS OUT RSC
 |
 |
- Set the external and internal lights as needed, INT / EXT LIGHTS AS REQ'D RSC
- First, take a look around to the right and left to see that there is no other aircraft in the approach.
”Clear on Approach, Threshold, Runway and Departure Lane”

Then you roll onto the runway, align the aircraft with the centre line and roll straight ahead slightly to ensure that the nose wheel is straightened.
Runway behind you is wasted
Hold the aircraft on the Toe Brakes BRAKES ON PEDALS
- Give it a full power THROTTLE FULL HOTAS.
- Briefly check the engine instruments and warnings for any unusual values.
You are ready to go, but we will cover that in the next section.
Up Next
The next section continues with the Take-off.
6. Normal Take-off and Climb
Or you can start the training mission 03 Take-off and Free Flight. Here you are already on the runway and all systems are activated. This helps if you want to practice the launch several times in a row.
At the end of the previous section we completed the Before Take-off Checks with:
- Give it a full power THROTTLE FULL HOTAS.
- Briefly check the engine instruments for any unusual values
The Take-off continues as follows:
- Turn off the nose wheel control NOSEWHEEL STEERING DISENGAGE HOTAS.
- Release the brakes. BRAKES RELEASE PEDALS.
- Initially, control the plane if necessary by carefully pressing the wheel brakes.
- From about 50 KIAS, the rudder becomes aerodynamically effective and you then hold the aircraft with side rudder inputs in the middle of the runway.
- At about 110 KIAS, pull the joystick back slightly until the nose of the aircraft rises.
The aircraft may accelerate a little further, depending on its weight, and then take off.

- Hold the nose of the aircraft at about 7-10 ° and ensure the aircraft has a positive climb rate.
- Select the Landing Gear up GEAR UP PRIOR 175 KIAS VLSP
- At 500 ft above ground and with over 120 KIAS airspeed, you are selecting the flaps FLAPS UP 120-175 KIAS LSC.
- For the further climb, pull the thrust back slightly until the engine displays are all within their respective green areas.
- Turn off the landing lights LANDING LIGHTS OFF LSP.
- Speed up to 275 KIAS and continue climbing at the rate to maintain this speed.
- As soon as you reach your planned altitude, lightly push the joystick forward to go into level flight.
Check with the altimeter and VSI that you do not climb or sink and keep your altitude. Set the thrust to fly about 300 KIAS.
Up Next
In the next section you can get used to the flying behavior of the MB-339. Fly around and experiment with the flight characteristics.
7. Flight Characteristics
We recommend that you first make a few flight with this plane. You should be familiar with the machine and its flight characteristics.
You can try a few things at moderate speed and height. Try each of the following list:
- Climb and dive, fly up and down, sometimes gently, sometimes more aggressively, sometimes at slower speeds and sometimes faster. How does the bird react?
- Fly right and left turns, also at different speeds and roll rates
- Progressively apply up to full rudder
- Combine rudder with aileron (slipping)
- Test the reaction to power changes by advancing and retarding the throttle. How quickly does the engine respond?
- Try to fly as slowly as possible without stalling and losing control. At what speed does the controls become "sloppy"? At what speed does the MB-339 stall? When does the shaking start in the cockpit? A sign that you are about to stall. Try this Clean (Landing Gear Up, Flaps Up) and Dirty (Landing Gear Down, Flaps Down)
All this should be tested to get an initial feel for the plane. If you overdo it, it's worth mentioning that you trigger the ejection seat with Ctrl + E], [Ctrl + E], [Ctrl + E. ; -)
That is a personal question taste, but also a matter of practice and skill.
Note: Set as much curvature and central deadband as necessary to allow for small, sensitive control inputs, but as little as possible to avoid over-reacting at the end-stroke of the axles.
As a specific preparation for the landing you test the flight characteristics best with partially and fully extended Flaps and Landing Gear Down:
Now fly at a sufficient height of about 5,000 feet or higher, as slow as possible. At what speed can you no longer control the aircraft? So when does the stall occur? The joystick feels doughy and the aircraft responds barely or delayed to your control movements. Remember these speeds, to be prepared for them later. Pitching the nose to the horizon and accelerating, you can usually quickly stop the stall, if you do not and wait too long it may start to spin and then even hit the ground. Therefore, approach this slowly, without unnecessarily “destroying the aircraft and killing yourself.
Also try to maintain altitude and reduce speed with the landing gear and flaps extended. Trim the plane so that you keep the angle of attack indicator as central as possible within the landing AoA marking. Whether the machine is properly trimmed, you will notice, when you let go of the stick. If the aircraft then goes into a climb or descent, you had not correctly "trimmed off" all control pressure.
Success in this exercise means you can already apply the required angle of attack for the landing.

Get used to slow flying. That will make the landing much easier.
The practice mission pack includes the practice of landing and flying. This is the quickest way to test flight behaviour repeatedly or to land directly.
If you feel ready to land, move on to the next section.
Up Next
Approach and Normal Landing.
8. Normal Landing
Each mission ends successfully only when pilot and machine can reach the parking position undamaged and handover the aircraft to the ground crew. So that you do not forget anything when landing, it is necessary to work through the procedures of the checklist. There are various ways to fly to an airport. But they will be covered in the advanced courses which explain the various approaches.
The standard approach to an airport is on a 3 ° glide path. In this Aircraft Basic Course the Normal Landing with 3 ° glide path is described in detail. In our practice mission, we have built a visual aid in the form of green gates. If you follow this course and follow the instructions below, it should work quite well.
Training Mission
This one starts at a point 13 miles away from the airfield and at 3,400 feet altitude. Two miles ahead of us is the glide path at the same height. We have marked this point with the first green guidance box. Just fly to it and work on the following list quickly. As soon as you reach the first box, you start descending to the next box and continue working the list.
Before Landing Checks
-
- Set your Landing Light to Landing, LDG LIGHTS ON LSP
 |
 |
- Set your altimeter to the QFE of the course, which you either got from ATC or took it from the mission description
ALTIMETER SET IP-R
 |
 |
If entering the Airfield Pattern straight in (as the mission)
- Reduced to 60% RPM and the Speedbrake. SPEEDBRAKE OUT HOTAS
- Once you have slowed below 175 knots, you can extend the Landing Gear, GEAR DN and LOCKED / THREE GREENS LSC
- Retract the Speedbrake. SPEEDBRAKE INHOTAS
- Lower first stage of Flaps to Take-off, FLAPS T/OLSP
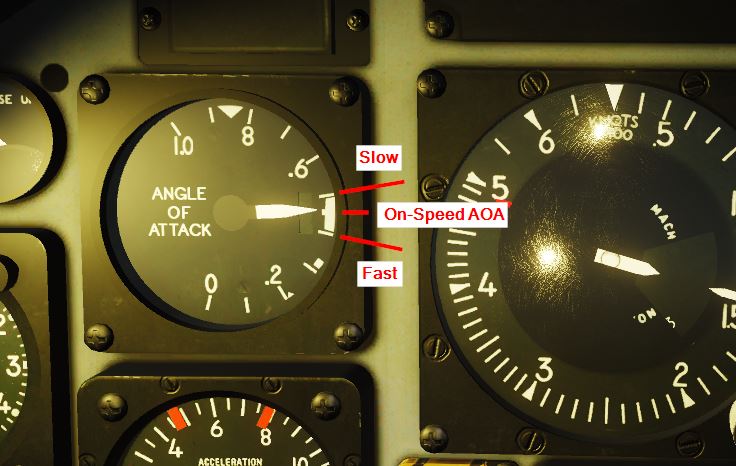
- The aircraft's speed will be reducing so progressively trim up to compensate. The AoA Indicator will move into the White band indicating "On-speed" AoA
- Increase power to catch about 140 kts.
- Select Full Flaps, FLAPS DOWNLSP
- Allow the aircraft to slow to 130 kts continuing to trim up to keep On-speed AOA
Final
Start the descent at the first or at the second green gate.
Correct left or right errors calmly, but positively determined to "Fight for the Centre line". The green guidance gates will show you the 3° glide path.
Use the approach through the guidance gate to get a visual impression of what a 3° glide slope landing should look like.
Maintain inbound on Runway 07’s accurate heading of 068⁰.
- Fly visually to the runway threshold. Correct left or right errors calmly, but positively determined to "Fight for the Centre line".
- Trim the plane in pitch so that the AOA (Angle Of Attack) indicator on the left side of the cockpit is in the middle of the white landing peg.
To fly on the correct glide path use thrust, so observe the position of the threshold in the windscreen. It should remain stationary with everything around it expanding.
- If your glide path is too steep (more than 3°), or the threshold is moving down the windscreen, then slightly reduce the engine thrust. The plane will start to drop steeper, leading you back to the correct glide path.
- If you are too shallow (less than 3°) or the threshold is moving up in the windscreen, then give more thrust.
The engine reacts very slowly, especially with throttle settings below 60%, therefore anticipate with the thrust lever.
Once the sinking rate starts to change, you usually have to readjust in the opposite direction.
Practice makes perfect.
- If your glide slope and AOA are correct, maintain this attitude to just above the threshold.
- As you arrive at the threshold transfer your gaze to look at the far end of the runway and perceive the ground approaching.
- Just short of the ground reduce the thrust to IDLE and lightly pitch up slightly to flare without climbing. This will reduce the rate of descent.
- Hold this attitude too wash off the remaining speed and touch down.
- After landing, keep the aircraft straight initially with rudder and then differential braking to remain centred on the runway.
- Press the wheel brakes to reduce the aircraft speed BRAKES ON PEDALS or .
You can go to also use the speedbrake SPEEDBRAKE ON HOTAS or .
- Activate the nose wheel control, NOSEWHEEL STEERING ENGAGE HOTAS
 |
 |
- Vacate the runway at the next exit. Pass the Hold line and stop.
After Landing Checks
- Retract the Flaps, FLAPS UP LSP
- If used for Aerodynamic brake, retract the Speedbrake, SPEEDBRAKE RETRACT HOTAS
- Turn on the Taxiing lights, TAXI LIGHT ON LSP
 |
|
- Turn off the anti-ice systems, if they were turned on, ANTI-ICE PITOT OFF / ANTI-ICE ENGINE OFF RSP
 |
 |
- Secure the Ejection Seat with the Safety Pin (on the left side of the Canopy) SEAT SAFETY PIN INSERT IP-L
 |
 |
Now taxi to the parking stand of your choice and stop.
Up Next
In the next section, we will focus on shutting down the machine.
9. Parking and Shutdown
After landing, some procedures still have to be processed before the aircraft can be handed over to the ground crew. Many virtual pilots skip the shutdown, but a successful flight requires shutting down.
Engine Shutdown
When you arrive at the parking position, you use the ENGINE SHUTDOWN checklist to shut down the engines.
- Turn off the Taxiing lights, TAXI LIGHTS OFF LVP.
- You can do this shortly before turning into the parking stand so as to not dazzle the ground crew.
 |
 |
- Set the Parking Brake on, PARKING BRAKE SET LVP.
 |
|
- Set the engine to 60% RPM, then pull the throttle over IDLE to STOP position by, RShift + End or THROTTLE STOP HOTAS.
 |
 |
- Turn off the Beacon BEACON OFF
 |
 |
- Turn off the Engine Master, ENGINE MASTER OFF
 |
|
- Turn off the JPT Limiter, JPT MASTER OFF
 |
|
After The engine has stopped, continue by shutting down the electrics.
- Generator 1&2 off, GEN1/GEN2 OFF
- Battery Switch off, BATT OFF.
 |
 |
- Finally, open the Canopy, CANOPY OPEN.
 |
 |
The ground crew can now take over the plane and your mission is complete.
Up Next
The following section gives the details of flying the airfield circuit.
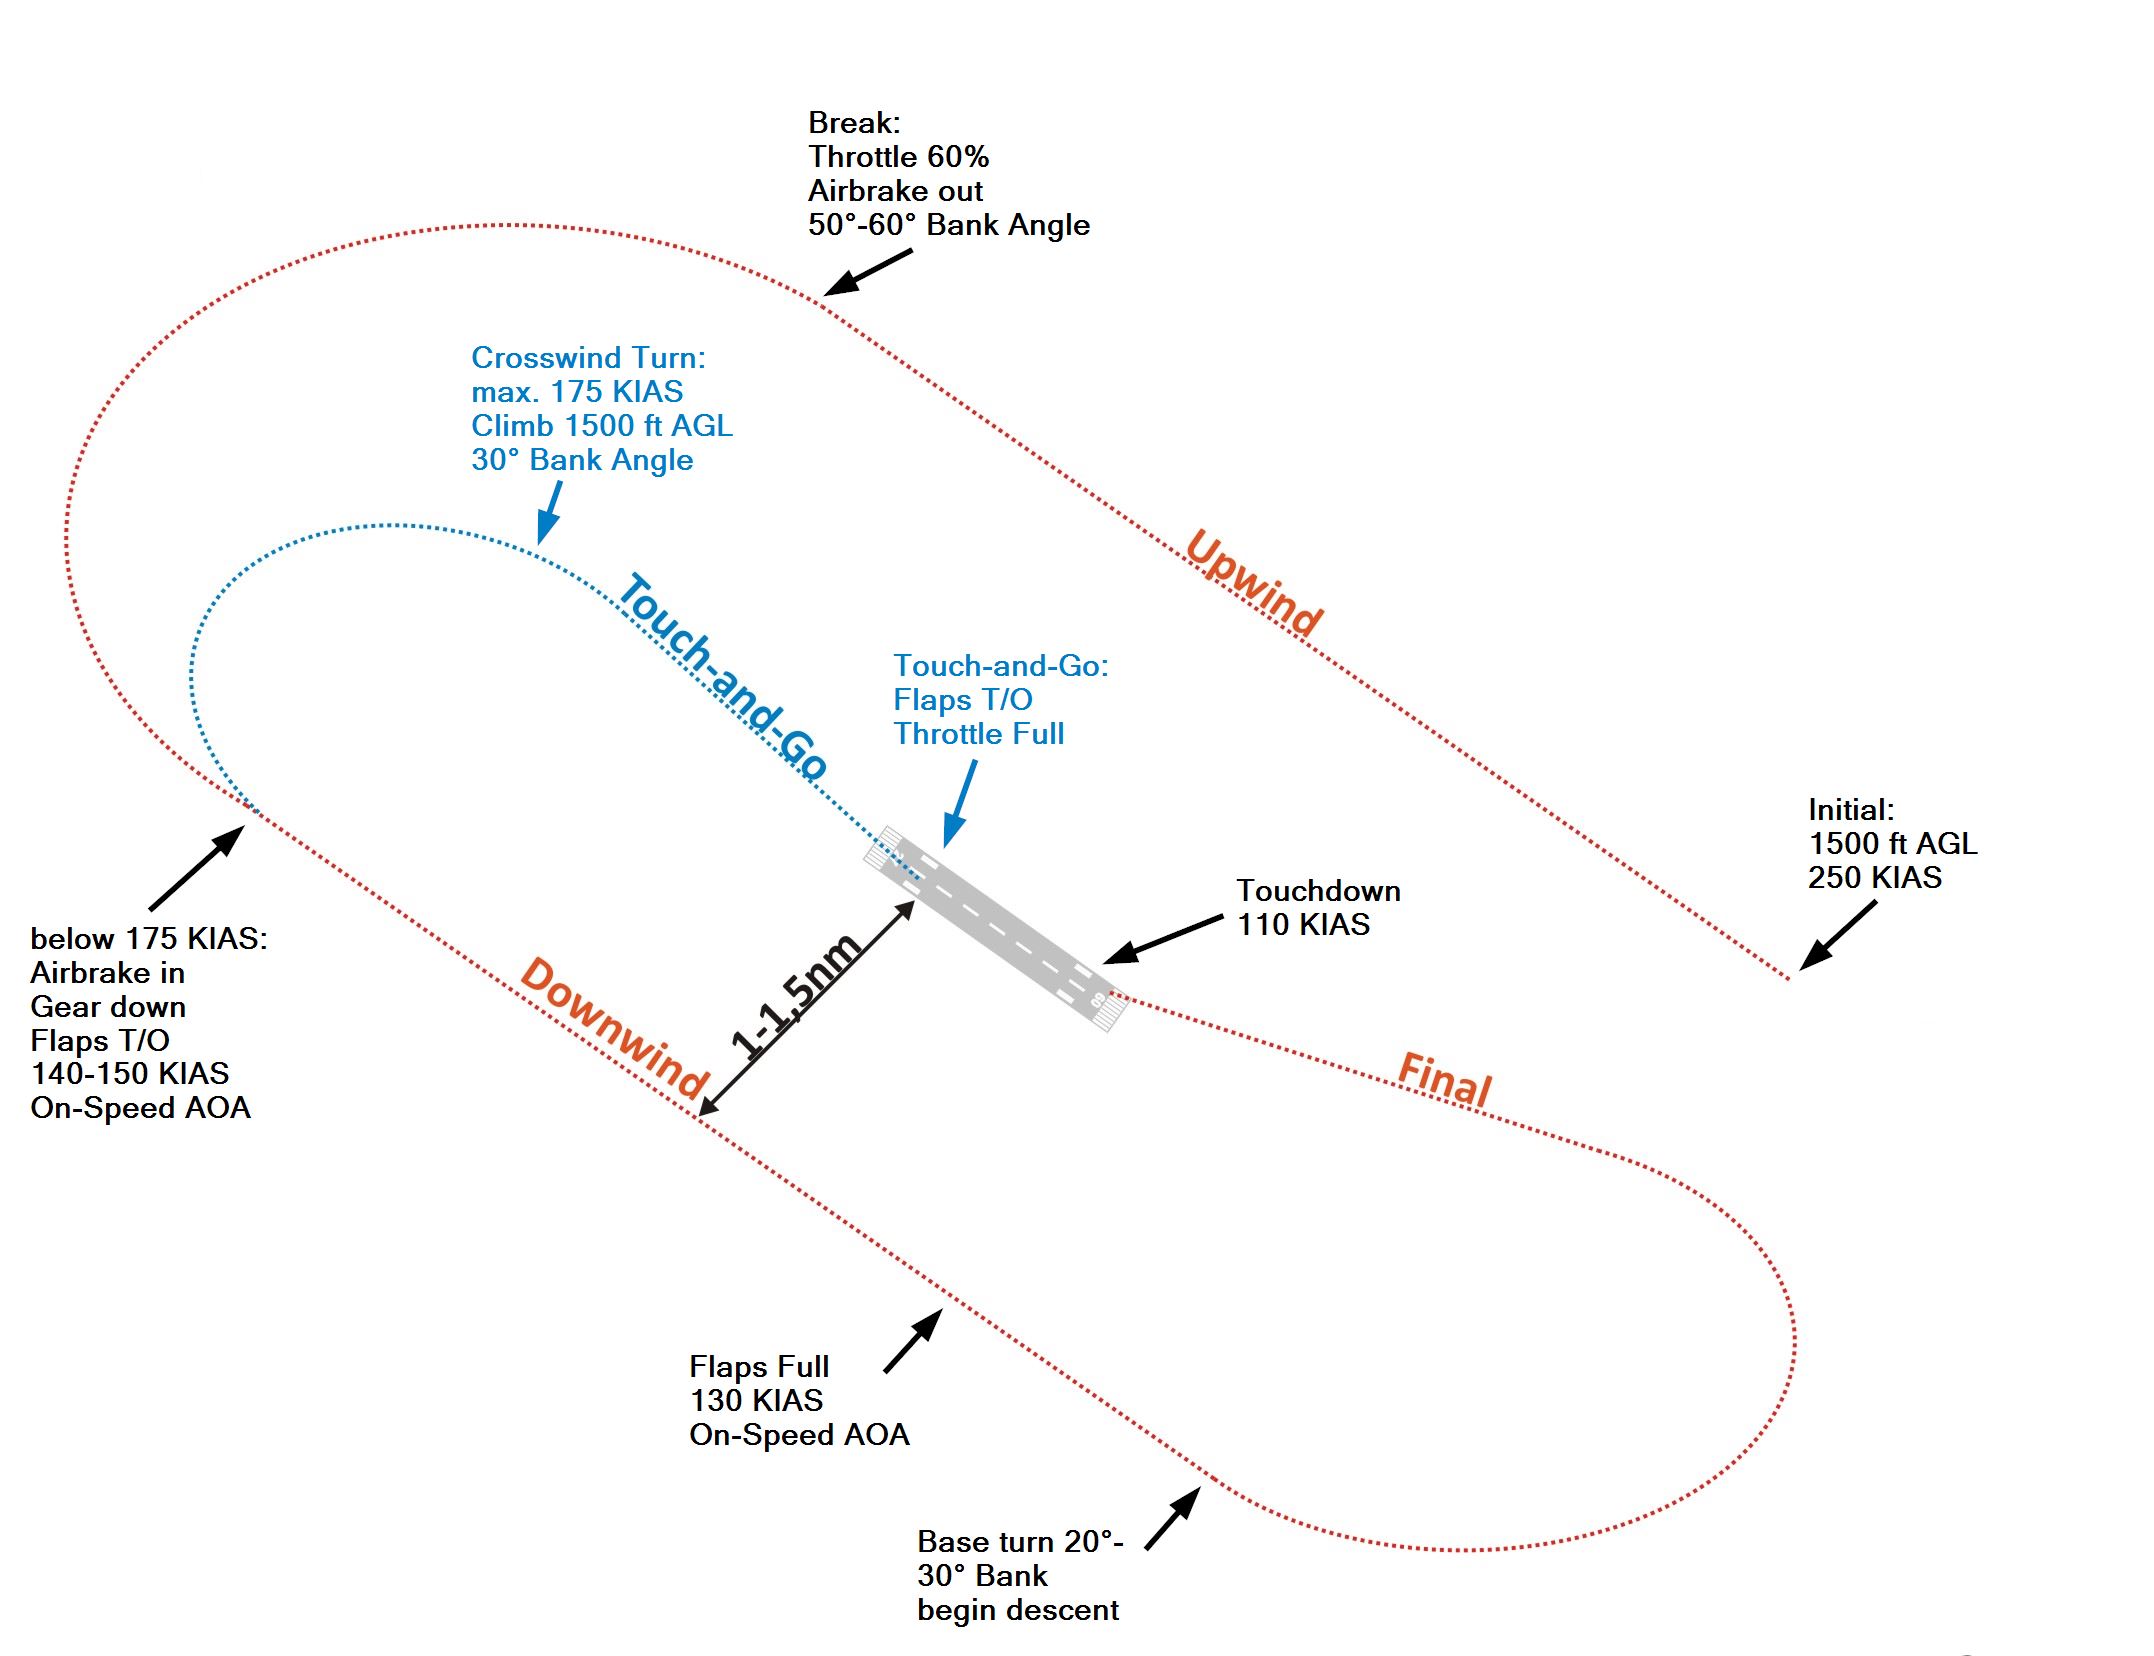
10. Flying the Circuit Pattern
Normal VFR Circuit
The circuit is a standardised procedure for the arrival of aircraft under Visual Flight Rules (VFR).
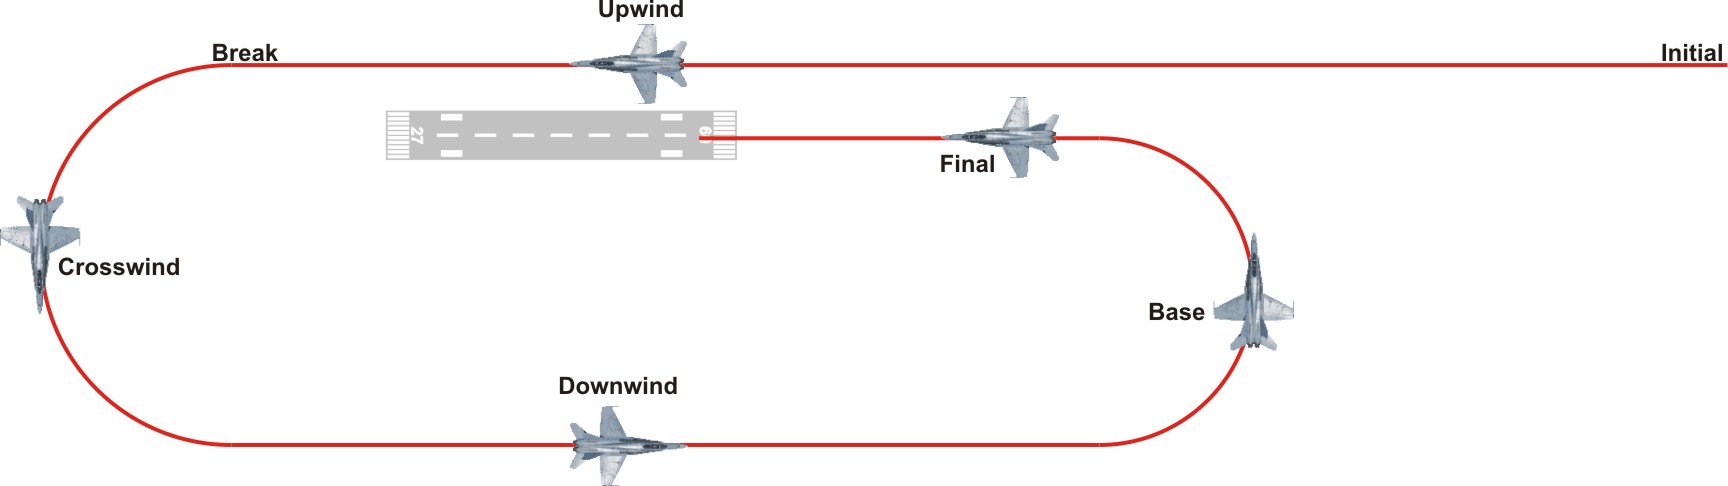
The approach and circuit with the MB-339 is described below.
Initial
The circuit begins at the Initial Point, which is 3-5 nm before the runway. At this point you should have a height of 1,500 feet AGL (above ground level - QFE - Not RadAlt) and 250 knots.
Upwind Leg
On the Upwind leg you fly slightly to the right to the runway at 1500 ft AGL and pass the airport. Take the opportunity to look at the airport to get an overview of the area.
- Maintain 1,500 feet and around 250 kts to clear of the runway at the far end by about 1 mile.
Break
The Break is a 180⁰ level turn to the start of the Downwind.
- Break into the "Circuit" with about 50⁰ - 60⁰ Angle of Bank (AoB)
- Reduced power to 60% RPM and the Speedbrake. SPEEDBRAKE OUT HOTAS
- Hold the level turn until 250⁰ (the opposite of Runway 07) to start the "Downwind"
Downwind Leg
The Downwind Leg is abeam the runway spaced out by about a wing's width visually. I.e. the runway appears to pass under the wing tip of the aircraft.
Having arrived at the start of the Downwind and as the aircraft slows below 175 knots:
- Extend the Landing Gear GEAR DN and LOCKED / THREE GREENS LSC
- Retract the Speedbrake SPEEDBRAKE INHOTAS
- Lower first stage of Flaps to Take-off, FLAPS T/OLSP
The aircraft's speed will still be reducing so:
- Progressively Trim up to maintain level. This will bring the AoA Indicator into the White band which is "On-speed".
- Increase power to catch about 140 kts
When passed the Runway to a point where the threshold aligns with our left wing (about 8 o’clock), we are at the end of the "Downwind":
- Select Full Flaps, FLAPS DOWNLSP
Base Leg / Turn
The Base Leg is actually a descending turn to align facing directly down the runway.
- Start a descending turn using about 20⁰ - 30⁰ AoB
- Allow the aircraft to slow to 130 kts and trim to maintain "On-speed" AoA.
- Aim for about 1,000 fpm Rate of Descent
- Roll out on Final approach at about 500 ft.
The turn should be almost a smooth glide, but never select less than 60% RPM to ensure the engine will "spool up" in time if required.
Keep an eye on the runway to be able to correct errors in rate of descent and rate of turn as necessary, so that we roll out aligned with the runway exactly. Try to avoid overshooting the centre line.
Final
The Final is the leg from 500 ft to the threshiold.
At approximately 500ft with the aircraft slowing to about 115 kts remaining On-speed AOA and on centreline, the rest of the final approach is identical to the section "Normal Landing".
Notice the position of the threshold in the windscreen. It should remain stationary with everything around it expanding. However:
- If it is moving up increase thrust to reduce the rate of descent
- If it is moving down reduce thrust to increase the rate of descent.
As the threshold arrives look to the far end of the runway ONLY and perceive the ground approaching beneath you.
Just short of the ground:
- Pitch slightly up to flare, without climbing, and cut the throttle to idle. THROTTLE IDLE HOTAS
- This will reduce the rate of descent.
- Hold this attitude too wash off the remaining speed and touch down at about 95 - 100 kts..
On touch down, maintain the attitude by progressive pitch up. This gives aerodynamic braking.
As the airspeed decays to about 70 kts, lower the nose wheel.
Maintain the centreline with rudder and then differential braking, and come to a full stop.
Touch-and-Go
If you want to practice the circuit pattern several times in a row, then you use the Touch-and-Go procedure.
In this case, continue along the runway and
- Select full power THROTTLE FULL HOTAS
- Select Speedbrake in. SPEEDBRAKE IN HOTAS
- Change Flaps to takeoff position.
- Check full RPM and pitch to start a climb at about 7⁰ - 10⁰ Nose up.
- Climb to 1,500 ft agl while completing the After Take-off Checks.
- Passing 1,000 ft turn left to rejoin the downwind. From there, the circuit and landing approach can be repeated.