Cockpit Overview
| Site: | Open Flight School |
| Course: | Ka-50 Black Shark Basic Course (DCS) |
| Book: | Cockpit Overview |
| Printed by: | Guest user |
| Date: | Sunday, 22 March 2026, 8:40 AM |
1. Division into Sections
The cockpit is divided into 6 approximate areas. We have decided to us the designations in the aircraft manual so that you can read them in parallel and avoid confusion.
- Forward Panel (FP)
- Left Panel (LP)
- Right Panel (RP)
- Wall Panel (WP)
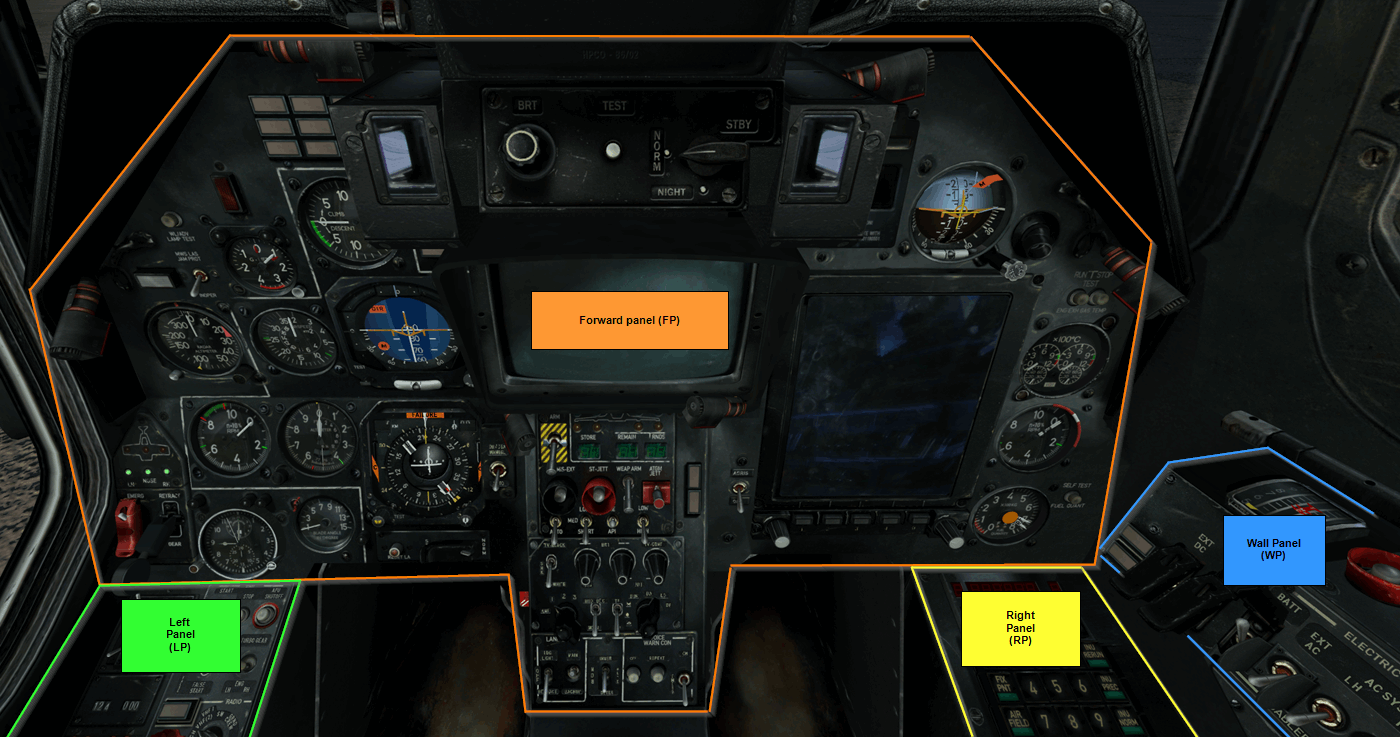
5. Overhead Panel (OP)
6. Rear Auxiliary Panel (AP) and Left Aft Panel (LA) (not shown)
9. Head Up Display (HUD) (Not Shown)
Cockpit Location Terminology
With these terms it is possible to specify the rough position of a switch or a display instrument. However, this is usually not sufficient. With the front panel the horizontal position is indicated quite simply by Left / Center / Right and the vertical position by Top / Middle / Bottom. To describe the position of the Fuel Gauge, for example, use the Front Panel - Bottom Right, or the short form FP-BR in tables.
The Left and Right Panels are divided into Fore / Mid / Aft. The Front part of the console is closest to the nose of the helicopter, while the Aft end of the console is closest to the tail. Here too, you can use a short form in checklists. For example, the position of the K-41 switch is described as a Left Panel - Fore or LP-F for short.
In the following we will name the instruments and switches that are important for this course and explain them separately.
For beginners this can be an intimidating and a very dry subject. Please read the pages carefully anyway. Nobody expects you to memorize all instruments and switches with positions and meaning immediately after this lesson. These will only be remembered in the practical exercises when you use the individual elements for real. But the following pages also serve as a reference to which you can return to read the use of a particular switch or instrument.
For pilots experienced with other aircraft, this information is extremely important for orientation.
2. Front Panel (FP)
First we will look at the displays on the left side of the Front Panel. You should check these indicators constantly, as they show you your altitude, speed, position, climb rate, descent rate, course, etc.:
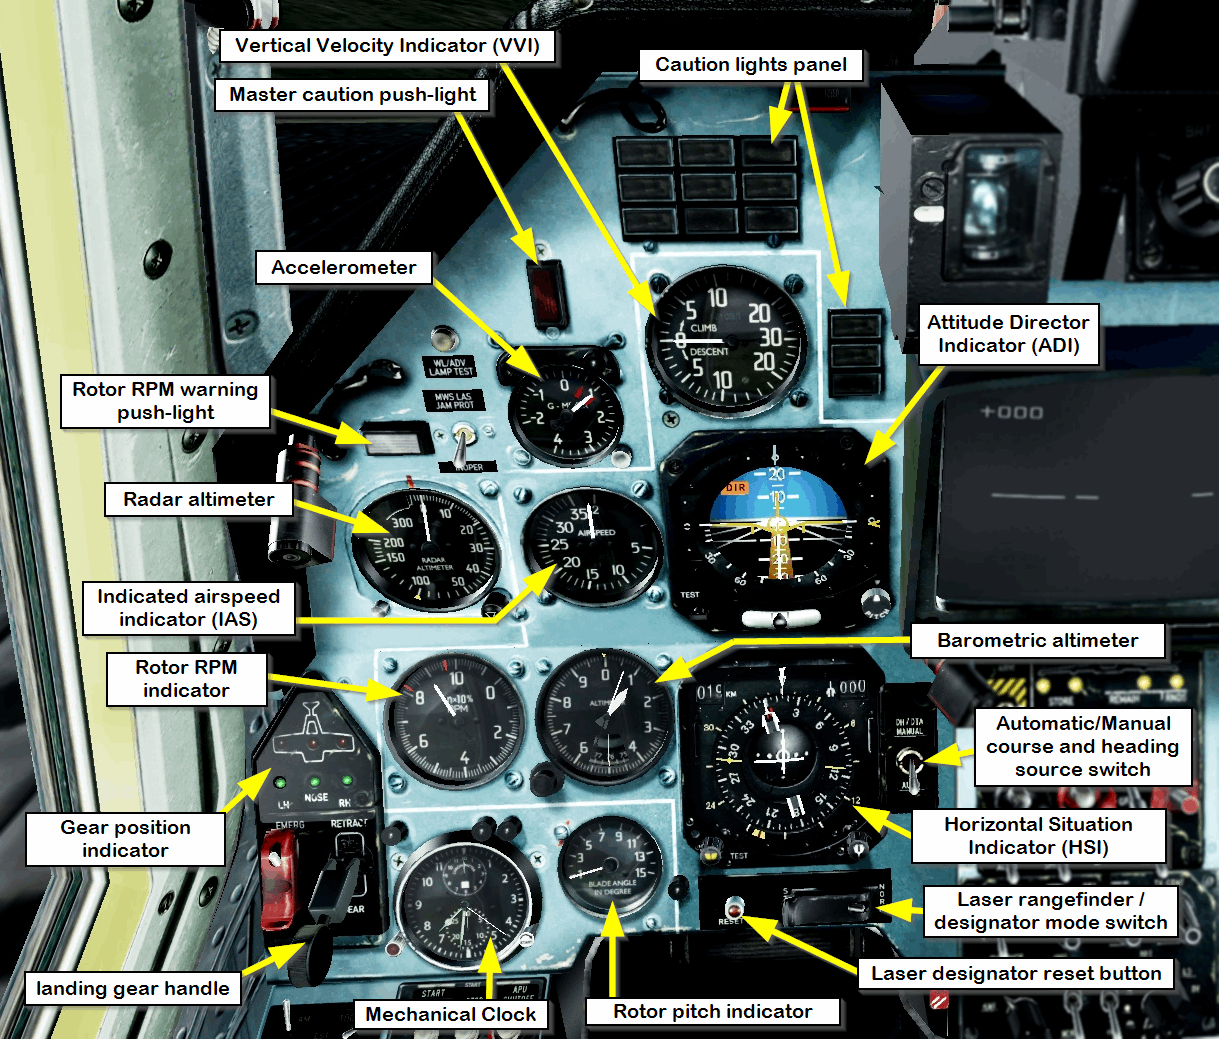
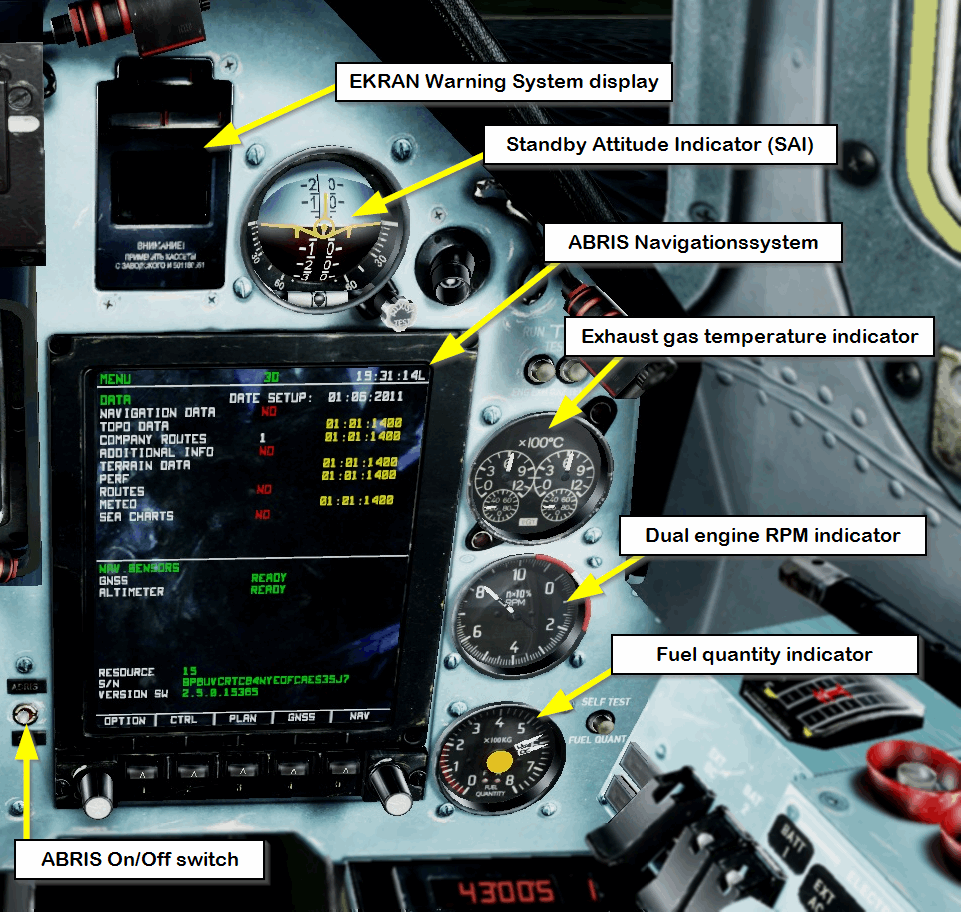
The right Front Panel contains instruments that are important, but do not need to be checked as often.
The two most important are the EKRAN warning and control system and the ABRIS navigation system. But also the exhaust gas temperature indicator, engine speed indicator and fuel quantity indicator are mounted there:
In the middle area there is the Head Up Display HUD, the electro-optical target system (Shkval), the weapons status and control panel (PUI-800), the control panel for target system displays and the control panel for landing lights and voice information system (Betty).
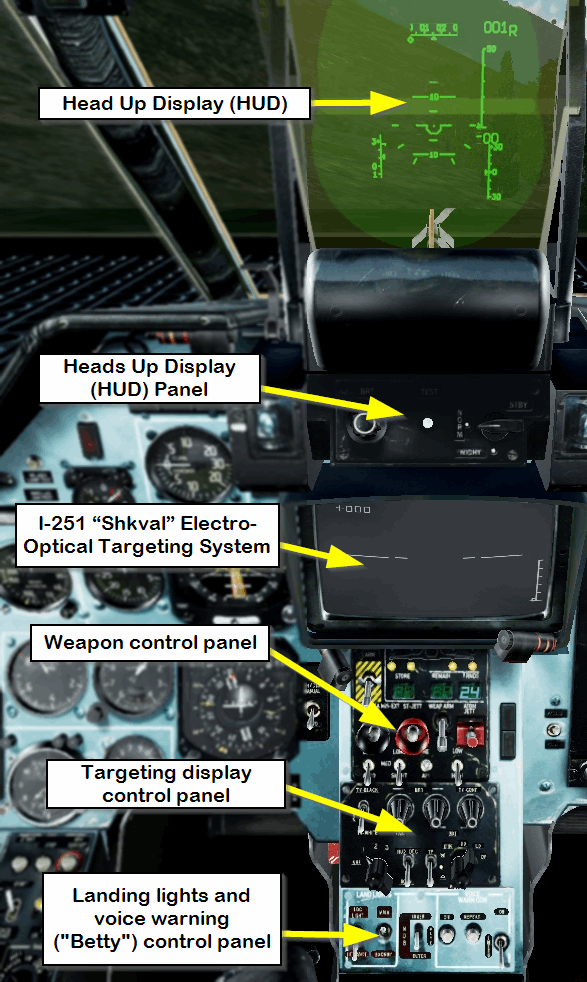
All these systems will only be dealt with in later courses, as we do not need them for the basic course.
However, we will explain some of the HUD elements later, as they can make flying easier for you.
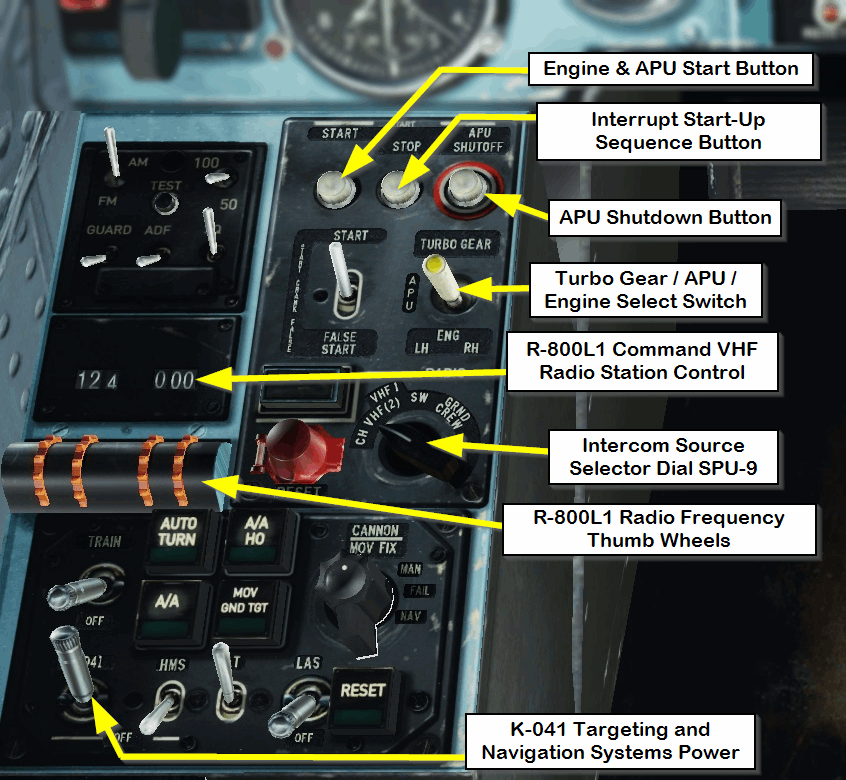
3. Left Panel (LP)
On the left cockpit side there is a smaller panel, the collective lever and a few other rarely used systems.
In the picture below the elements are labeled which are also used in the checklist of the basic course.
The elements for the radio are additionally labelled. These should also have been seen before.
ATTENTION: Since version 2.5 there are problems with the lighting in the current cockpit of the Ka-50. The illumination of the buttons (e.g. AUTO TURN, MOV GND TGT etc.) are hardly visible. ED is currently working on a completely new cockpit for the Ka-50. When it will be ready is unknown so far. The cockpit mod from Devrim improves the situation a bit.
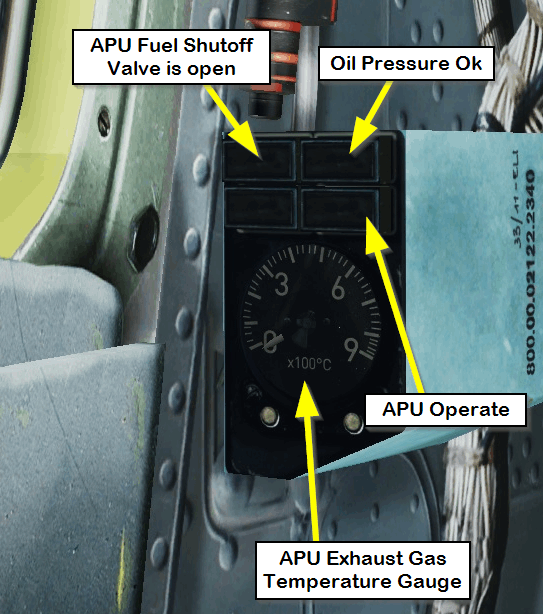
In the middle area the Engine Cut-Off Valves are placed, in case of Fire. Also, the collective lever of curse. The switches and buttons on the collective lever are not needed in the basic course.

The Auxiliary Power Unit (APU) control, with its display and indicators, is located a little lower.
4. Right Panel (RP)
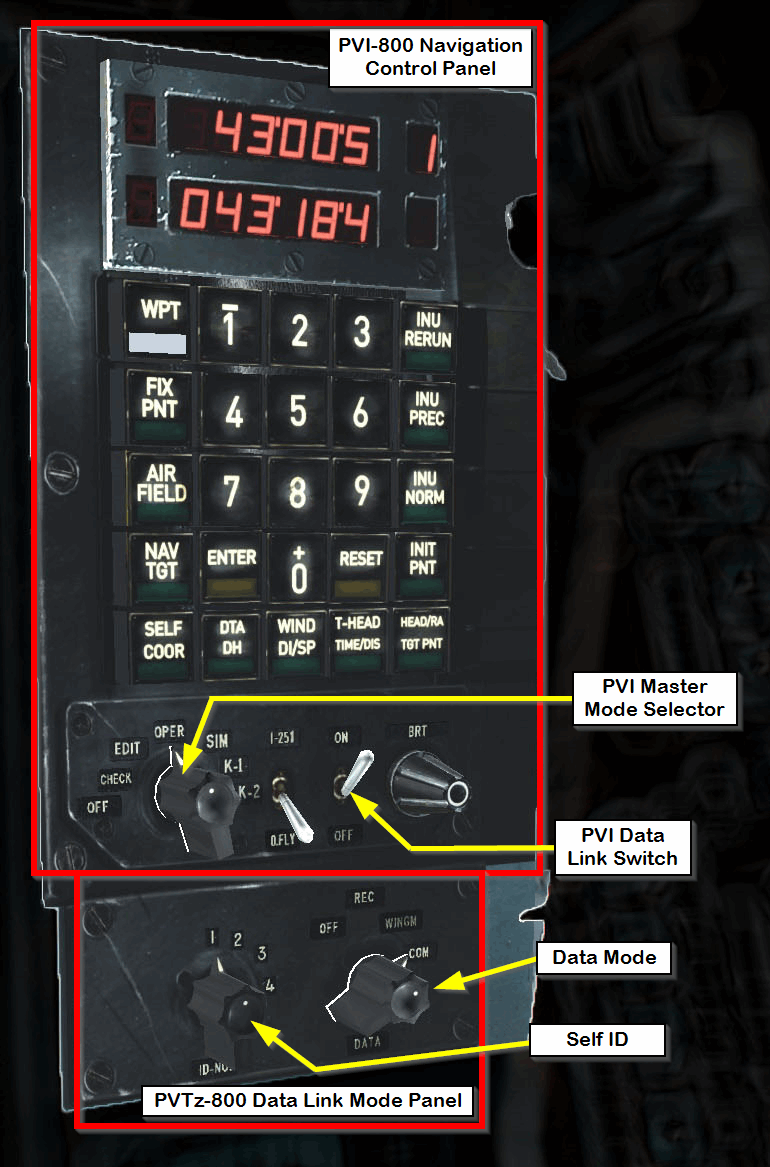
The front area is dominated by the PVI-800 Navigation panel, which we don't use in the basic course yet.
However, we set the PVI operating mode correctly in the start checklist and activate the PVI Data Link. The selector switch for the Data Link mode is also set to COM at startup. What this is used for is explained in the advanced course.
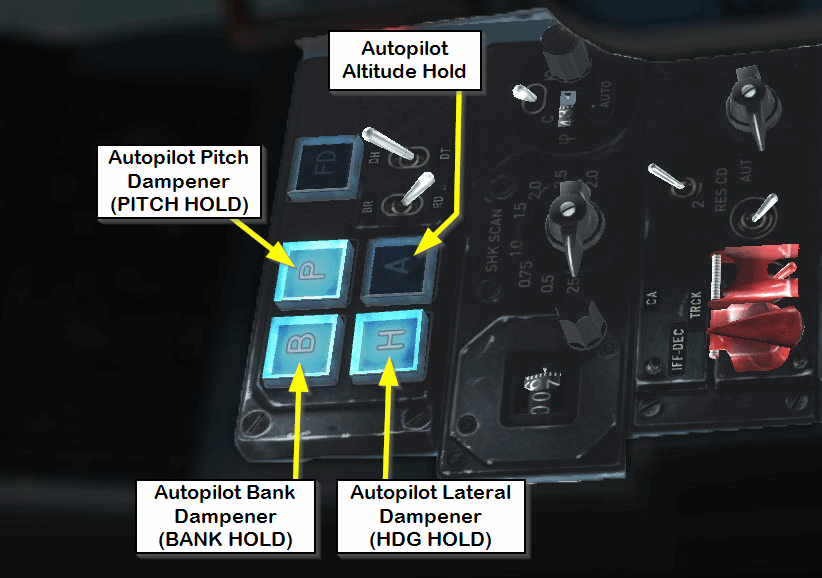
On the rear part of the console we are only really interested in the blue buttons at the front.
This activates the autopilot and dampeners. Bank, Pitch and Heading should always be activated. With Altitude selected only when needed.
This makes it much easier to fly the helicopter, but you also have to understand the trimming mechanism. Both will be explained later.
5. Wall Panel (WP)
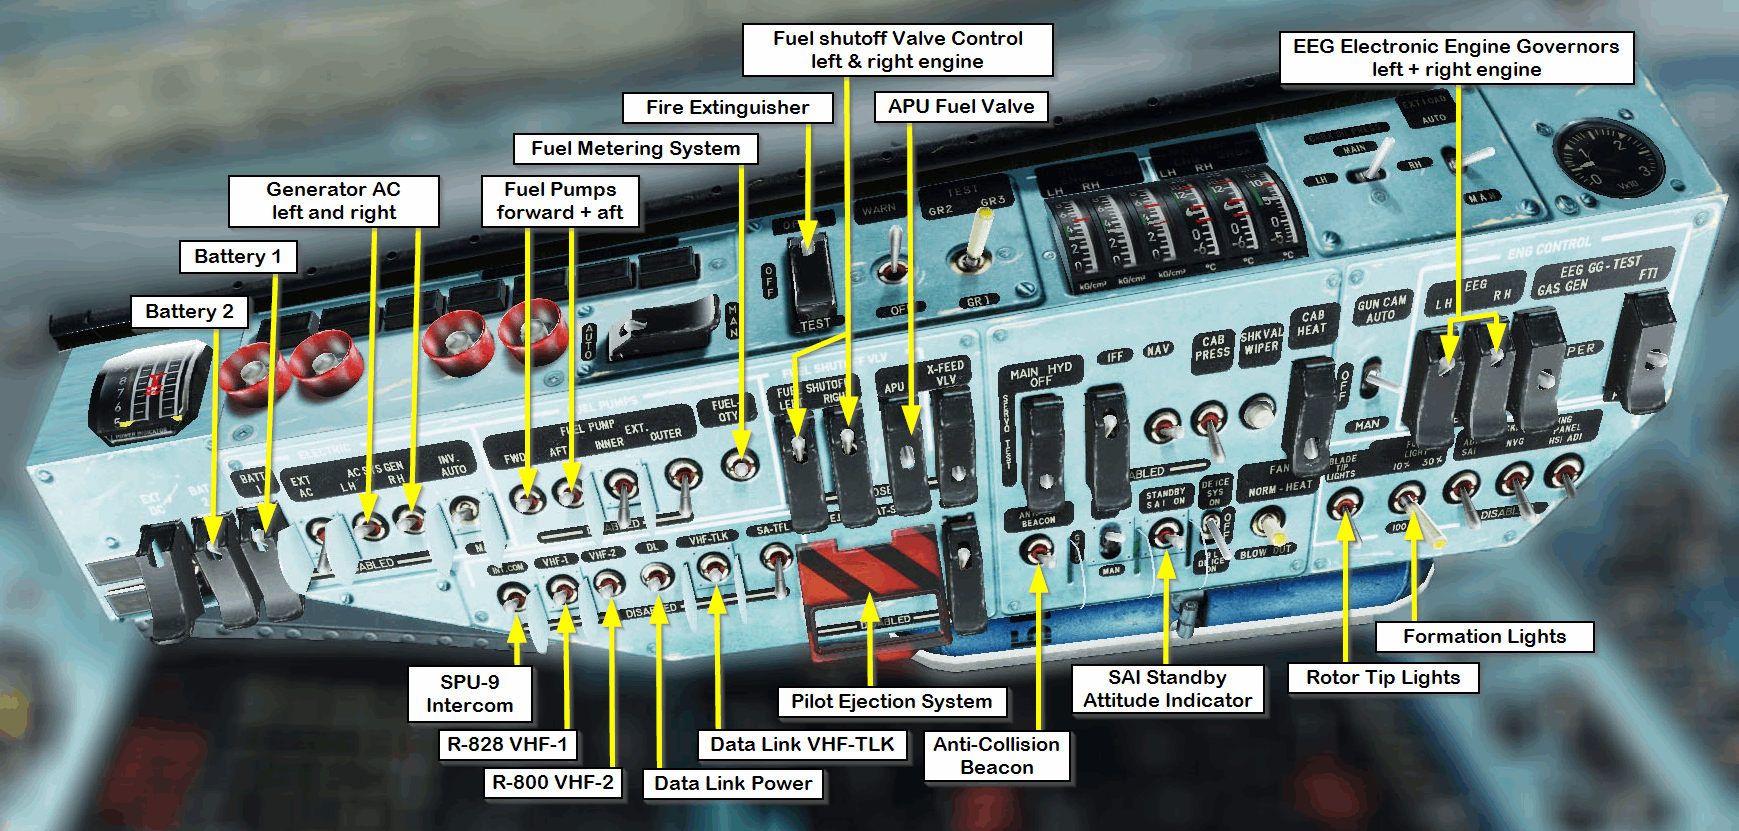
The right vertical console is stuffed with switches, buttons and a few indicators. At first glance this looks very confusing, but the elements are grouped by function. For example, all electrical switches are grouped together in the front. Then there are two groups for the fuel supply. Below in front you will find everything you need for communication. At the bottom are the switches for the lighting.
You will quickly learn the position of the required switches.
All switches that are not labeled on the picture are not needed in the basic course.
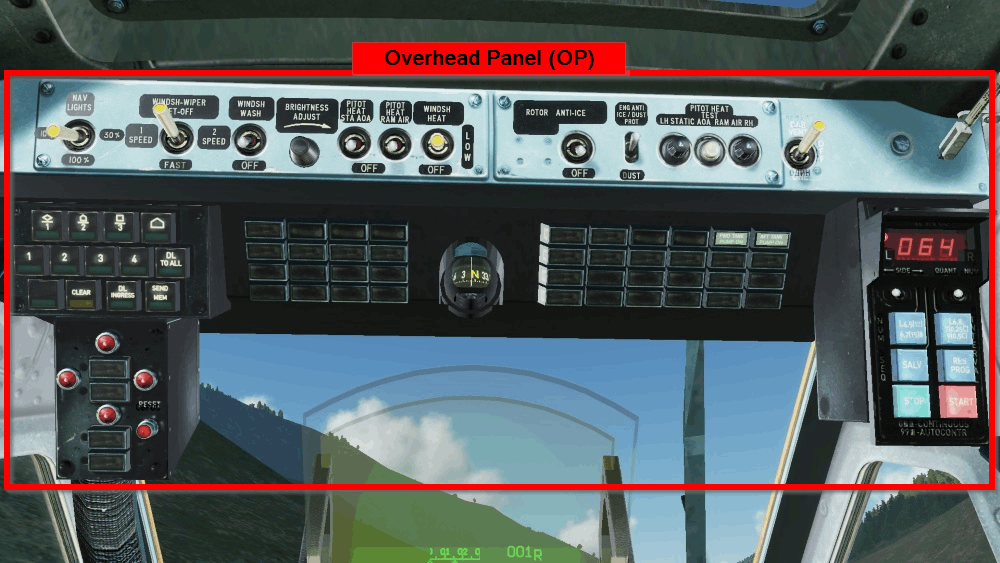
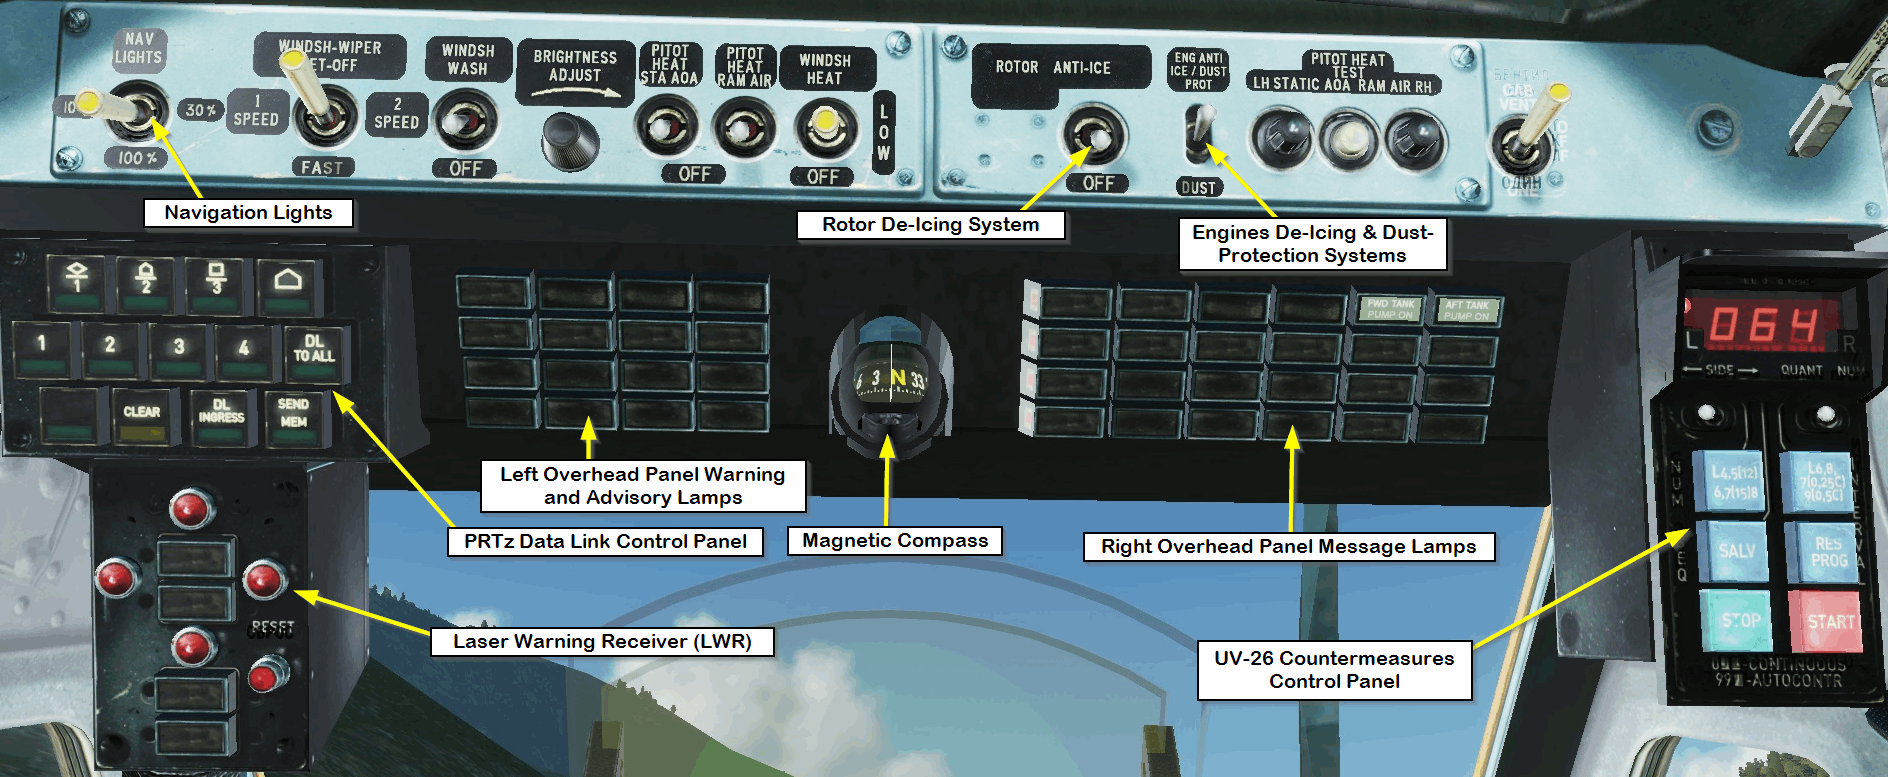
6. Overhead Panel (OP)
We also only need a few elements from the Overhead console in the Basic course. The panels for the Laser Warning Receiver, the PRTz Data Link and the UV-26 Countermeasures will only be covered later in the Weapons course. The warning and indication lights will then be included in the Advanced course.
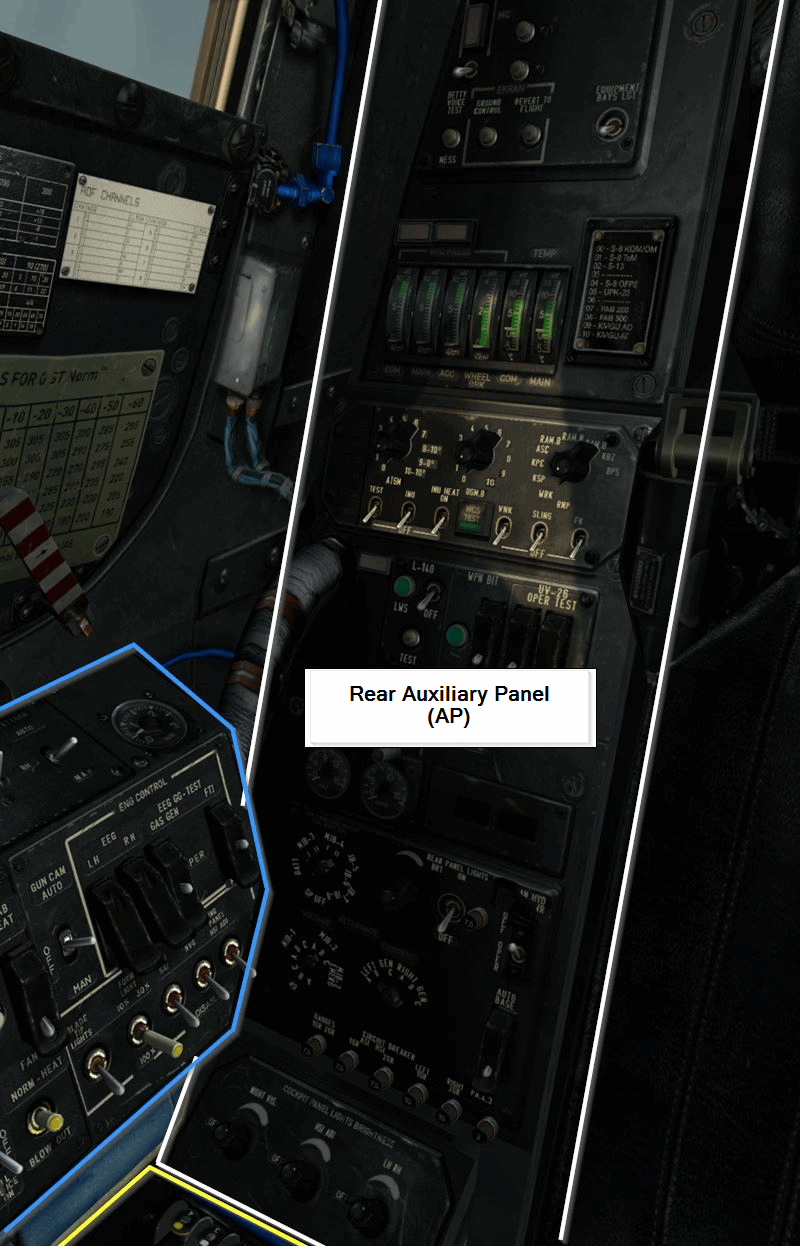
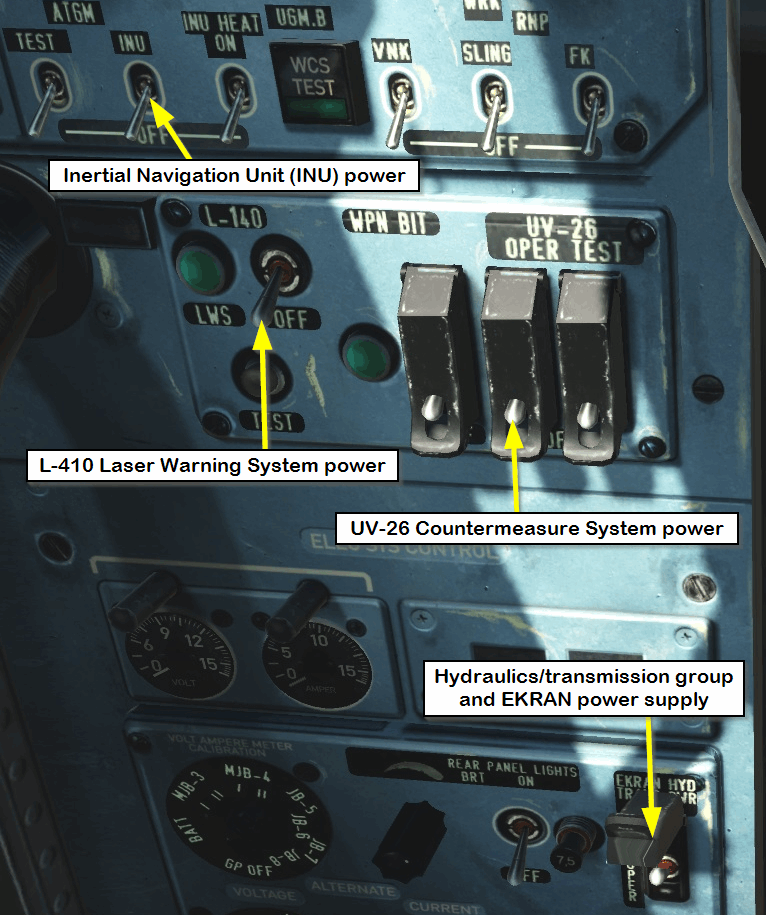
7. Rear Axillary Panel (AP)
On the panel to the Right cockpit Aft wall there are four switches that interest us in the basic course.
These are:
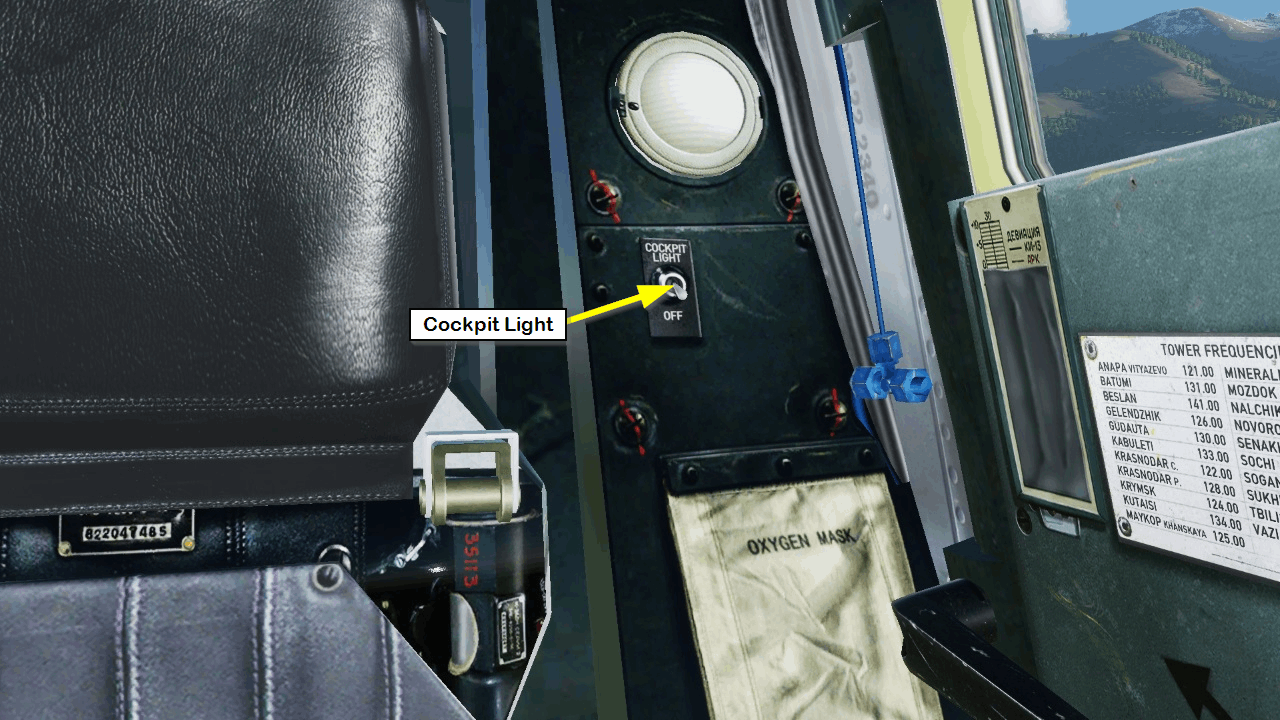
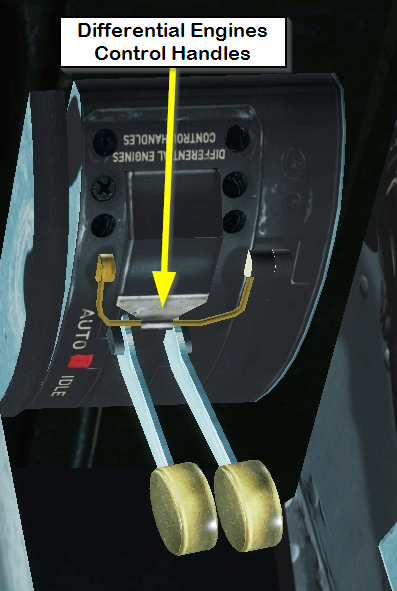
8. Left Aft Panel (LA)
On the Left cockpit Aft panel there is only the Lighting Cockpit Interior Lamp Switch in the upper area. It switches on the Emergency Light. If you start a mission with a ”Cold” (switched off systems) in the dark, you will have to find the Battery 1 switch (two times [LCtrl + LShift + E]) and the Emergency Light switch [K], so you can see something in the cockpit again.
The two Engine Throttles are mounted at the very bottom:
9. Head Up Display (HUD)
A lot of information is displayed on the HUD, which is also available from the other displays in the cockpit. However, it is helpful to have all the information bundled in one place so that you don't have to lose sight of the target.
The displays on the HUD are adjusted according to the situation. This means that when a weapon is activated, it looks different than when you are flying, and even if you transit flying, parts of the display change depending on altitude, speed, etc.
The picture below should only give you a rough overview of the different elements.
The HUD will be discussed in the Extension course.