DCS Settings
| Site: | Open Flight School |
| Course: | General Principles (DCS) |
| Book: | DCS Settings |
| Printed by: | Guest user |
| Date: | Tuesday, 30 December 2025, 4:42 PM |
1. System
In the DCS main screen, there are four icons in the upper area for access to the module manager, general settings, offline mode and login/logout.

The Gear Wheel leads to the general settings.
Here we find the most important settings for DCS and its modules in several tabs.
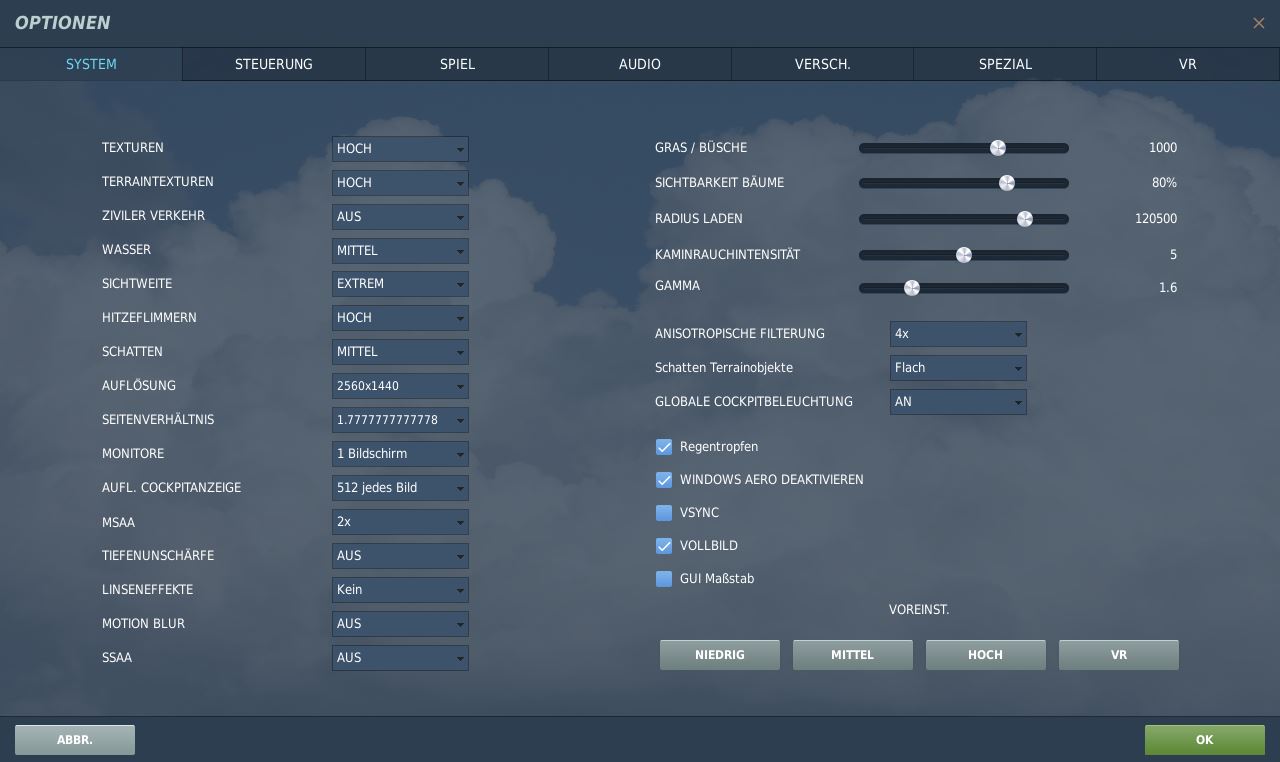
System
The general graphics settings are made here.
At the bottom right, under the item PRESET, there are buttons with which you can apply a rough preset. buttons with which you can adopt a rough presetting. You can choose between LOW, MEDIUM, HIGH and VR. At the beginning this is useful to test how strong your system is. After that, you should try out which settings work best. The higher the settings, the more beautiful the game will look and the more fun you will have. However, if the settings are set too high and the game stutters, you have to set a few options lower again..
Some of the options are real performance killers and should be chosen carefully.
Important Recommendations
These are not the right settings for everyone. PCs and their performance are always different and so is the personal taste of the owner. Therefore, we can only make a few recommendations here. If you have problems with the settings for your system, contact a DCS trainer. He will go through the options with you and can make a recommendation.
Left Side
| Name | Value | Remarks |
| Textures | HIGH | At LOW and MEDIUM the cockpit textures are also washed out and blurred. This is the most important setting of all! |
| Terrain Texture | HIGH | Significantly improves the details of the terrain textures, should only be reduced in case of performance problems |
| Civil Traffic | OFF | Automatically generated Ki vehicles on the streets, unfortunately not synchronised in multiplayer mode. Nice to look at, but unfortunately also very CPU-heavy. Switch off if CPU is weak. |
| Water | MEDIUM | The bottom layer of each map consists of water. The landscape, cities, trees, etc. are placed on top of it. The water looks best on the HIGH position, but it also draws a lot of performance. Therefore, MEDIUM is a good compromise. |
| Visibility | HIGH | Controls the general visibility, ULTRA and EXTREME bring few advantages, but eat up quite a lot of performance. With LOW and MEDIUM you see the targets, cities and trees too late. |
| Heat Shimmer | LOW | This refers to the flickering of the air when it is hot. For example, at the engine jet. |
| Shadows | MEDIUM | Shadows are an important part of the simulation. But MEDIUM or medium is enough. |
| Resolution | - | Set the native resolution of your monitor here. |
| Aspect Ratio | - | Automatically selected to match the resolution. |
| Monitors | - | For the beginning 1 screen. However, it is possible to use more than one screen; we may take up this topic in a later manual. |
| Other Cockpit Display |
512 each image /1024 each image |
This only affects displays present in the cockpit such as multifunction displays or monitors for optical search systems and determines their resolution. Depending on the graphics card and aircraft type, this has more or less influence on performance. With 512 each image it should actually always be sufficient and run well. If the image resolution is generally very high (more than HD), you should also set more here. |
| MSAA | 4x | Edge smoothing only depends on the performance of your graphics card and your taste. (2x is often enough) |
| Depth of Field | OFF | Foreground sharp and background blurred. Great for screenshots but a matter of taste and performance-heavy. Also switch off. |
| Lens Effects | NONE | Sunlight and optical lenses result in reflections in the image. Nice for screenshots or videos but a real performance killer. Switch off when you are not on a photo hunt. |
| Motion Blur | OFF | Motion blur of moving objects, textures, among other things, during fast eye changes, looks great, but eats... |
| SSAA | OFF | SSAA= SuperSample-Antialias, edge smoothing with significantly increased resolution and subsequent downsampling to the display resolution, consequence = eats up graphics card performance, with high-end cards of course quite sensible. |
| (HDR) | OFF | Remains off when you switch on delayed shadows. (not applicable as of v. 2.5.x) |
| (Delayed shadows) | ON | The name is totally confusing. This setting activates the new graphics engine. (Dropped since 2.5, the new graphics engine is permanently on). |
Right Side
| Name | Value | Remarks |
| Grass / Bushes | 1000 | Sets the distance at which grass and bushes can be seen. |
| Visibility of Trees | 100% | Sets from when individual trees are visible. The maximum 100% value is set with the visibility setting. At low visibility settings, trees should remain at 100%. Otherwise, missiles will fly into the trees because they are in front of the target but not yet visible. |
| Loading Radius | 100000 |
Objects within the radius are preloaded into the RAM memory, even if they are not yet visible. This leads to significantly smoother frames. On computers with 16 GB RAM and more, this can usually be set to high values up to "maximum". On computers with less RAM, cutbacks should be made here. Keep an eye on the utilisation of the RAM; if there is still room for improvement when playing, the slider can be moved further to the right. |
| Chimney Smoke Intensity | 5 | Sets the number of smoking chimneys (only from factories, no residential buildings) on the map on a scale of 0-10. Nice to have. 10 corresponds to 100% of all existing chimneys on the map. |
| Gamma | 2 | Brightness adjustment. Personal taste. Values between 1.5 and 2.0 are common. |
| Anisotropic Filtering | 4x | This feature preserves the sharpness impression of distant textures and is again strongly dependent on the performance of the graphics card. |
| Terrain Objects Shadows | Flat | You should not switch off the shadows completely. But flat is enough, then the performance-heavy 3D rendering of the shadow areas is omitted when the (tree) shadow hits e.g. a house wall.. |
| Global cockpit lighting | ON | External light sources and reflections, as well as daylight colors affect the cockpit colors. Sunsets tend to make red yellow light and the cockpit takes this into account. (Nice to have) |
| Raindrops | ON | Wet cockpit windows with realistic animated drops when it rains, wind and speed dependent drop formation, very nice to look at |
| Disable Windows Aero | ON | The Windows interface continues to run in the background and consumes memory. Especially if you use complex effects like transparency or animations. With this setting, Aero and the effects are switched off at the start of the game and then activated again.. |
| VSync | OFF | If VSync is on, the frame rate is set to the refresh rate of the monitor. Without VSync, "stripes" appear in the image when the view is changed. This is called tearing. Who can activate FastSync in the graphics card settings should do this. Those who do not have this should enable VSync. |
| Full screen | ON | You can also run DCS as a window. There are even a few situations where it is helpful. But in general you should run DCS in full screen. This saves resources. |
| GUI Scale | OFF | Changes the size of the surface of the menus. This is useful when using multiple monitors or VR. |
Conclusion: Computers with a 4-Ghz CPU and better and e.g. Nvidia 980, 1070 and better as well as at least 16 GB RAM can actually turn up everything. We strongly recommend using an SSD instead of an HD hard drive, both for Windows and DCS.
Status: Nov. 2018
2. Controls
In the Control tab you have the option of setting the assignment of buttons and axes for all installed modules.
On the far left you will find a drop-down field for selecting the module (e.g. Fw 190 D-9 Sim).
Caution: Many modules have an arcade and a sim key assignment. We do not use the arcade mode, so please assign your keys in the sim section of your module!
The General and GUI Layer sections contain settings that do not belong to a specific aircraft.
To the right you can limit the range of actions displayed. This shows you how many actions there are and it is often an indicator where the respective switch is located in the cockpit, at the weapon system, at the control lever, etc. The button All shows all actions/switches again. With All, all actions/switches are displayed again.
The search function (Search...) makes it much easier to find certain functions.
Axis commands are used to assign and adjust your joystick, thrust controller and pedal axes. These are handled separately from the buttons.
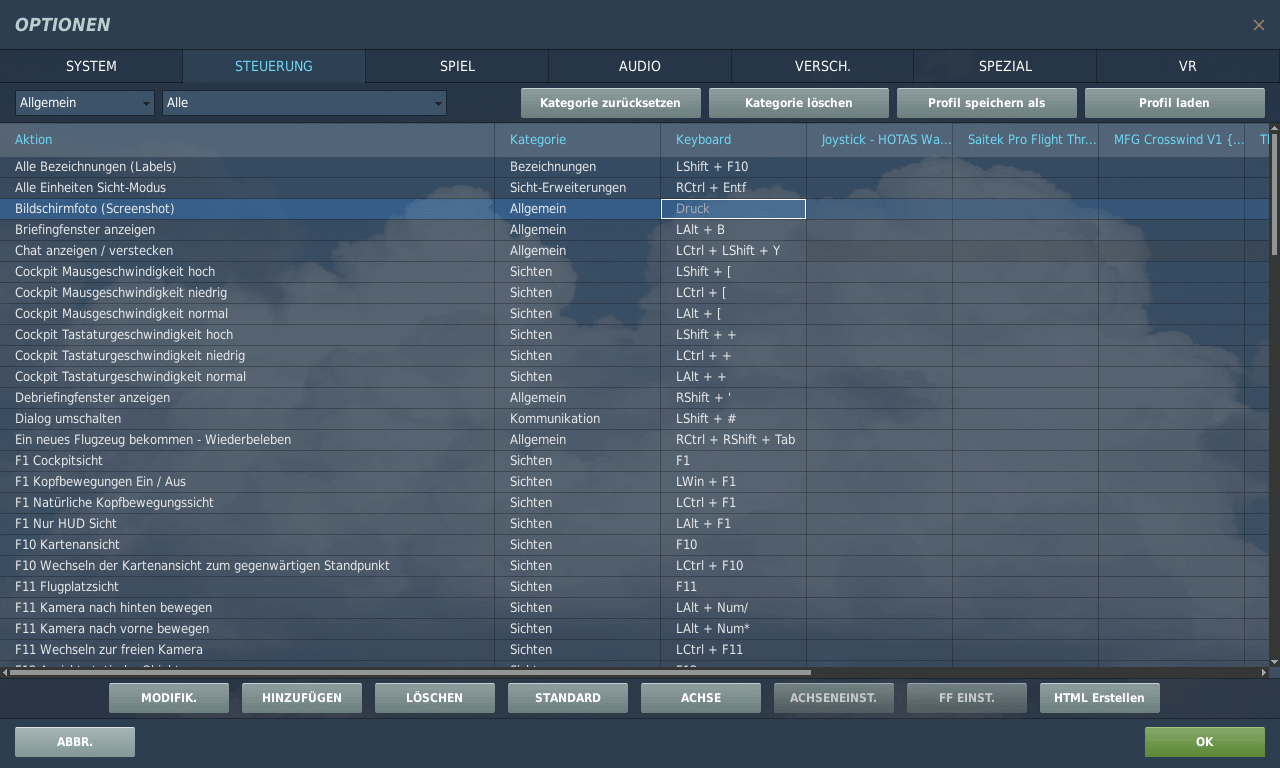
In the standard assignment for a module, however, DCS assigns certain default buttons and axes for each recognised device. This is often more of a hindrance than a help. This is especially true for the axis assignments.
Most experienced DCS players assign everything according to their own scheme. However, this can be difficult and very tedious, especially for a beginner. Therefore, first use the default assignment for your Hotas.
For all additional devices (e.g. rudder pedals, joypad etc.) you should delete the keys. Click on a field in the column of a joystick and select Delete Category. This will remove the useless default assignments and you can start assigning your own.
Especially check the axes! Sometimes there are strange double assignments that have driven many a beginner to despair. With the axles it is worth deleting everything and reassigning only what is needed.
With the A-10C & A-10C II, the Thrustmaster Warthog is already very well assigned. If you delete all the buttons and reassign them, it's not only a lot of work, some things don't work properly anymore. For example, the pusher IDLE/OFF position. Nevertheless, some things are unfortunately assigned incorrectly and have to be changed. This is described in the corresponding course.
If you press a key combination or a joystick button here in the settings, DCS jumps directly to the corresponding position. This is very practical and is a feature that does not exist in IL-2, for example.
With Reset Category you restore the default settings.
It is not really necessary to save the assignment via the save profile function. Unless you want to create several profiles or make a backup copy that can be read in again via Load profile.
To assign a button, select the desired function (row) and then the device whose button (or axis) you want to assign (column). Double-click on the cell in the intersection. Now press the button and it is entered.
You can assign a button more than once via MODIFIC. However, we will not look at this in detail here.
With ADD you can even assign several buttons to a function. DELETE removes the selected assignment. STANDARD resets the default value. This is useful if you have accidentally deleted an assignment.
The button AXIS switches to the assignment of the axes. You can also do this via the dropdown at the top.
With AXIS SETTINGS you can make the settings for the assigned axes. See below for details.
FF SETTING is used to set force feedback devices.
HTML Create is very handy. It creates a file of the selected mapping that you can open with a browser and print out..
Axis Settings
Most important is the curvature, as this makes the aircraft react more smoothly to control movements.
Whether and how high you set the curvature is a matter of taste and also depends on the aircraft itself. The proof of the pudding is in the eating.
The dead zone can help with joysticks that have a nervous zero position.
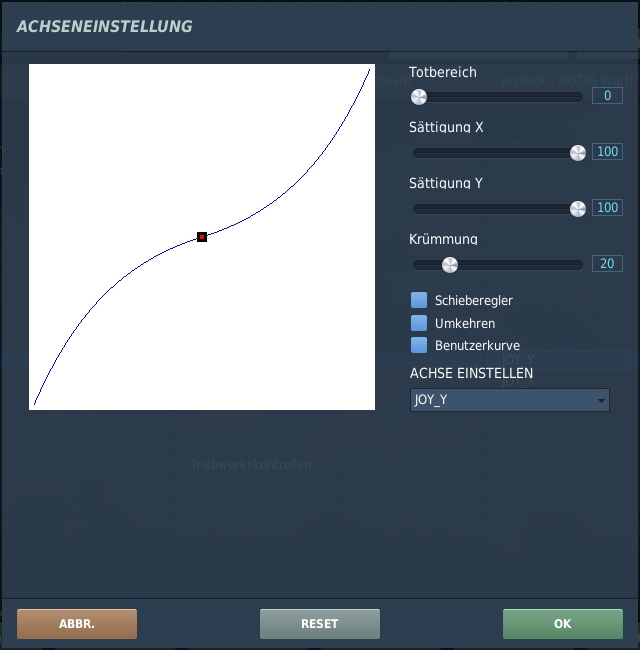
The remaining options explain themselves by changing the axis line.
3. Game
These settings influence the degree of realism of DCS. If the mission creator or the server does not make strict specifications for the individual points, DCS uses the player's settings.
If the player decides, for example, that he wants to see the lettering on the vehicles and aircraft or that he wants to be invulnerable, then this will always and everywhere be the case until a mission or a server temporarily and forcibly demands other settings.
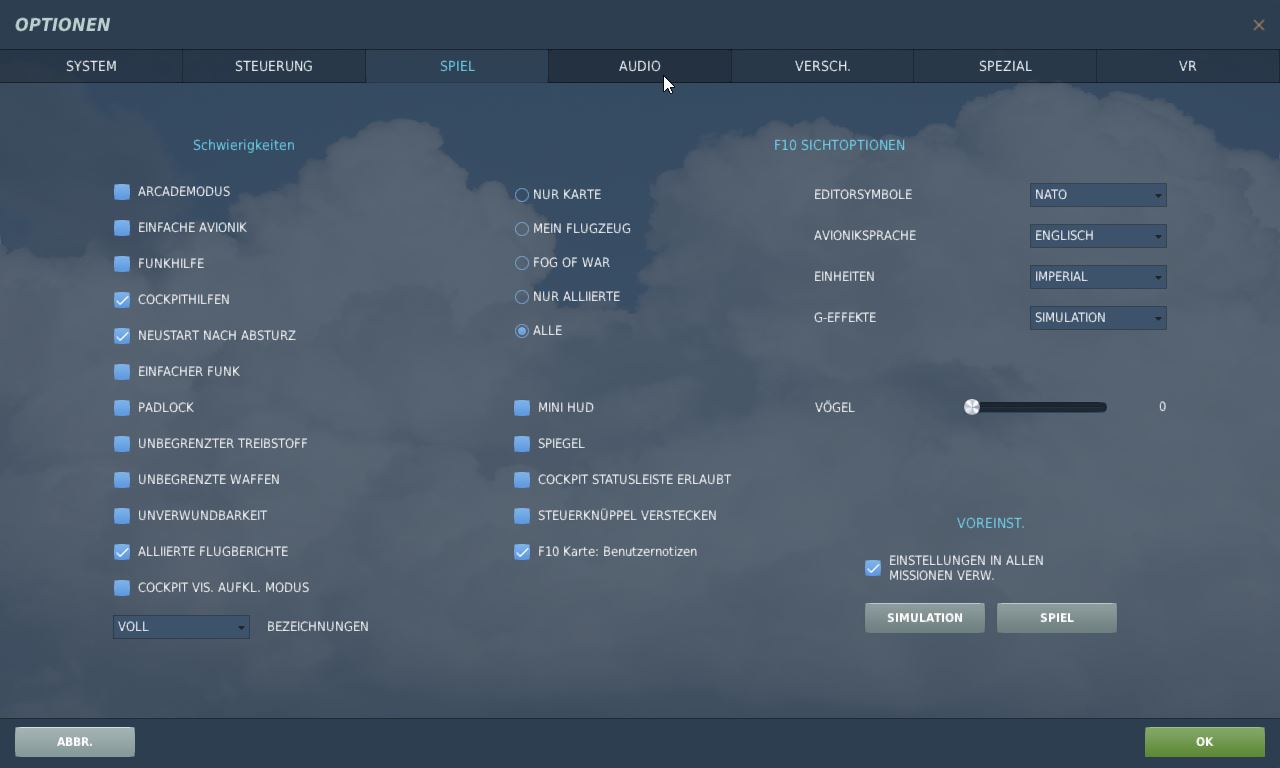
Here is a table with the settings used with the OFS and descriptions.
Difficulty
| Name | Value | Remarks |
| ARCADE MODE | OFF | Simplifies the game and adds e.g. target markers. The arcade layout is then used. |
| SIMPLE AVIONICS | OFF | If the mode is active, the aircraft switches to a simpler navigation and flight display system. |
| RADIO HELP | OFF | If activated, you will receive warnings by radio if, for example, a missile is approaching. |
| COCKPIT AID | ON |
Tool Tips displays the name of a switch when you point the mouse at it and do not move it. |
| RESTART AFTER CRASH | ON |
The name says it all. If this is over and you die in the mission, you may not re-enter or get back in. Very nice for a hardcore mission to get the adrenaline pumping, but not useful for a flight school. |
| SIMPLE RADIO | OFF | Simplifies the use of the radios (automatic frequency setting). |
| PADLOCK | OFF | This can be used to fix the view of an opponent so that you don't lose sight of them. |
| UNLIMITED FUEL | OFF | Air refuelling can be learned, or you have to fly sparingly |
| UNLIMITED WEAPONS | OFF |
Normally this is OFF, but if you want to practice a special weapon, you can switch it ON and practice intensively and you can practice intensively without always having to take off and land. We enforce the setting in such training missions, so you don't have to worry about it as a student pilot. |
| INVULNERABILITY | OFF | You should know when you do something wrong. |
| ALLIED FLIGHT REPORTS | ON | Receive radio messages from other allied AI aircraft. |
| COCKPIT VIS: ENLARGE: MODE | ON | Enemies on the map are normally only visible when someone has reconnoitred. With the setting you can or must report enemy positions so that someone else can see them on the map. We use this mission specific, but ON allows you to do it, but not necessarily have to.. |
| REFERENCES | FULL |
You see a designation above all enemies and your own troops in the immediate vicinity, consisting of name, type and distance. This makes it very easy to recognise targets. Many virtual pilots are advocates of "icons off", but we only switch them off when you are ready. Many multiplayer servers offer reduced icons (part of the mission file) where instead of name and distance etc. only a simple small black dot is displayed. This facilitates the recognition of aircraft (monitor deficits) but does not make it too easy. These are also only visible if AN has been selected here. The icons can be switched off at any time during the game (Lshift+F10) but cannot be activated if they are always off. Since version 2.5.3, there are several ready-made settings to choose from, then the labels, for example, are permanently reduced unless the server requests otherwise. . |
F10 View Options
Here you can set which objects you would like to see as symbols on the map, if the server or the individual mission file does not require otherwise:
-
Map Only does not show any objects.
-
My Plane shows only your plane on the map.
-
FOG OF WAR shows all objects that have been reconnoitred by your coalition and whose position is already known.
-
Allies only shows all allied units.
-
ALL shows all objects.
We recommend Fog of War. Any AI units will of course help with the reconnaissance all by themselves.
| Name | Value | Remarks |
| EDITOR SYMBOLS | NATO | Tactical signs for tanks, supplies, artillery, etc. based on NATO or Russian models. |
| AVIONICS LANGUAGE | ENGLISH | Screens with written output, e.g. navigation systems in the original language or English, those who can speak Russian can leave it native. |
| UNITS | IMPERIAL | Imperial or metric system of units, metres kilometres or knots and feet, applies to measuring tools on the chart, status bars, but not to aircraft cockpit displays. |
| G-EFFECT | SIMULATION | Black out and red out at high G-forces |
| BIRDS | 0 | Presence of currently invisible birds and thus a probability of a simulated bird strike in lower air layers, engine failure without further simulation, should therefore be OFF |
| Name | Value | Remarks |
| MINI HUD | OFF | The most important indicators of the HUD display remain in focus no matter where you look, forcing some kind of simple helmet display even if it does not exist in the aircraft. |
| MIRRORS | - | The use of mirrors draws a lot of performance. Not for weak computers. Can also be switched on and off during the game if necessary. |
| COCKPIT STATUS BAR ALLOWED | OFF | The most important displays summarised in figures, (Cheat Mode) |
| HIDE CONTROL STICK | OFF |
With this option, you can make the control handle invisible. This is useful if you want to |
| F10 Map:User Notes | ON | Place and label a marker on the F10 card during the game. This marker is visible to all players in your coalition. |
4. Audio
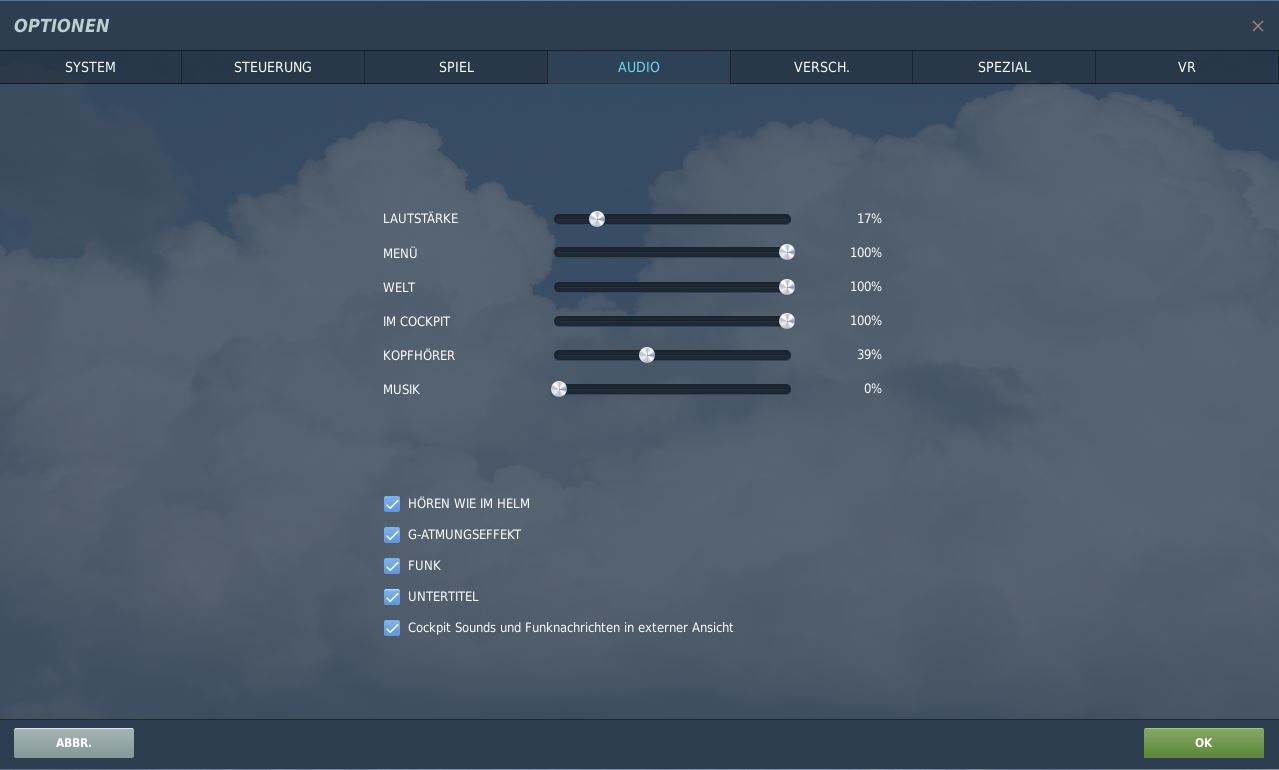
Use VOLUME to adjust the general volume of the game. NOTE: This is also possible via the Windows Sound Mixer. As a rule, you should reduce DCS considerably and turn up Teamspeak to full volume.
Below this, you can set the volume differently for the audio sources MENU, WORLD, IN THE COCKPIT, HEADPHONES and MUSIC.
Menu affects all menu sounds,
World is everything that happens around you in the game, birds, wind, etc.
Cockpit is all cockpit sounds.
Headphones refers to everything the virtual pilot would hear from his headphones in the pilot's helmet. Radio messages, warning messages
Music is the DCS background music
LISTEN AS IN THE HELMET adjusts the sound so that it sounds as if you are wearing a helmet, e.g. engine noise is greatly reduced, but only in the cockpit view, when switching to the external views it can quickly become very loud.
If the G-BREATHING effect is activated, the virtual pilot starts to breathe heavily and audibly. This is a kind of warning signal for you, as you cannot feel the G-Force on your own body.
If you don't want to hear the radio messages any more, switch RADIO off. And if you don't want to see the text messages any more, deactivate SUBTITLE.
Cockpit sounds and radio messages in external view. It is quite helpful if you look around in the area and still notice when a warning tone comes on.
5. Miscellaneous
Here is a table with the explanations and the values prescribed by the OFS. Please note that some settings can be explicitly overridden in a mission.
I.e. if an Advanced course is about navigation by sight, the F10 map view is deactivated in the mission. Then the value you set here in the game will be ignored.
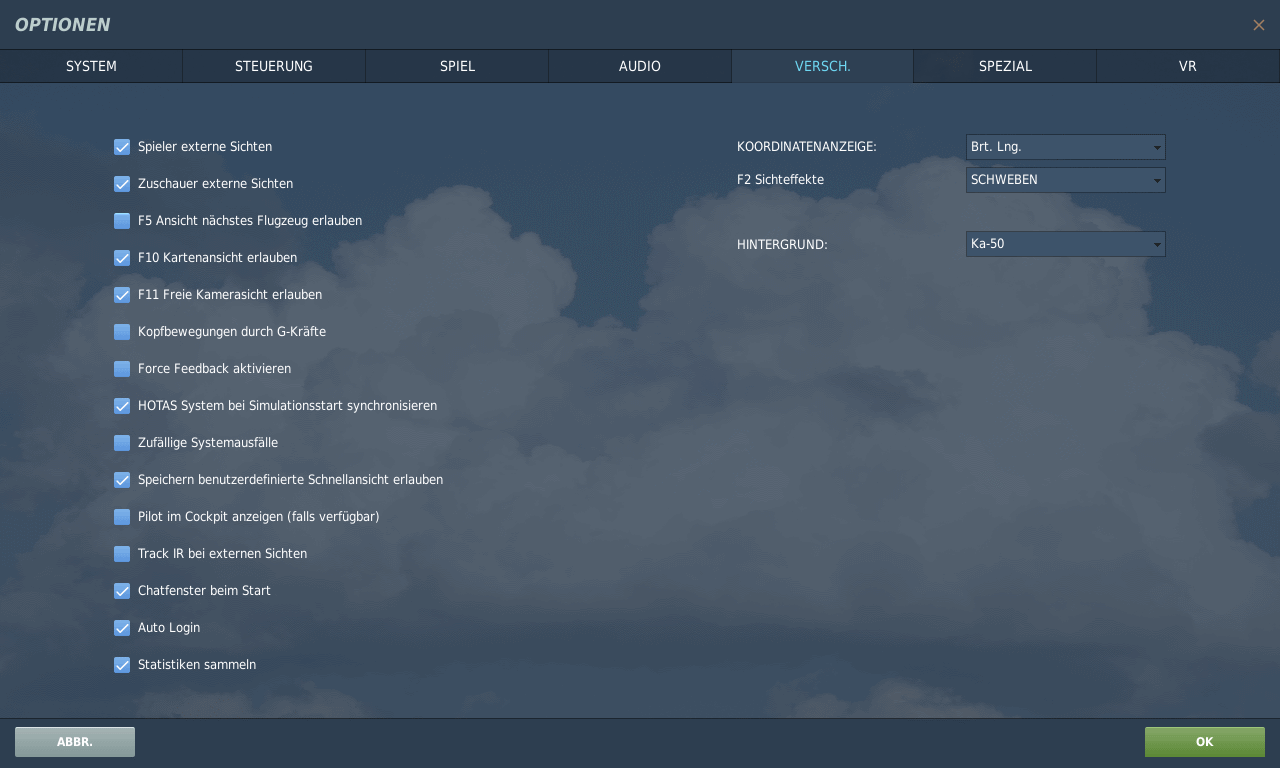
Left Side
| Name | Value | Remark |
| Player external views | ON | The external views are very helpful, especially for basic training. You can look at the aircraft from the outside to see how some inputs affect the aircraft. |
| Spectators external views | ON | This setting is also helpful so that, for example, the trainer can demonstrate something and all students can participate as spectators. |
| F5 Allow next aircraft view | ON | Also needed here for demonstration purposes and for learning. You can switch through all aircraft according to distance and observe them.. |
| F10 Allow map view | ON | With this you can open the map. Helps student pilots determine their position at the beginning. In later courses this can be overridden by the mission settings.. |
| F11 Allow free camera view | ON | You can move freely in the room with it. It's more practical for screenshots. But it can also be useful for lessons. |
| Head movements due to G-forces | OFF | If this option is activated, the movement of the head is influenced by the G-forces. Especially for the beginning we leave this out. |
| Enable Force Feedback | - | No default. Those who have a force feedback joystick should activate it. |
| Synchronise HOTAS system at simulation start | - | No default. If this is activated, DCS checks the switch position at the start of the flight and immediately carries out the appropriate actions. This is interesting for the Warthog, for example, but can also backfire badly if the HOTAS system is still set incorrectly when the new aircraft is ready. |
| Random system failures | OFF | In reality, there are sometimes failures of systems in the aircraft. But especially in school operations, it would be totally disruptive to activate this option. |
| Allow save custom quick view | OFF | You can save certain positions of the view and call them up quickly. This is a good aid, especially for people without a TrackIR. |
| Show pilot in cockpit (if available) | - | No default. Whether the pilot is displayed in the cockpit is more a matter of taste. Sometimes it is more of a nuisance. |
| Track IR in external views | - | No default. It is up to you whether you move the external view with TrackIR or with the mouse. |
| Chat window on start-up | - | No default. We leave it up to you to decide whether the chat window should be displayed at the start of the mission or not.. |
| Auto Login | - | No default. Here you can set whether you want to be logged in automatically or not.. |
| Gather statistics | - | No default. The statistics help the producer to make decisions regarding future developments. |
Right Side
| Name | Value | Remark |
| COORDINATE DISPLAY | Lat. Lon. | Standard coordinate system used (last digit GPS data 0-100 or 0-60 i.e. minute system or decimal) |
| F2 Visual effects | - | No default: Sets how the F2 view should look. Simply test and adjust as desired. |
| BACKGROUND | - | No default. Sets the background picture in the main menu. |
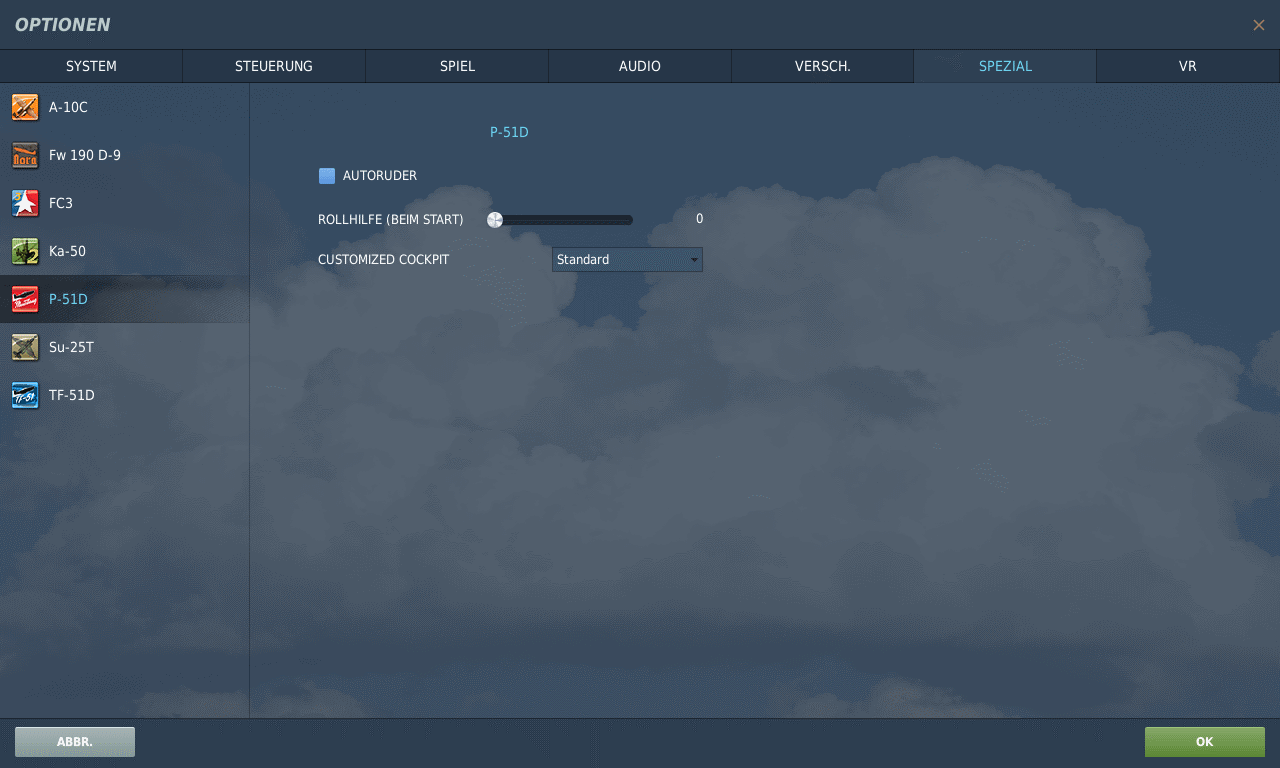
6. Special
The SPECIAL tab contains all settings that are specifically required for a particular DCS module.
All installed DCS modules are displayed on the left-hand side. As soon as you click on a module, the corresponding options for the module are displayed on the right.
We will not go into the settings for each module here. These are covered in the basic course for the corresponding module.
7. VR
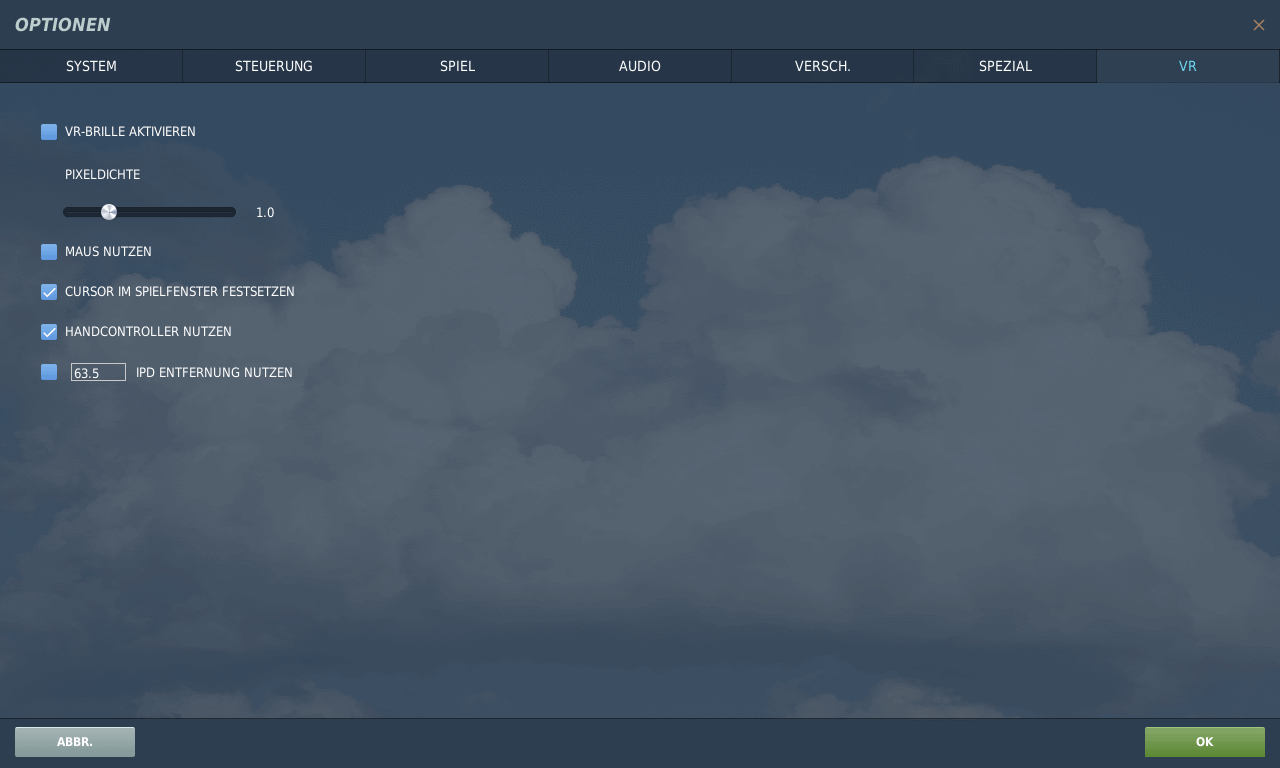
With the option ENABLE VR GLASSES you can switch the use of VR glasses on and off.
With the PIXEL DENSITY you can influence the quality of the image. The higher the number, the better the image. But this influences the performance to a great extent!
With USE MOUSE you can decide whether you want to control the small green crosshairs with the mouse or with the VR glasses. It's up to you, but I find it annoying to have to take my hand off the joystick.
SET CURSOR IN THE GAME WINDOW is important so that you don't click outside the game and the game loses focus. This happens with multi-monitor systems and causes the joysticks to stop sending input to the game. This is very bad in the middle of a battle.
By using HAND CONTROLLER USE, you can set that the Oculus Touch, for example, can be used in the game. The feature is still very fresh and not really useful to use. But when the first VR gloves are available, this option will become important.
IPD REMOTE USE = Interpupillary distance, Lens Spacing.
USE INTEGRATED AUDIO DEVICE = headset of the VR goggles (missing in the picture).
8. Windows Reload
With the new installation of Windows, all joystick IDs are redefined. The assignment of axes and buttons in the DCS settings must be redone. Simply recopying the old saved config files is not sufficient. With many modules, this can turn into real work.
But there is a way out by adjusting the ID numbers in the config files. This is much quicker than redoing everything. In the ED forum you will find good instructions:
This link may help - https://forum.dcs.world/topic/144963-joystick-configuration-files/?do=findComment&comment=2928486