Settings
| Site: | Open Flight School |
| Course: | AH-64D Apache Basic Course (DCS) |
| Book: | Settings |
| Printed by: | Guest user |
| Date: | Tuesday, 3 March 2026, 12:59 PM |
1. Initial Settings
Before we get started, let's take a quick look at the options of DCS together.
Details of the options should first be read in the DCS General Basics Course under DCS Settings.
The following pages describe the settings needed for the AH-64D Basic Course. This is mainly the control and special settings. It is assumed that you know how to change the assignments. If you do not, please read the Controls chapter in the General Fundamentals (DCS) course before continuing here.
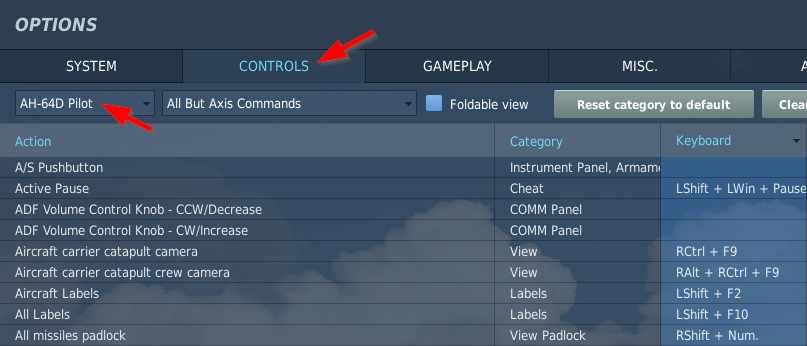
- Click on the cogwheel in the main menu to open the options:

- Here you select the CONTROL tab and then set AH-64D Pilot in the drop-down menu in the top left-hand corner:
- Continue with the instructions for assigning the axes and then the buttons (see following pages).

2. Axis Setting
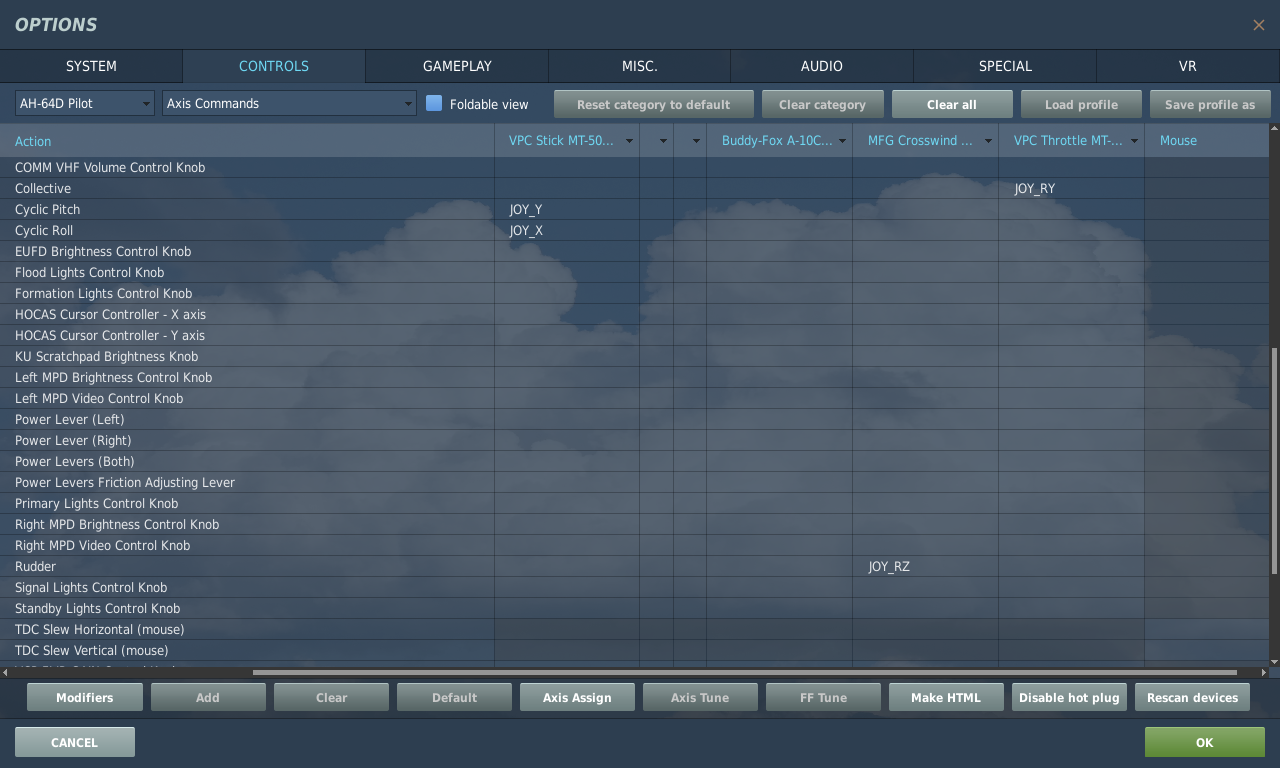
First you should select the section Axis Commands or press the button AXIS (at the bottom, in the middle). Both will change to the list of actions for which you can select an analogue axis (joystick or thrust lever). Each device is shown as a separate column, while the actions are shown as a row (see marking below). Of course, the listed input devices have different names.
By default, there are certainly some strange assignments in there. To delete them all, select one field in each column in turn (e.g. VPC Stick on the screenshot...) and then delete the whole column using Delete Category. For example, many beginners have problems due to double-occupied axes.
If you then double-click on a cell (intersection between row and column), you can assign an axis.
You should set the following axes:
| Action | Description | Remark |
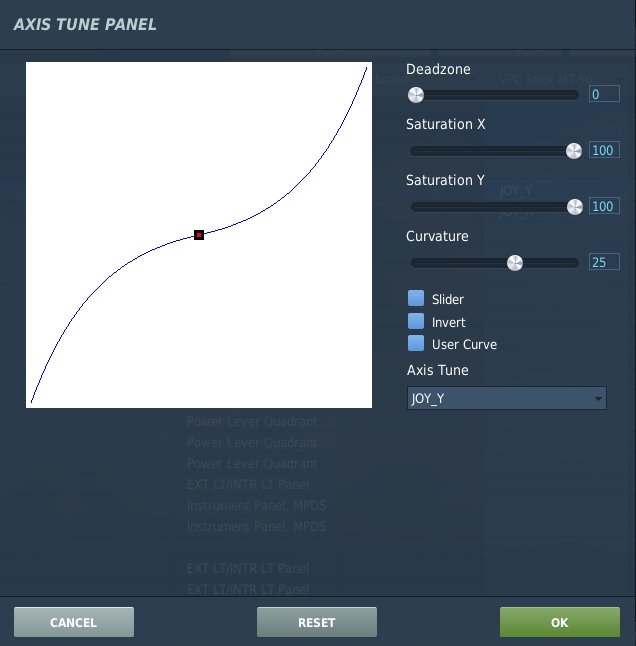
| Cyclic Roll | Roll Axis - Aileron | Recommendation: Curvature 25 |
| Cyclic Pitch | Pitch axis - Elevator | Recommendation: Curvature 25 |
| Rudder | Yaw - Rudder | Recommendation: Curvature 30 |
| Collective | Lift | Collectively adjusts the blade pitch and thus the overall angle of attack of the rotor blades. Do not set curvature |
To set the sensitivity of the assigned joystick axes, open the AXIS SETTING dialogue via the button AXIS SETTING:
3. Key Bindings
In the basic course, only a few keys are required from the take-off procedure to the landing.
Generally, you should keep the standard keyboard assignment and expand it with unassigned functions according to your own wishes.
You can of course change the settings according to your needs, but then you must know them during the mission.
A key combination is shown in this course as follows:
- A standard key combination is represented like this: RShift + K
- Sometimes it is necessary to set up additional key combinations. These are then displayed like this: L
The following keyboard layout is necessary:
| Action | Description | Standard Assignment |
| Wheel Brake - ON/OFF | Full braking on both wheels | W |
| Communication menu | Opens the radio menu | # |
| Kneeboard ON/OFF | Opens and closes the kneeboard | RShift + K |
| Kneeboard Glance | Opens the kneeboard temporarily | K |
| Kneeboard Next Page | Turns forward one page in the kneeboard | [ |
| Kneeboard Previous Page | Turns back a page in the kneeboard | ] |
| Tail Wheel Lock/Unlock Button - Depress | Switches the tail wheel (free/locked) | L |
| Power Lever (Left) - IDLE | Switches the left engine power to IDLE position | RAlt + Home |
| Power Lever (Right) - IDLE | Switches the right engine power to IDLE position | RShift + Home |
| Power Lever (Left) - OFF | Switches the left engine power to OFF position | RAlt + End |
| Power Lever (Right) - OFF | Switches the right engine power to OFF position | RShift + End |
| Power Lever Step (Both) - Increase | Gradually increases the engine power for both sides | PageUp |
| Power Lever Step (Both) - Decrease | Gradually reduces the engine power for both sides | PageDown |
| Force Trim/Hold Mode Switch - R/Up |
Trim System control |
T |
There are many more keyboard commands, but you can also operate all switches in the cockpit with the mouse. So this should be enough for this basic course.
4. Special Settings
You can access the special settings via the options and the SPECIAL tab.
Select AH-64D on the left-hand side. Here you can select various settings.

Customized Cockpit
Here you can later select the appearance of the cockpit. At present there is only one appearance for the cockpit (default).
CYCLIC TRIMMER MODE
Here you can set the behaviour of the trim for the control stick:
- INSTANT TRIM (FFB FRIENDLY): Only for force feedback joystick!
- Central Position Trimmer Mode: Useful for 95% of all joysticks. Please use!
- Joystick Without Springs and FFB: Only useful for a few self-built or modified joysticks.
By default this setting is INSTANT TRIM, which is wrong for most players with their normal joysticks. Please change this to Central Position Trimmer Mode unless you know you need something else.
Later in the course there will be a tutorial on how to set the trim.
PEDALS TRIMMER MODE
Here you have the same settings as for CYCLIC TRIMMER MODE. Again, for most pedals, Central Position Trimmer Mode is best.
Detent in LOCKOUT Position
In a real helicopter you have to overcome a physical resistance to move the power lever from FLY to LOCKOUT position.
This option can be used to adjust the behaviour in DCS:
- Depress Fingerlifts to Release Locks: Here you must first press a button to move the lever to the LOCKOUT position. This is recommended if your axles have no physical resistance.
- Automatically Jump Over: This option moves the power levers of the power quadrants beyond the FLY position to the LOCKOUT position without any lock. This is recommended if your throttles are equipped with physical detents.
Cockpit Camera Shake
Here you can adjust how much the cockpit vibrates.
IHADSS
With the IHADSS settings you can configure whether the outer edges of the monocle should be visible. Some people like to see the outlines, others don't like it. Try both options and use what you like better.
You can also set which eye the monocle sits in front of (render eye). This only really comes into its own in VR. It makes little sense on the monitor.
Set it to match your dominant eye. Just test both possibilities and you will see what works better for you.
The real pilots can't choose. There it is always on the right.
George AI AUTO HANDOVER
If this option is activated and you move from the pilot's seat to the CPG's seat, then George (the AI pilot) automatically takes control. If it is deactivated, then the player retains control and must hand over control to George by command.
Balaclava
Here you can set whether the pilot and/or the CPG should wear a balaclava.