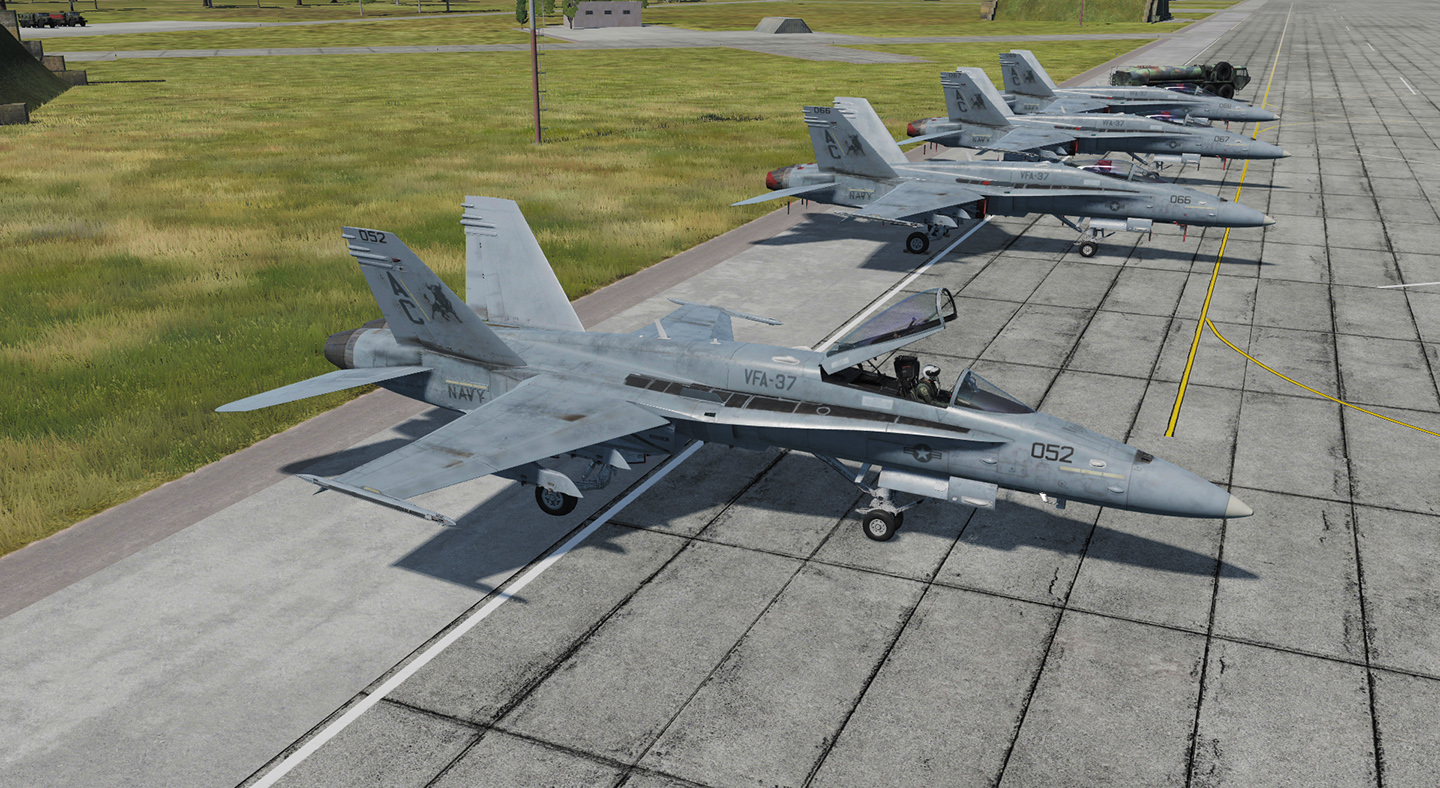
Simplified Procedures in Detail
| Site: | Open Flight School |
| Course: | F/A-18C Hornet Basic Course (DCS) |
| Book: | Simplified Procedures in Detail |
| Printed by: | Guest user |
| Date: | Wednesday, 11 March 2026, 10:20 AM |
1. General
 Here you will find detailed and illustrated Step-by-Step instructions for the F/A-18C.
In the Exercise Missions and Checklists section you'll find the appropriate exercise missions. Start the appropriate mission and work your way through the instructions. If you wish you can print them out for use later if necessary.
In later advanced courses you will start the F/A-18C according to the OFS Full Checklist. Here in the basic course we use, as already mentioned, only the BOLD set of checks within the full version, which is Insufficient for carrier operations.
Conventions used
- Action - with explanation (short name/label) [key combination],
- Optionally, a picture follows with additional remarks if necessary.
Shortcuts and key combinations are rarely used, but are specified here. Mainly we click the buttons in the cockpit. This is due to the fact that you can assign the keys to yourself and occasionally have to, because some are unassigned.
Unless otherwise mentioned, the element is activated by left-clicking with the mouse.
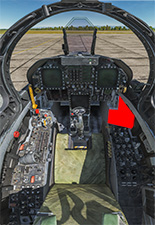
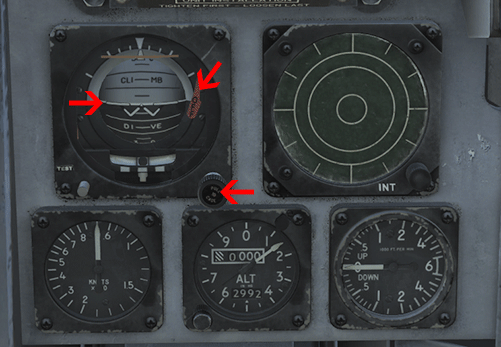
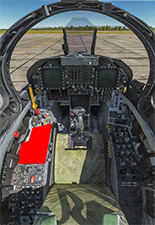
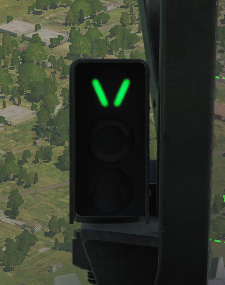
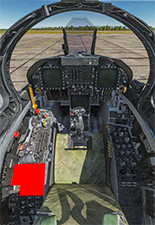
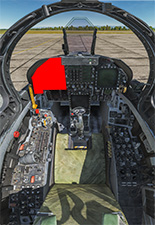
Switch locations are referred as shown in the following picture:

Animated pictures
In the instructions we use images with mouse-over effects. This means that if you move the mouse pointer over the image, it will be replaced by another one. If you move the mouse down from the image, the original image is displayed again. This allows you to make a before and after comparison.
Unfortunately this effect is ignored when printing and on tablets. Therefore, we decided to display the target state and the original state at the mouse-over. This is actually the wrong way around, but the printouts and the view on the tablet are useful for this.
Here is an example:
And we have recently started using properly animated .GIFs. These are images that display a sequence of images one after the other and run in an endless loop.
2. Starting Systems and Engines
In this section we will start the engines and power up the systems.
Use the OFS Engine Starting and Taxiing mission to practice. This mission is available in a simple version without explanations, checks and voice-over. Later on we might also build a guided version with voice-over and checks if you are doing everything right.
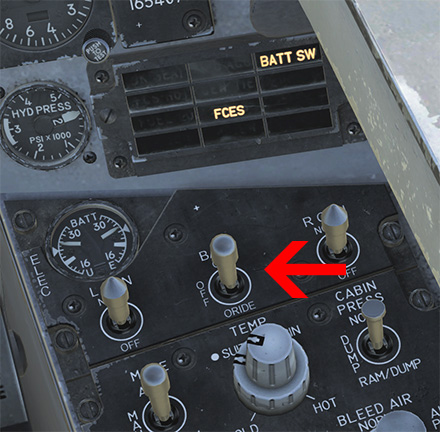
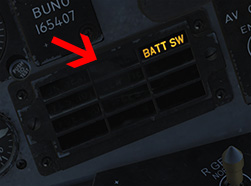
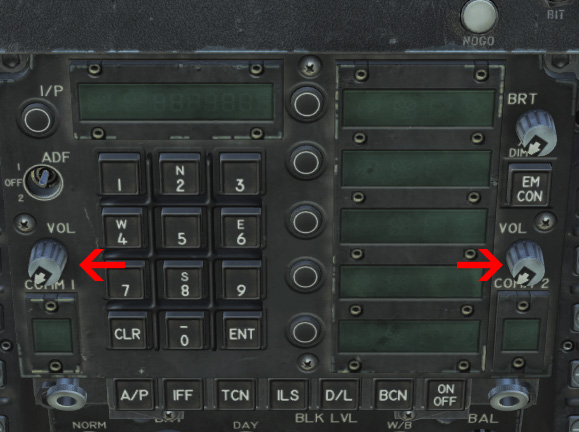
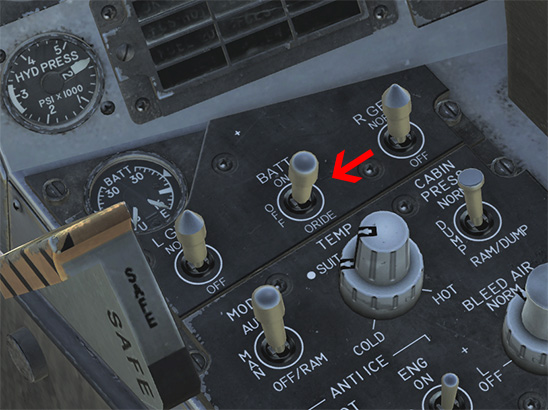
Switch on the Utility Battery and Check the Voltage
- Switch on the Battery, switch forward by right click BATT ON,
- Read and check the voltage of the Utility Battery (display on the left of the gauge above the switch). At least 23.5 volts BATT U CHECK >23.5 V.
|
|
 |
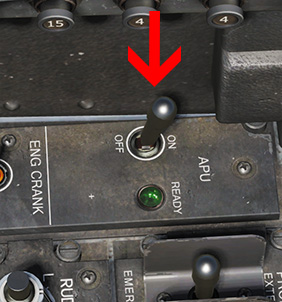
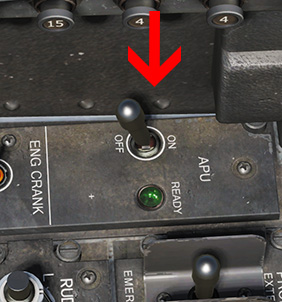
Power up Auxiliary Power Unit (APU)
-
Check whether the APU ACC warning light is off. The light is only on when there is an APU Warning APU ACC Caution Light OFF.
-
Switch on the APU, left click APU ON. The APU is a small auxiliary engine for starting the engines.

-
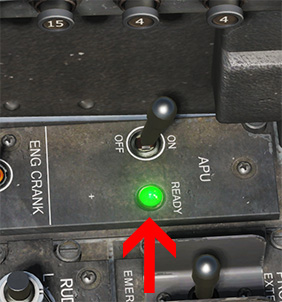
After about 30 seconds, when the APU is powered up, the Ready light will turn green APU READY CHECK.
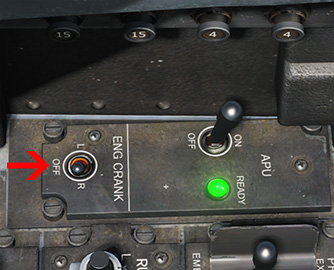
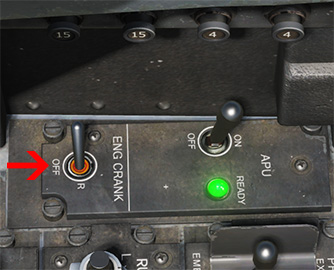
Start Right Engine
Please read everything up to the point Switching on displays before you begin the ENG CRANK, because the steps occur in quick succession.
-
Right click the Engine Crank switch to select R to start the Right Engine ENG CRANK R.
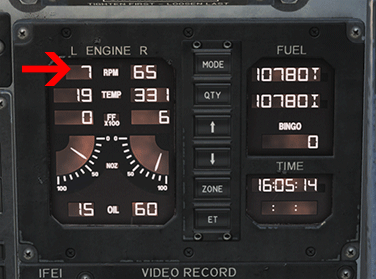
-
On IFEI (Integrated Fuel-Engine Indicator) observe the engine RPM rise to 15% IFEI ENGINE R RPM CHECK > 15.

-
Once the speed of the Right Engine is higher than 15% RPM, the Throttle can be set to Idle by RShift + HOME RIGHT THROTTLE IDLE.


- Observe the EGT (Exhaust Gas Temperature)
-
The Maximum during start is 815°C.

-
Check Voice Alarm.
-
As soon as the right engine starts it drives the right generator. When this happens Mission Computer 1 performs a Configuration Check. If the check is successful, this is indicated by the following voice warning:
-
Switch on the Displays
-
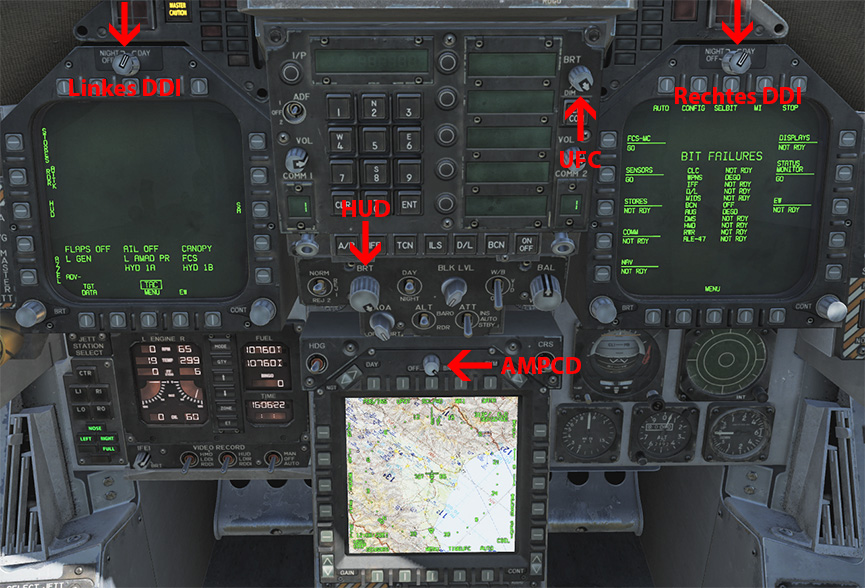
Switch on Left and Right DDI via their rotary knobs by 2 x right clicks (LEFT DDI ON / RIGHT DDI NO).
-
UFC Brightness by left click and drag up, or mouse wheel turn (UFC ON).
-
HUD Brightness by left click and drag up, or mouse wheel turn (HUD ON).
-
AMPCD on by left click and drag up, or mouse wheel turn (AMPCD ON).
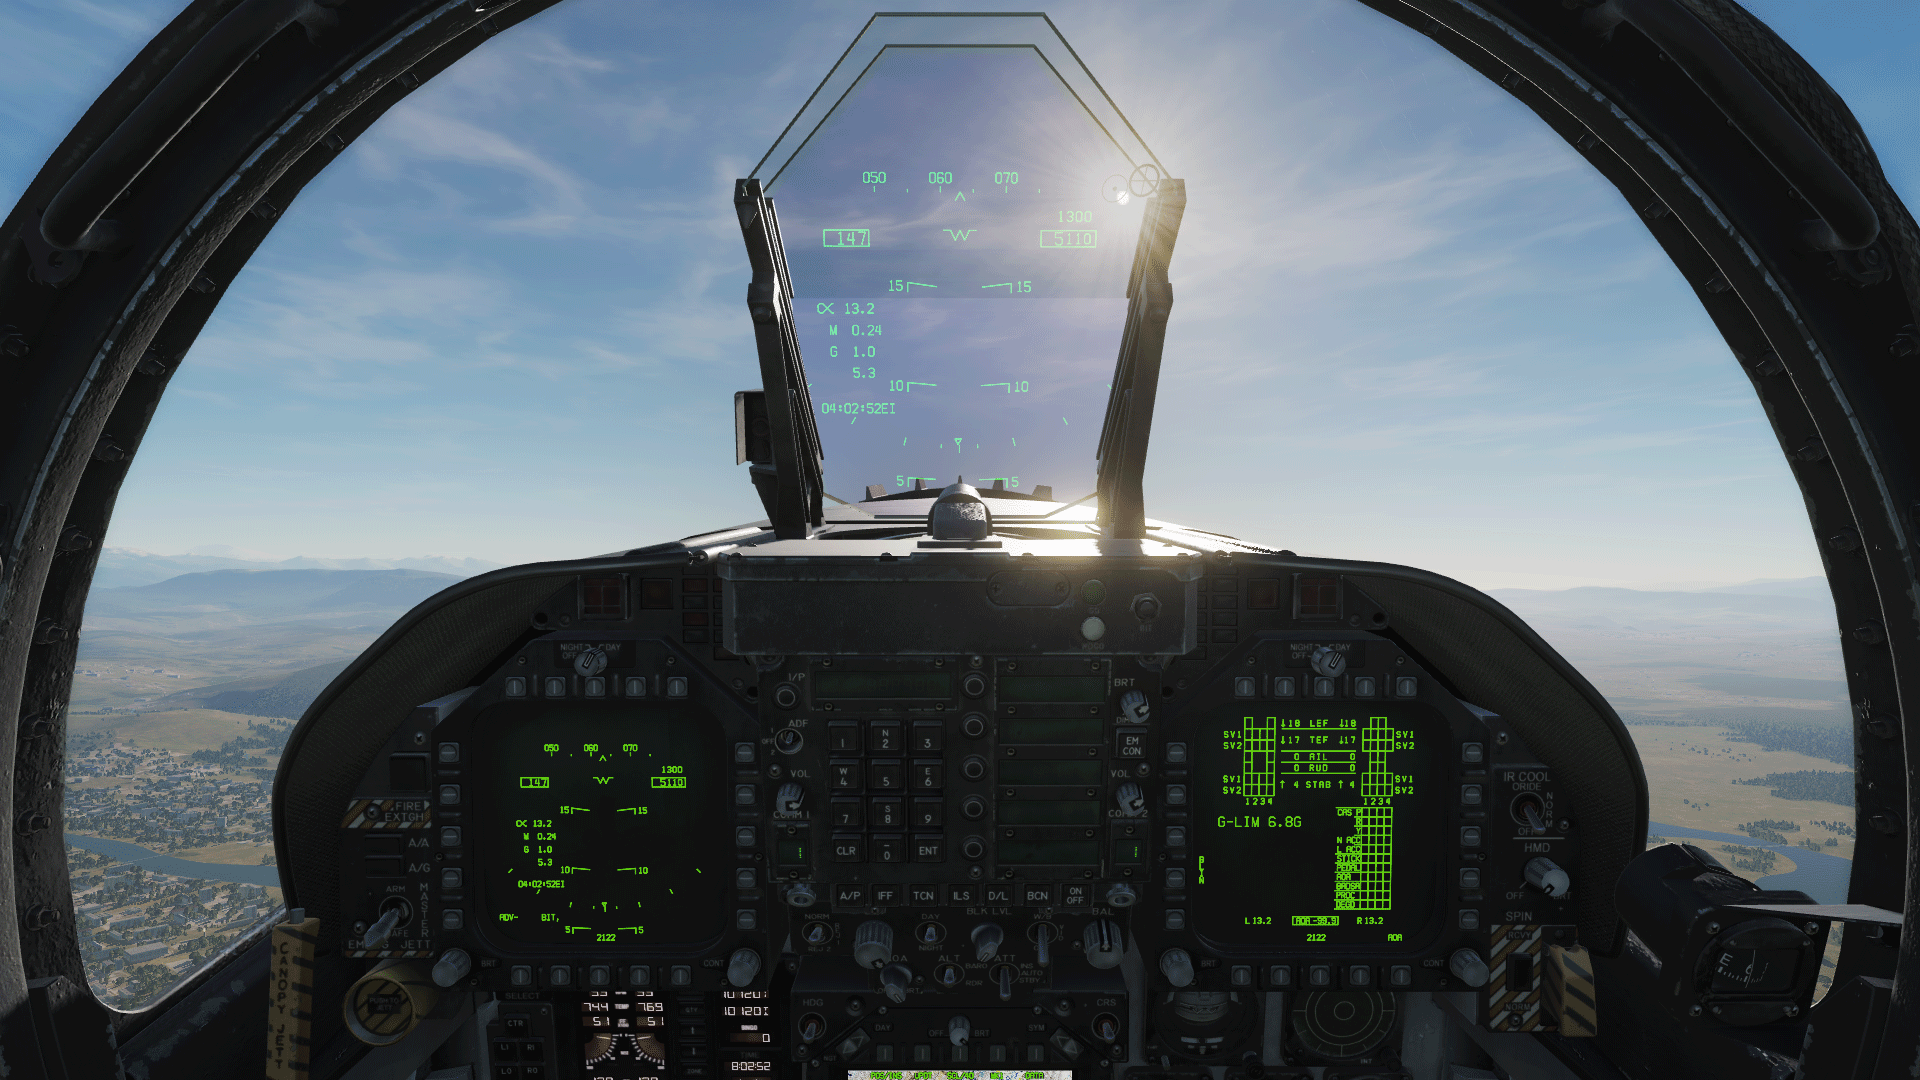
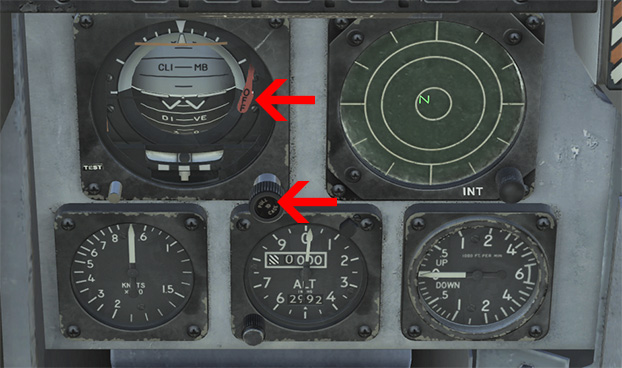
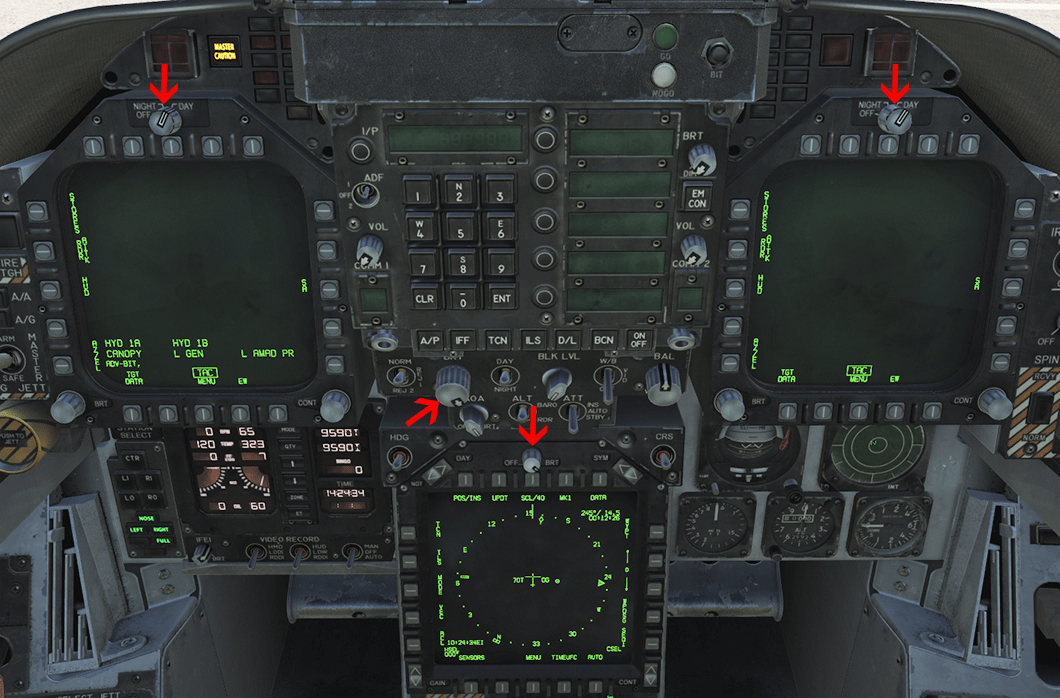
- Turn on the Radar Altimeter (RadAlt) and set it to 200 feet (turn the mouse wheel). The small triangle at the edge of the display is set to 2. The Radar Altimeter will swing full scale and then back to zero. As it passes the triangle a beep sounds (RALT 200).
-
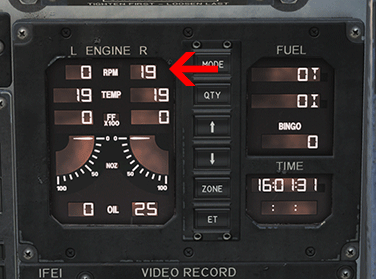
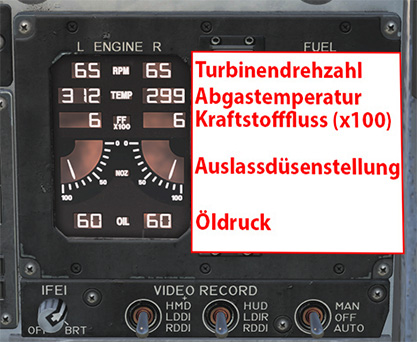
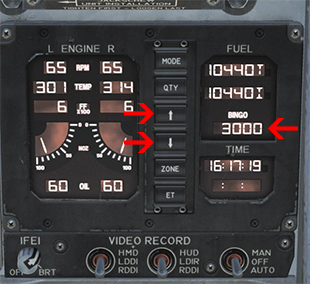
Check the permissible values of the engine at idle speed. To do this, read the IFEI and compare it with the following table.
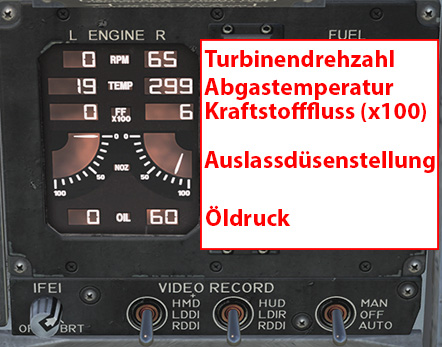
IFEI Parameter Limits RPM (N2 Turbine Speed) 63 bis 70% EGT (Exhaust Gas Temperature) 374° to 1094°F / 190° to 590°C Fuel Flow 420 to 900 pph / 68 to 146 gal/hr Nozzle (Exhaust Nozzle Position) 73 bis 84 % Oil pressure - warm oil 45 bis 110 psi
Start the Left Engine
-
Left click the Engine Crank switch to L to start the Left Engine (ENG CRANK L).
-
In IFEI (Integrated Fuel-Engine Indicator) observe the L Engine RPM (IFEI ENGINE RPM).
-
Once the Left Engine speed is higher than 15 RPM, the Left Throttle can be set to Idle RAlt+HOME(LEFT THROTTLE IDLE)
-
Maximum EGT during start is 815°C
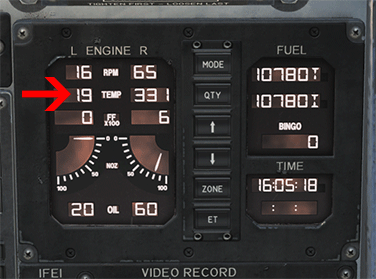
-
Check the permissible values of both engines at Idle RPM. To do this, read the IFEI and compare it with the following table.
| Parameter | Limits |
| RPM (N2 Turbine Speed) | 63 bis 70% |
| EGT (Exhaust Gas Temperature) | 374° to 1094°F / 190° to 590°C |
| Fuel Flow | 420 to 900 pph / 68 to 146 gal/hr |
| Nozzle (Exhaust Nozzle Position) | 73 bis 84 % |
| Oil pressure - warm oil | 45 bis 110 psi |
This completes the starting of both engines. On with the next part.
3. Before Requesting Taxi Clearance
This is the next step after starting the engine and systems. This is carried out in the same training mission.
Before we get on the way to the runway, we have to make further system settings and check the configuration of the aircraft.
-
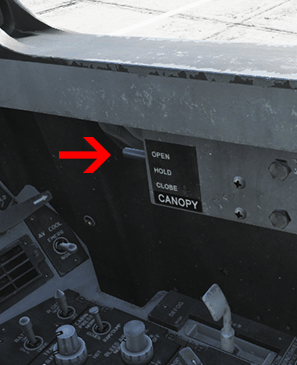
Close the canopy completely to reduce the turbine engine noise. This is done here for convenience, but is usually done at the Hold. The switch is located above the right console (CANOPY CLOSE).

-
To make the middle display easier to read, we hide the joystick Backspace.
-
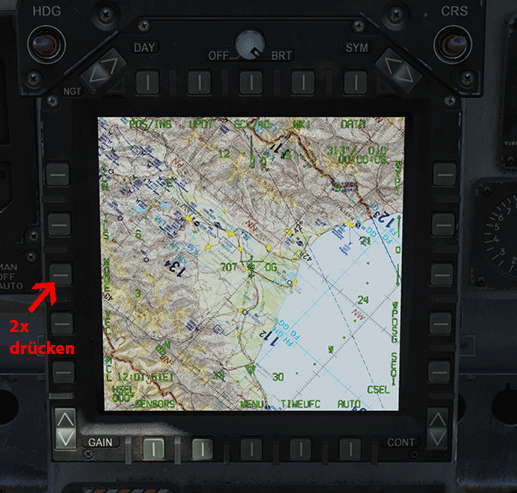
Switch off the chart in the AMPCD display by pressing PB03 (MODE) twice (AMPCD MAP OFF):
-
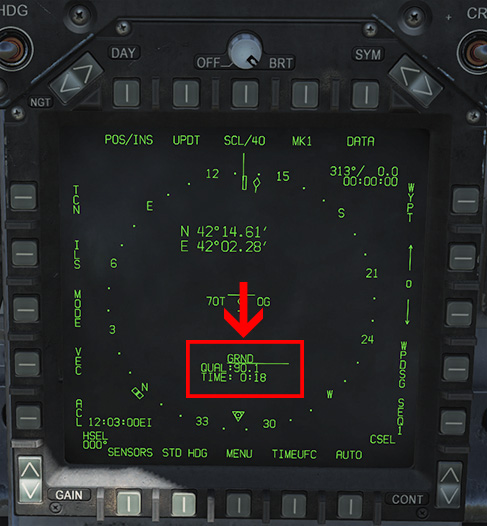
Now we see in the HSI (centre display) an indication of the INS state. At the top is the type of calibration type, underneath is the calibration quality number running backwards and beneath that is the time already taken.
-
As soon as the calibration is completed, an “OK” appears in the second line and the time taken.

-
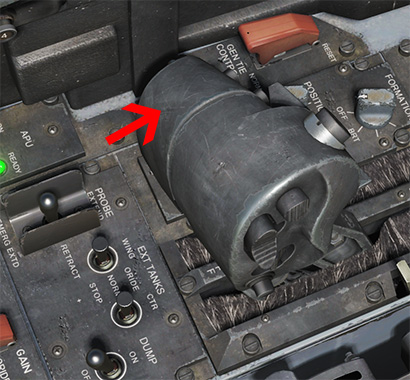
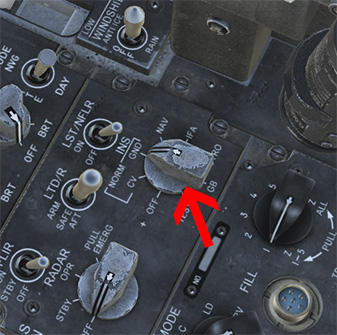
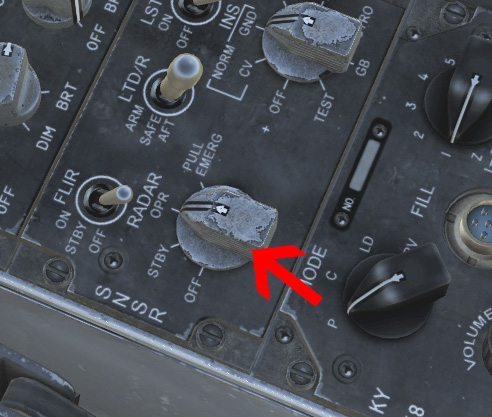
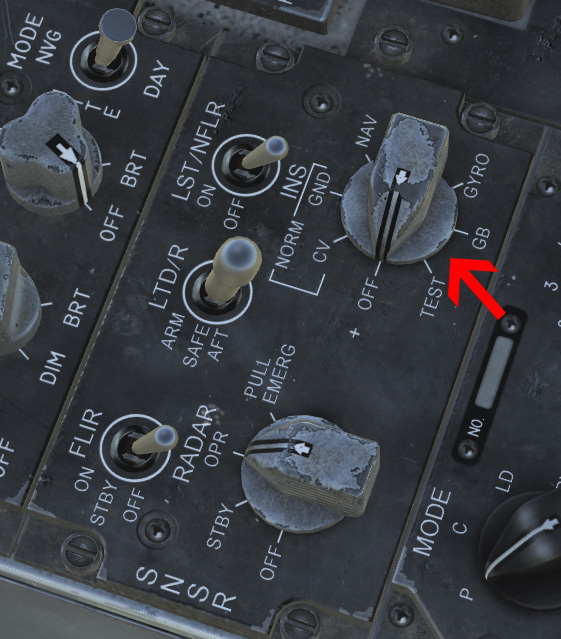
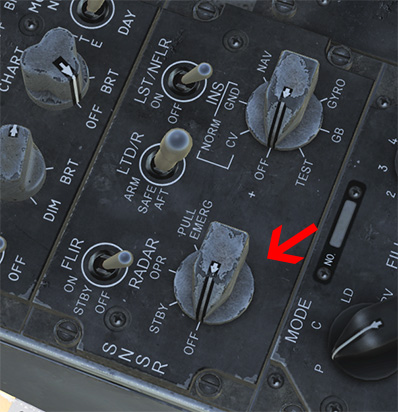
As the INS is calibrating, we can continue with the checks by switching on the Radar with the selection knob as shown in the following picture (RADAR OPR)

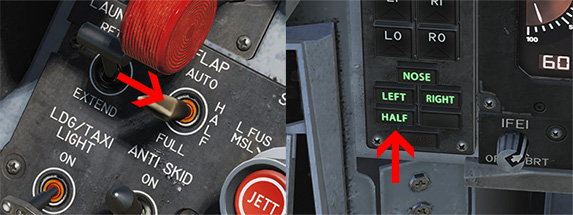
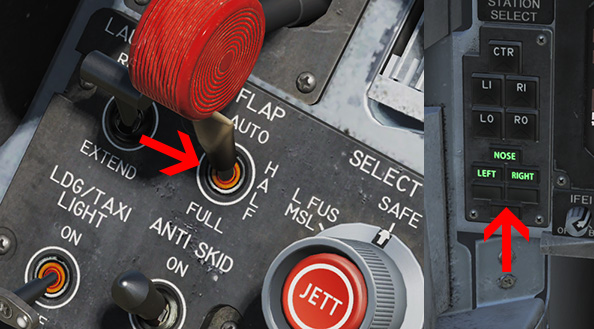
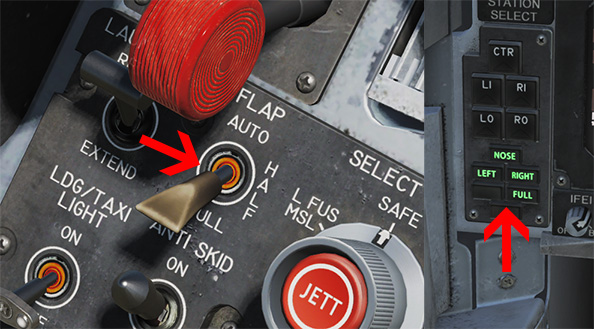
- We set the landing Flaps to HALF by right clicking. To the left of the IFEI (engine indicator) you can see the position of the landing flaps on the lights (FLAP HALF).

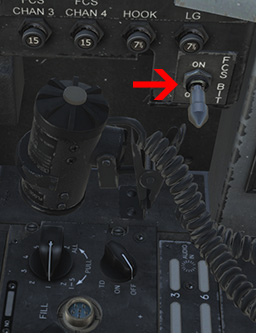
- Perform flight control system self test (BIT SELF TEST). To do this we have to press the FCS BIT switch on the right cockpit wall (above the right console) and operate the DDI at the same time.
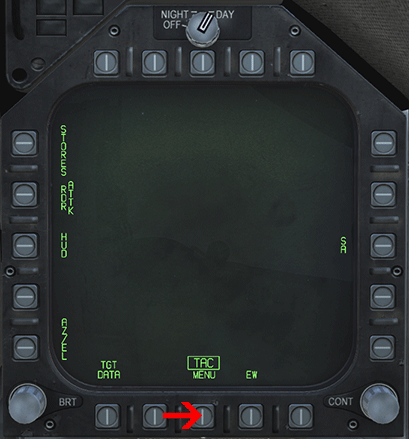
- Since we cannot operate both buttons at the same time with the mouse, we have to switch the FCS BIT switch with the key function Y. To do this we proceed as follows. We open the FCS-MC BIT subpage in the right DDI.
MENU -> SUPT MENU -> BIT -> FCS-MC
- Then we switch the FCS BIT switch with the Y key and keep it pressed (FCS BIT ON) while we click on FCS in the DDI (DDI FCS).
 |
 |
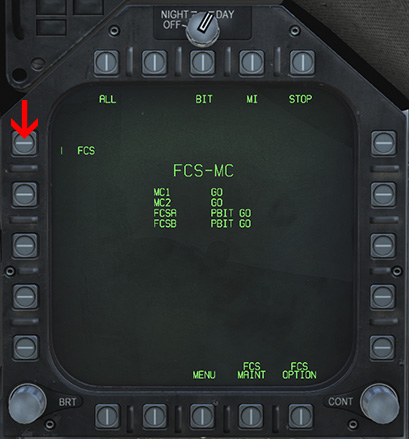 |
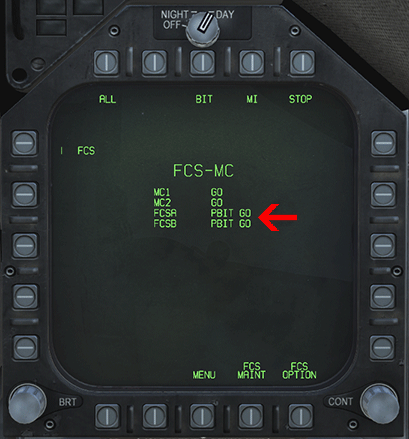
- Now we see in the DDI how the flight control system is tested. During the test the display shows FCSA IN TEST and FCSB IN TEST. After successful testing the display shows FCSA GO and FCSB GO (Check FCS RESULT).
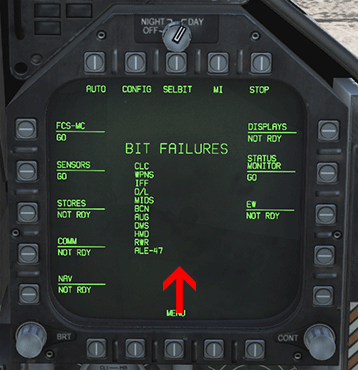
- BIT Note Check DEGD/FAIL. Press the MENU button (PB18) twice at the bottom center, then press the BIT button (PB08) at the top center (SHOW BIT PAGE).
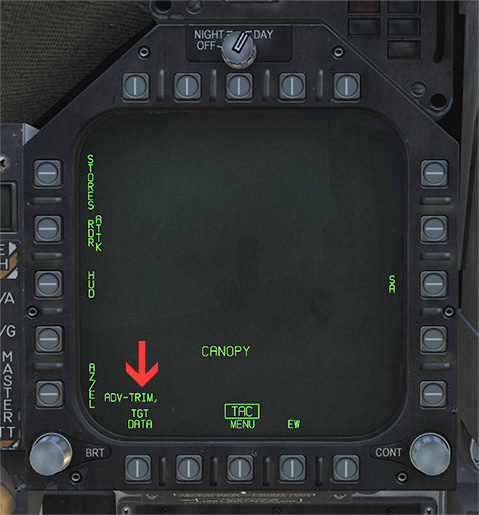
- We activate the Take-off Trim by pressing (left click) the centre button until the ADV-TRIM indicator is displayed in the left DDI. Then release the button again (T/O TRIM).


- Check Speed Brakes. Fully extend with LShift + B and fully retract with LStrg + B. With the F2 view you can switch to the outside view (SPEED BRAKE).

- Check if the APU has shut down. The APU will automatically shut down after a while if both engines are running (APU OFF).
- Set fuel / BINGO. With both arrow keys in the IFEI you can adjust the BINGO FUEL in steps of 100. In our example it is set to 3000 pounds. When our remaining fuel reaches 3000 pounds we get a BINGO message (BINGO FUEL).
-
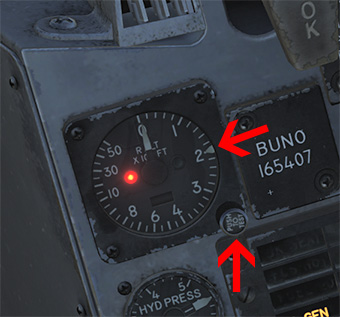
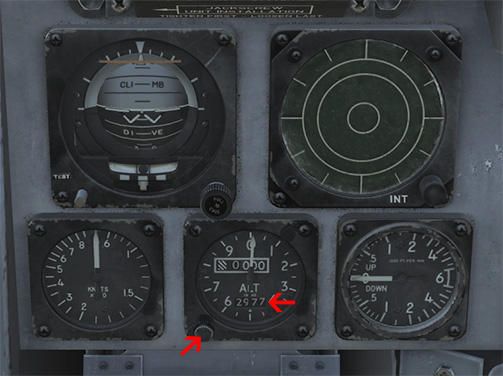
Now we adjust our barometric altimeter. We turn the knob at the bottom left of the altimeter as shown in the picture (turn the mouse wheel or left click and drag). We turn until the altimeter shows 0 feet. The pressure is difficult to read on the Altimeter so it is repeated in the HUD. This corresponds to the QFE (ALT QFE).
-
Setting the QFE is not quite correct, but for our mission (playout) it is sufficient and also easier. In most cases you set the QNH here. This will be explained in detail in the advanced course. If you are still interested, you can read in the theory basic course in the section QNH and QFE what the QNH/QFE is all about. Otherwise skip this part and continue with the next step.

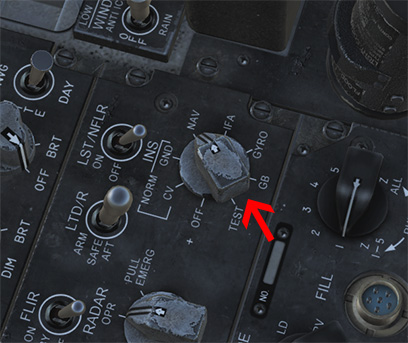
- Activate SARI (Standby Attitude Reference Indicator, artificial horizon) and align to artificial horizon by turning the mouse wheel (SARI UNCAGE)
 |
|
So the most important checks are completed and we can continue with the taxi to the Hold.
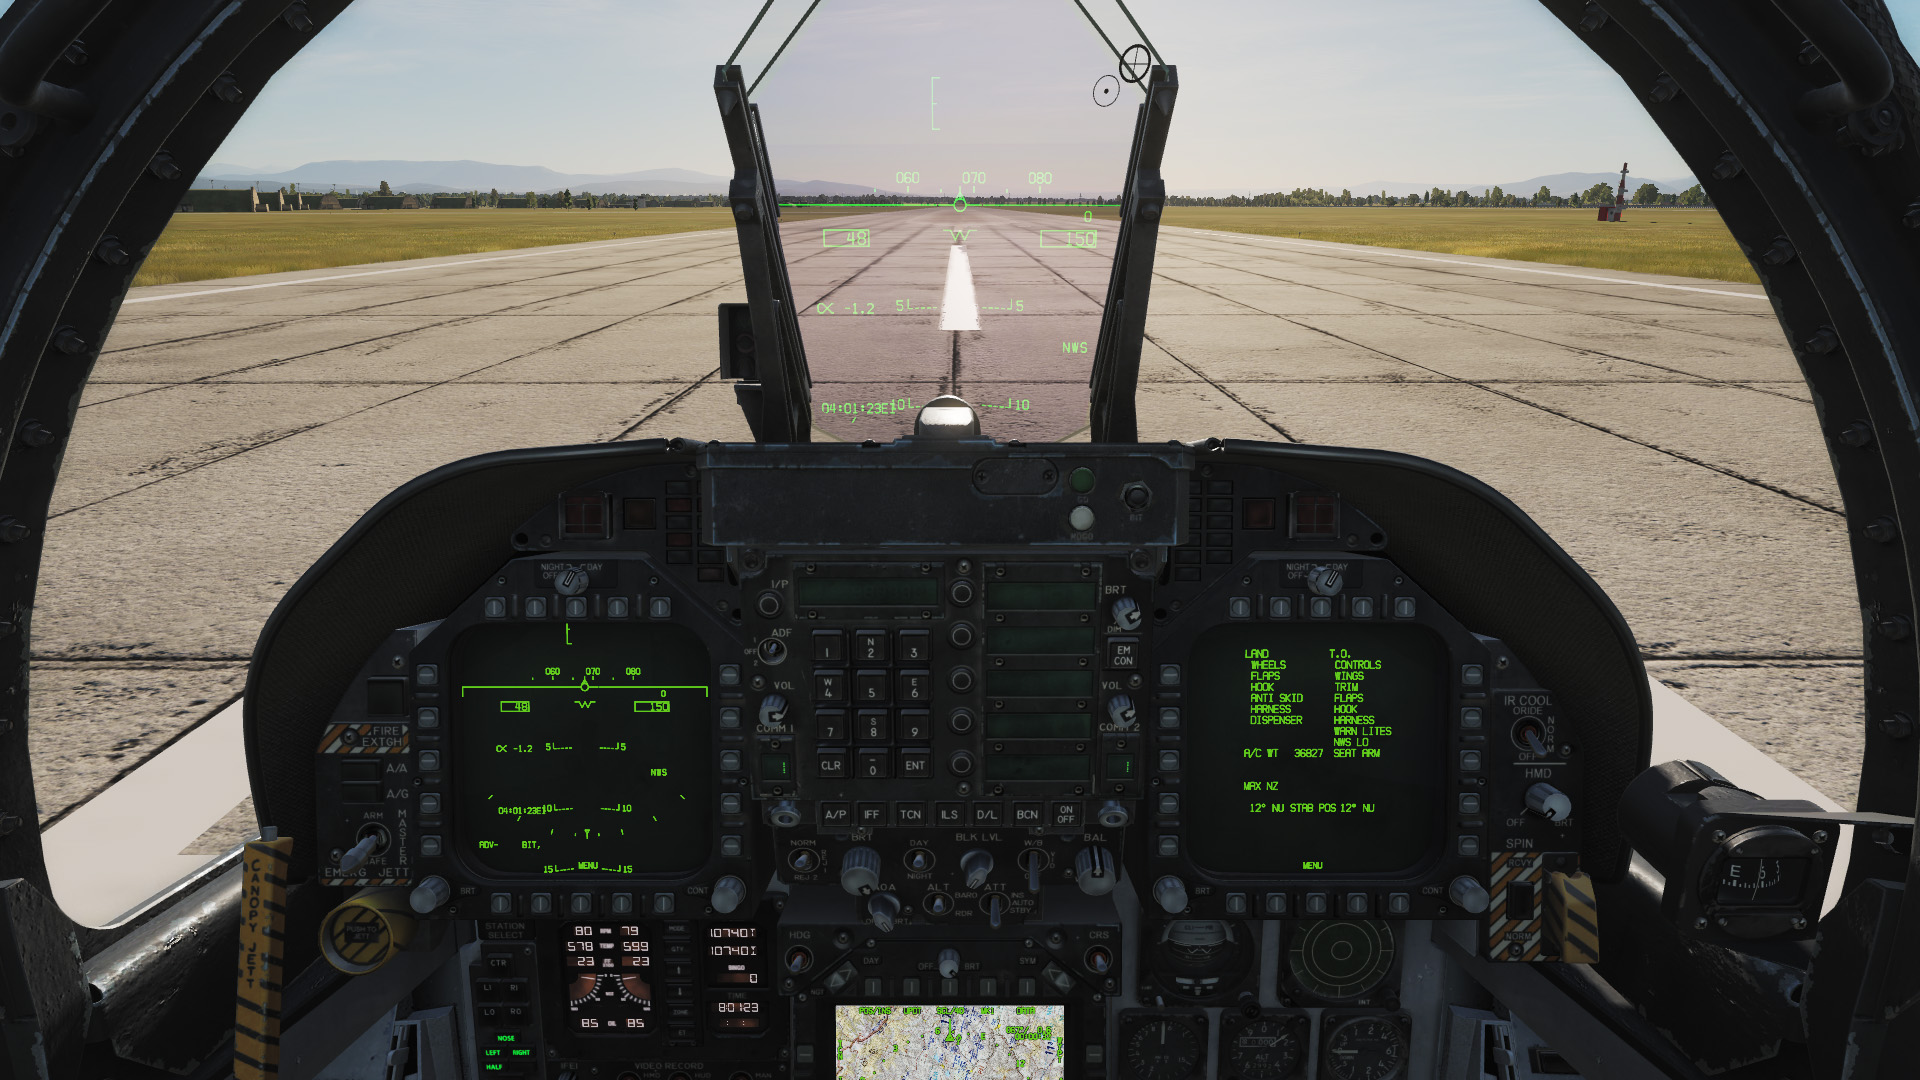
4. Taxi to Runway
This is the next step after Before Rolling and is performed in the same practice mission.
Basic information
- The ATC (Air Traffic Controller) has the responsibility and command when taxiing on the ground. His instructions must be followed without fail.
- The request to taxi must be submitted before rolling and rolling must only be initiated after release by the ATC.
- The runway to be used is announced when clearance is granted. The announcement is made in the form of the runway number, which is derived from the magnetic take-off direction as a two-digit number of tens (210° -> 21). The pilot should be familiar with the airfield layout or look quickly at the map (kneeboard, [F10] large map, or printed airfield charts) to orient himself. In reality and also on some DCS multiplayer servers with Real Life ATC, the exact taxiway to the runway is also given with the taxi clearance.
Example:
- Kutaisi Airport.
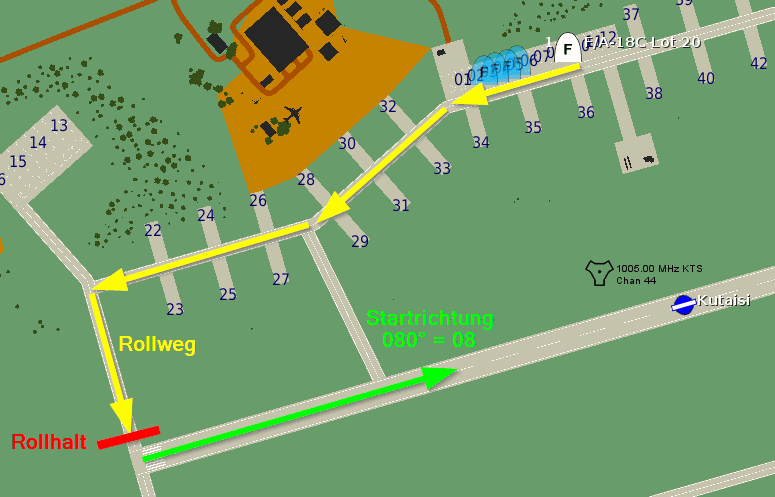
- Starting position announced by ATC: 08.
- Check: Where do I have to be to start a heading for 080?
- Which taxiways were explicitly specified, or can I find my own way? Usually you roll on the taxiways parallel to the runway in the opposite direction until you reach the correct taxi stop at the end of the runway.
Ask ATC for Permission to Taxi
Before we can ask for roll clearance, we must first obtain permission to start the engine. We could not do this before starting the engine, because the radio is only powered when the right engine is running. When starting the engine with external electrics (normal when starting at an airfield to save the aircraft's battery) it is possible to supply the radio with power in advance, but this does not play an important role for us here in the basic course.
The radio frequencies of the radios were set during the preparation of the mission so that ATC can be reached on channel 1. So you don't need to setup the radios.
Notice: In the following I always describe the complete radio menu from the main menu. It is quite possible and likely that you are already in a submenu. Please note the following pictures.
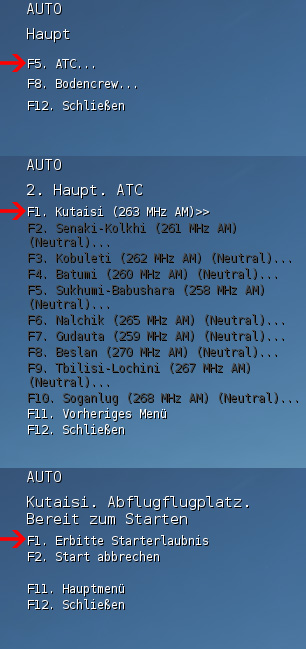
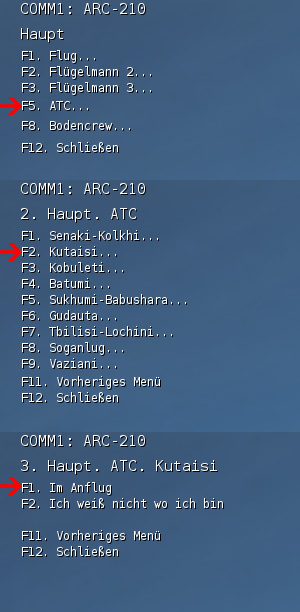
- Press [RAlt + #] to use the first radio and open the radio menu (COMM1 Request Start Up).
- Then [F5] for ATC...
- [F1] select Kutaisi Airfield...
- Press [F3] to display "Request permission to start engine."
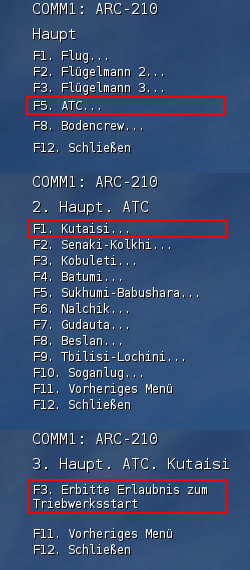
Note: Of course it does not make much sense to get permission to start the engine afterwards. But the procedure is fixed in DCS. Only when you have received permission to start the engine, you can ask for permission to taxi.
Now the following radio messages should be visible in the upper left corner.
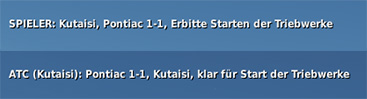
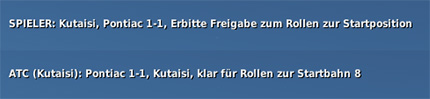
Afterwards we immediately ask for Taxi (COMM1 Request taxi).
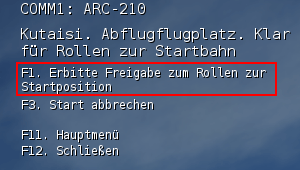
Note again the messages in the upper left corner.
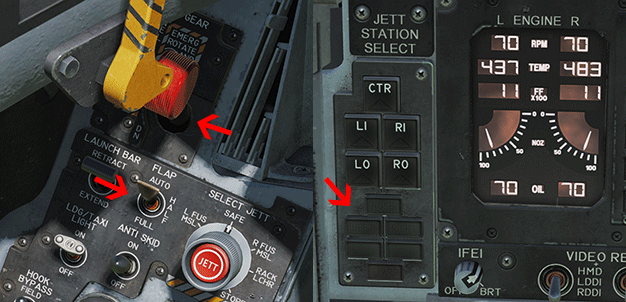
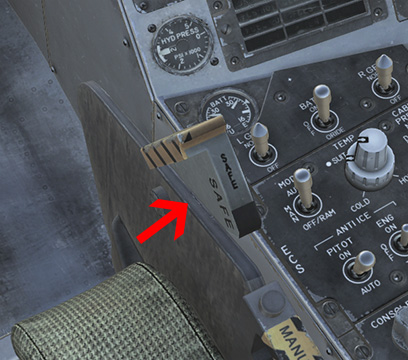
Before we can taxi, we have to select the Nose Wheel Steering:
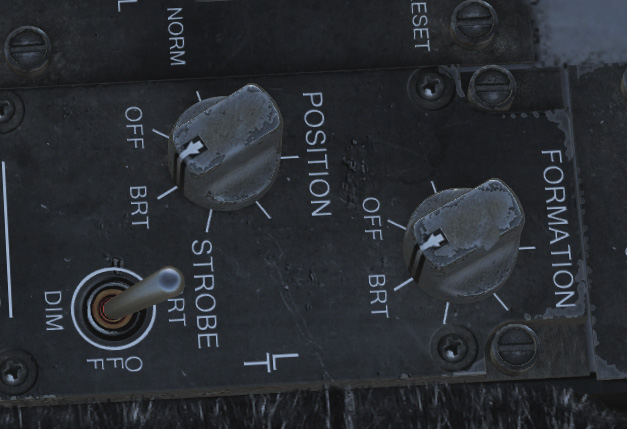
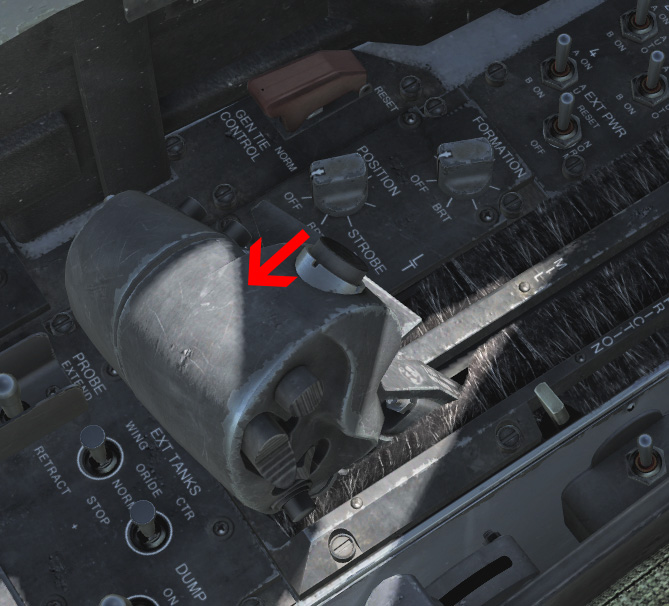
Now we switch on our exterior lighting:
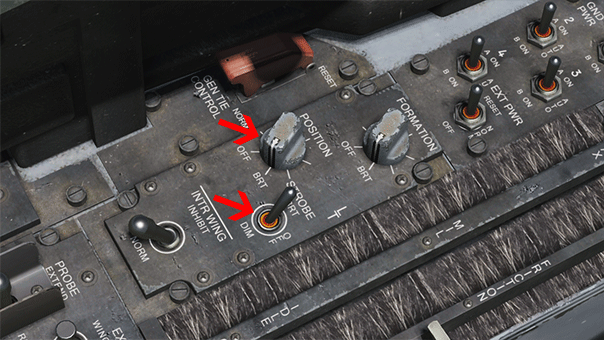
- Make sure the anti-collision flashlights are on bright (STROBE BRT) If not, right click to activate them.
- Set the position lights to maximum brightness using the mouse wheel or click and drag (POSITION BRT).
- You can set the formation lights as desired (e.g. also to BRT). Again, use the mouse wheel or click and drag (FORMATION BRT). At night FORMATION must be set to BRT to be seen better.
-
You may not be able to see the switches properly because they are located behind the throttle. Tilt your head accordingly or push the throttle forward gently and carefully. Attention: Apply the brake W when the throttle is moved.
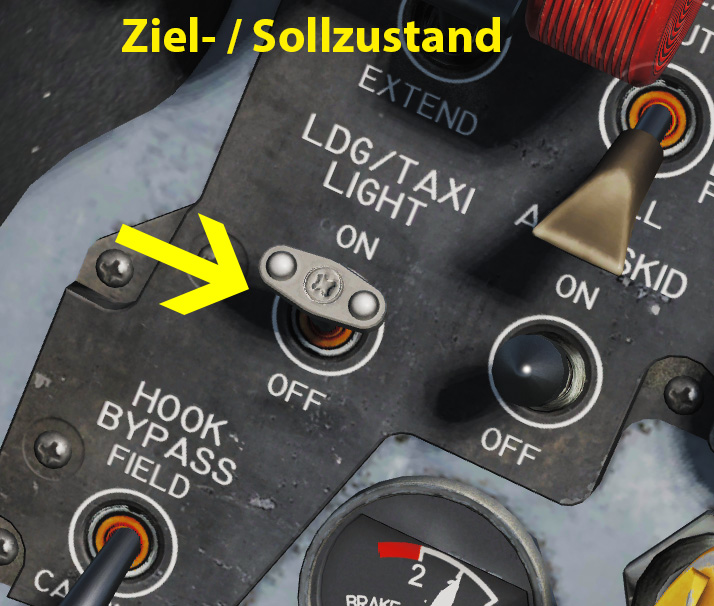
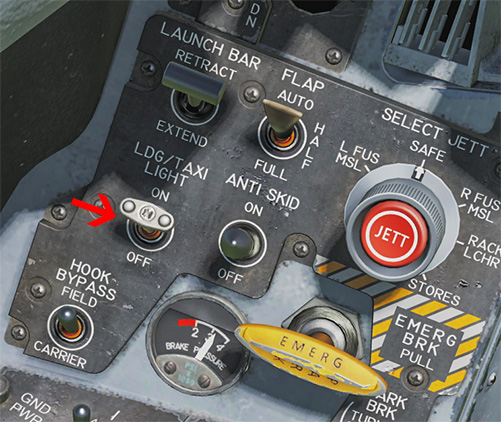
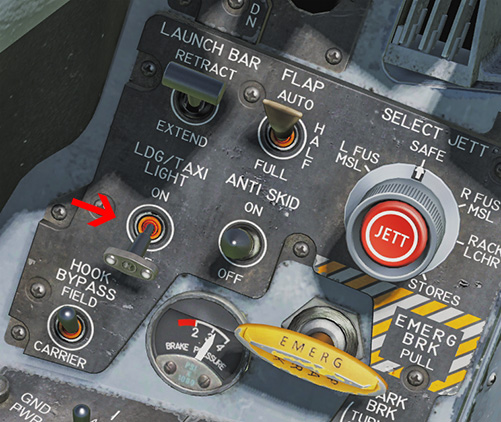
- Set the Landing Light On (LDG/TAXI LT ON)
-
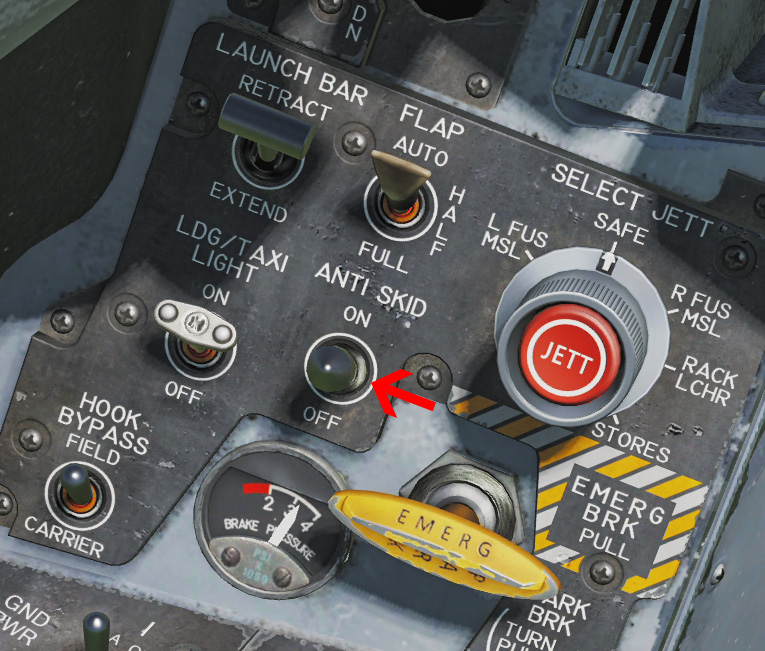
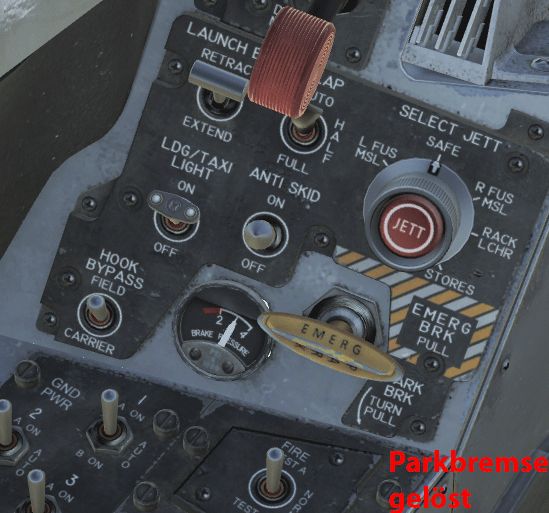
Release the parking brake by left click (PARK BRK OFF)


- To initiate the taxiing, the pilot uses a little thrust by slowly pushing the thrust lever forward.
- As soon as the plane starts to move noticeably, Test the brakes with a squeeze of the pedals W.
- In an emergency as in a case of brake failure (wrong assignment of brake axle or real simulator failure), the pilot can still come to a standstill by removing thrust and pulling the Parking Brake Handle RCtl + P.
- To steer and turn the aircraft, the rudders (twist function of the joystick or using rudder pedals) are operated. The nose wheel steering function is also tested, both in Low (HUD NWS) and High (HUD NWS HI).
- When taxiing a speed of 25 kts (knots) must not be exceeded and less in turns of course.
- Taxiways are always to be regarded as one-way streets. The white lines are only for orientation and alignment of the nose wheel. Rolling in the middle of the taxiway.
- The external lighting should always be switched on to be seen better.
- Permanent all-round visibility and anticipate while taxiing is important to avoid accidents.
- If the ATC calls the pilot while taxiing, the pilot must immediately follow the instructions of the ATC.
- So please pay attention for your own call sign!
- In wet conditions the braking power can be reduced by up to 50%.
-
Once the pilot has reached the taxiway Hold just before the runway, he is required to stop.
- Unnecessary delays must be avoided to ensure effective and safe operations at the aerodrome. However, in our mission you can take your time. There will be no other flight operations.
5. Before Take-off Checks
For the following section use the training mission called Engine Start and Rolling.
Having arrived at the Hold, the following checks are performed:
-
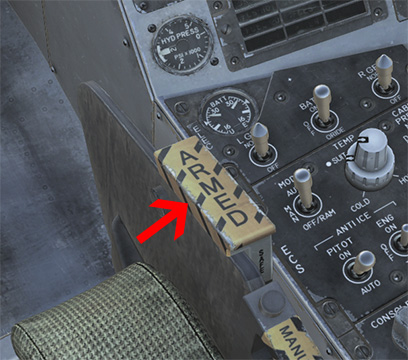
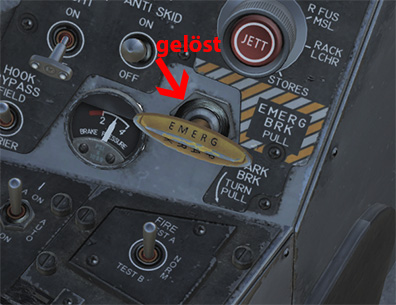
Ejector seat must be armed with a left click (EJECTION SEAT ARMED).

- Check the Canopy is closed and locked. CANOPY not displaying in LDDI
-
Check whether the oxygen supply is activated (Check OBOGS ON / OXY FLOW ON)
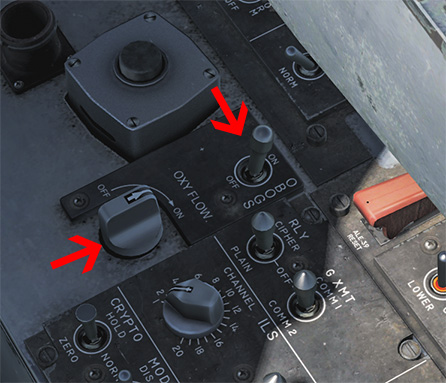
WARNING
It is possible to set the OXY FLOW knob to an intermediate position between ON and OFF, which can reduce the oxygen flow. OXY FLOW should always be turned completely to the ON or OFF position.
 |
 |
-
Ejector seat must be armed with a left click (EJECTION SEAT ARMED).
-
Release the parking brake if used at the Hold.
-
Request take-off clearance from ATC. #
As a reply we receive the permission with the indication of the current air pressure QFE. We remember this for the next point.

-
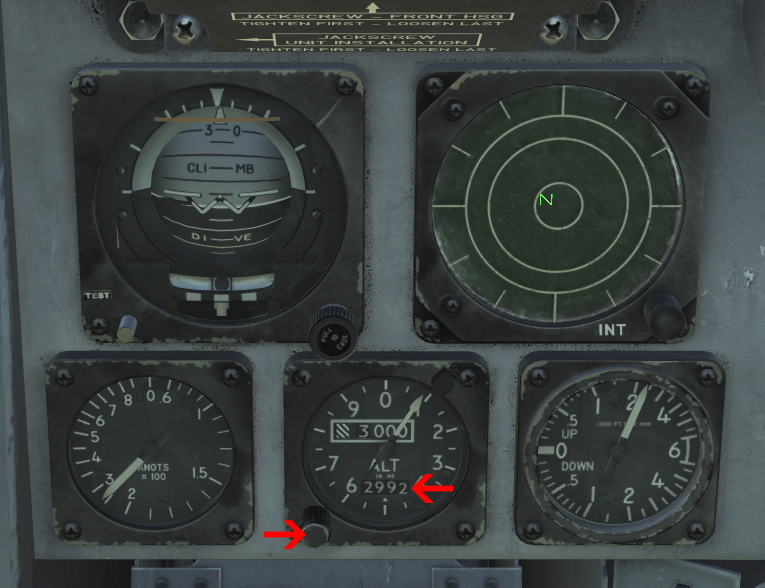
Compare the altimeter with the QFE specified by the ATC (Check QFE).
In the beginning we set the altimeter to 0. So, the displayed QFE on the altimeter should match the QFE given by ATC. The altimeter can now be readjusted if necessary.
 |
 |
-
Look out up the approach path to the right and down the runway to the left to check the airspace for other aircraft. (Check Approach & Departure Lanes). This is to make sure that no other aircraft is currently on approach and that the runway is clear, which should be the case if everyone follows the instructions of the ATC.
-
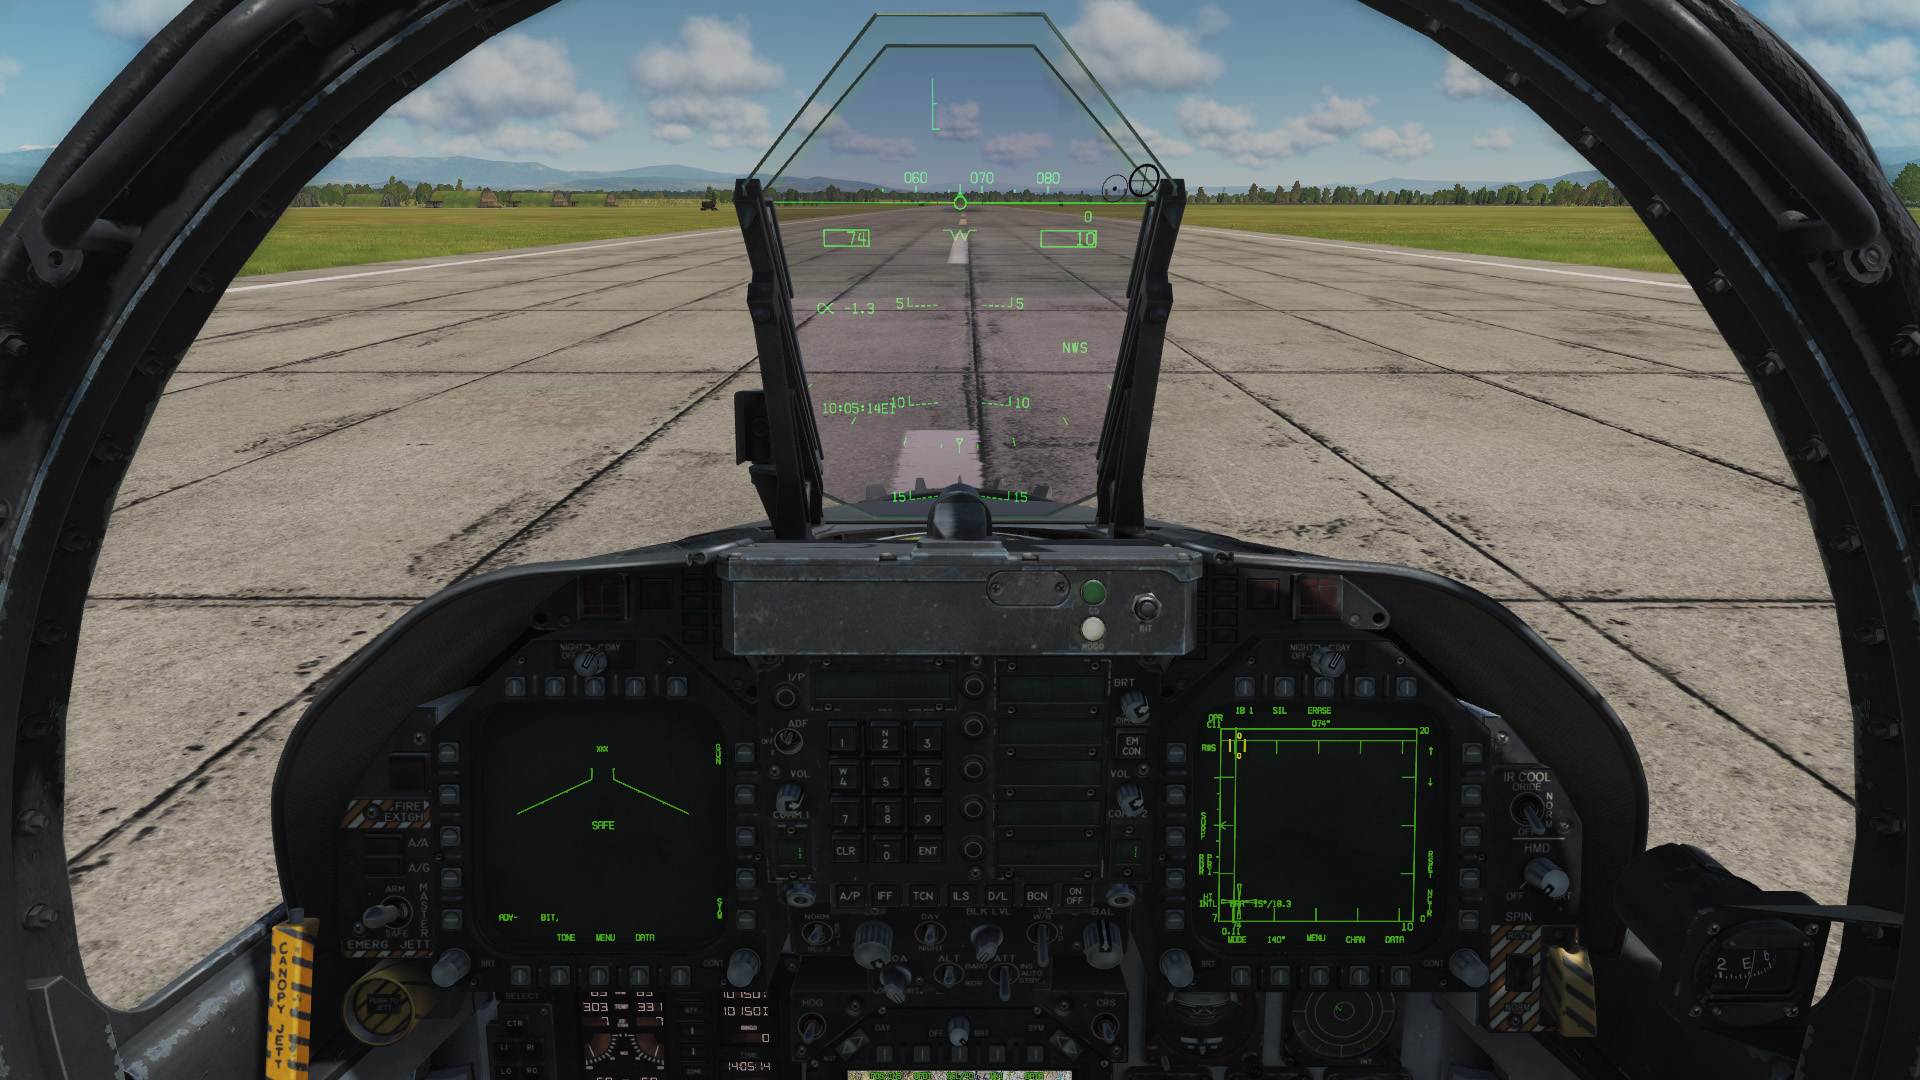
Taxi out onto the runway, align the machine with the centre line and roll forward slightly. This ensures that the nose wheel is straight.
Almost there, next is the takeoff.
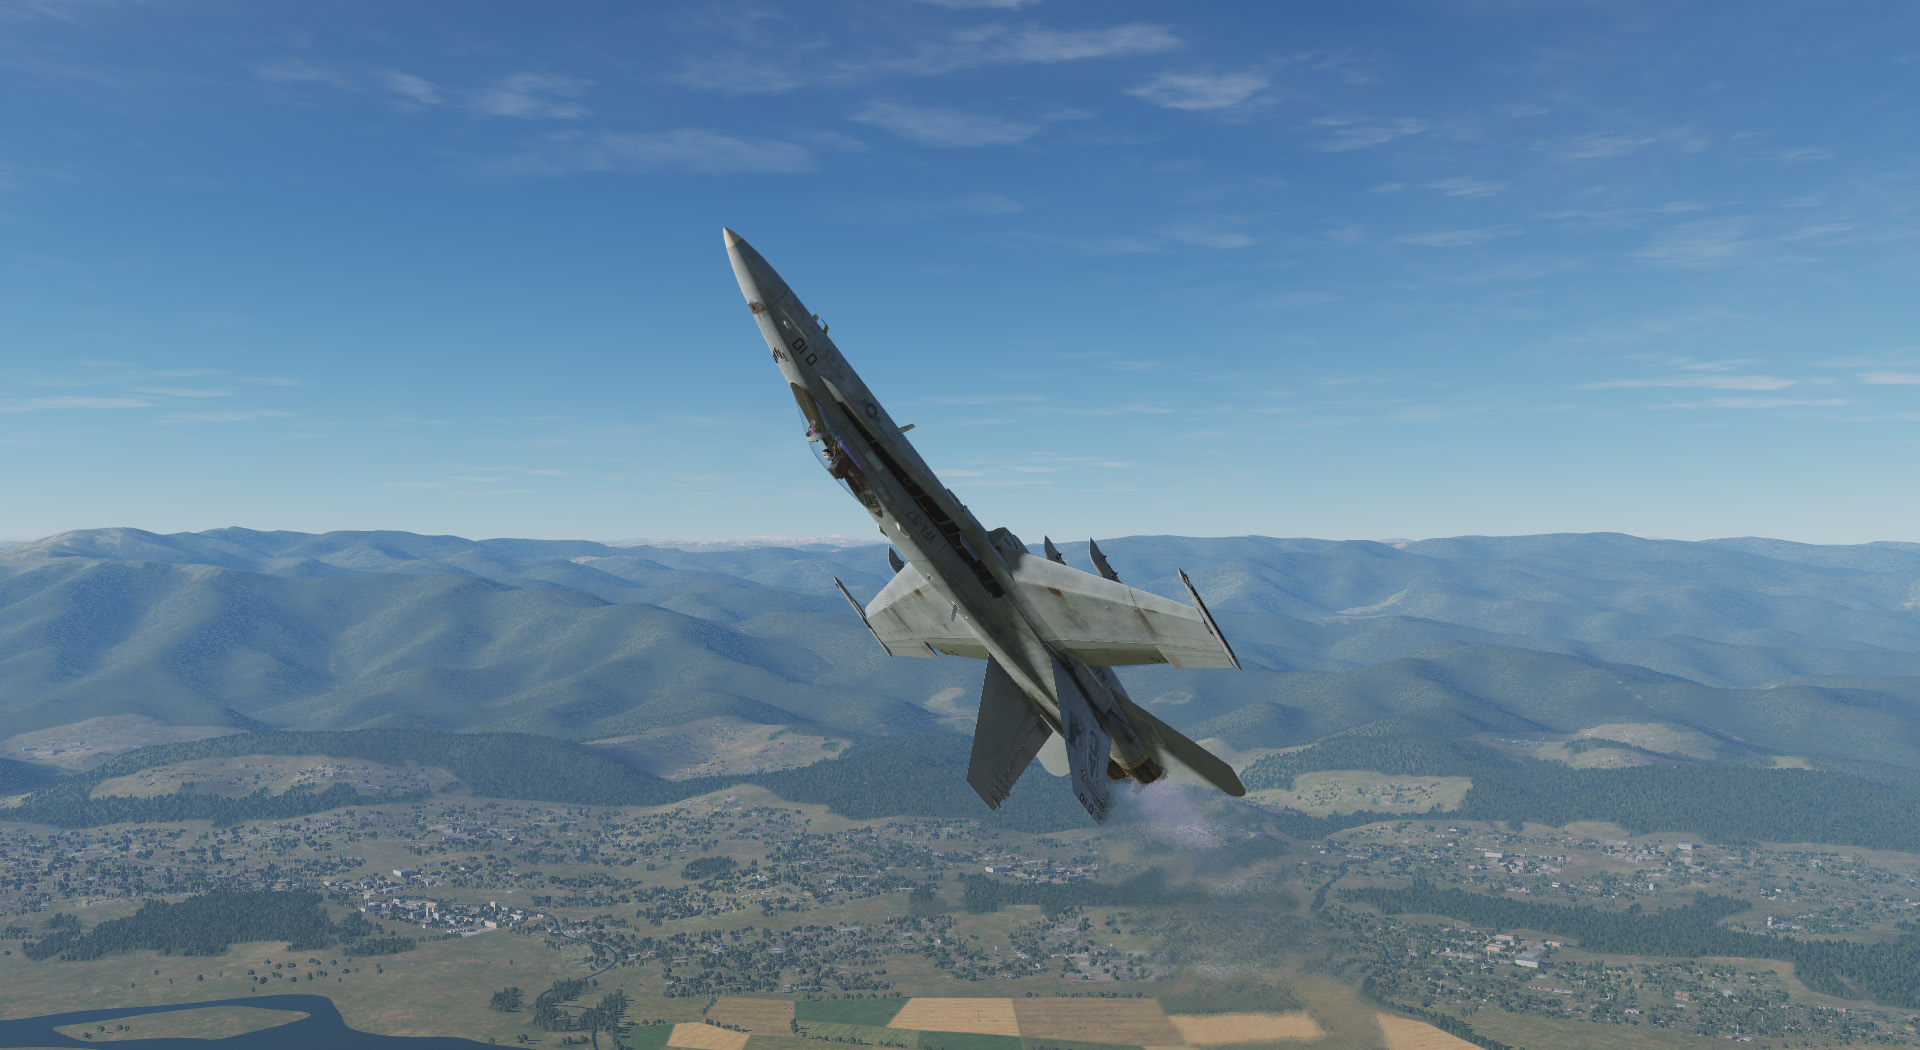
6. Standard Take-off and Climb
You can do this exercise with the mission Engine start and taxiing. Then you have to follow all steps of the previous chapters. Or, you start the exercise mission Take-off and free flight. Here you are already on the runway and all systems are activated. This helps if you want to practice the launch several times in a row.
Since we already have the take-off clearance and you are blocking the runway, we should hurry up and continue.
The starting procedure is as follows:
-
Apply the wheel brakes W(Hold BRAKE).
- Thrust to 80% RPM (ENG RPM 80%).
The nose of the airplane sinks slightly.
-
Briefly check the IFEI for any unusual values (Check IFEI)
-
When all values are "In The Green" (correct) range, release the brakes (Release BRAKE) W.
-
Increase to 100% thrust including afterburner (RPM 100%).
- Control any yaw of the aeroplane with the nose wheel control of the pedals, the keys Y and X or better with your joystick twist or rudder pedals. Be careful and make only small steering inputs.
-
In our training mission, the F/A-18C is light, as there are no weapons are attached. Therefore it will take off by itself at about 150 knots (Rotate).
-
If the aeroplane is heavier loaded, carefully pull back the control stick at 150 knots. The nose of the aeroplane should point 6° - 8° upwards. Hold this position until you are completely lifted off.

-
Once you are in the air and climbing, retract the landing gear LCtrl + G, before you reach 250 knots (GEAR UP).
-
Gear Limiting Speed = 250 Kts
-
Set the landing flaps to "automatic" F (FLAPS AUTO).
-
If you are online with others, report "<Callsign> Airborne" in the radio.
-
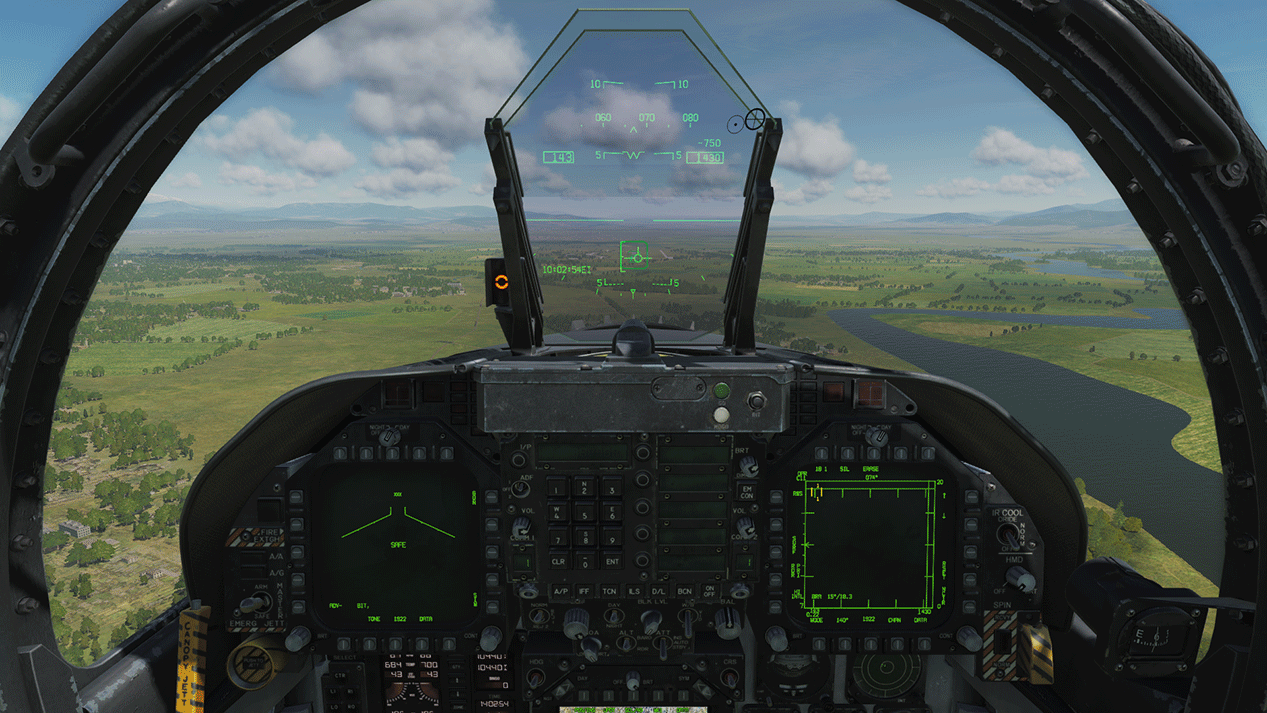
Climb at 10° (align flight path display with the 10° marker) and continue to accelerate up to 350 knots.
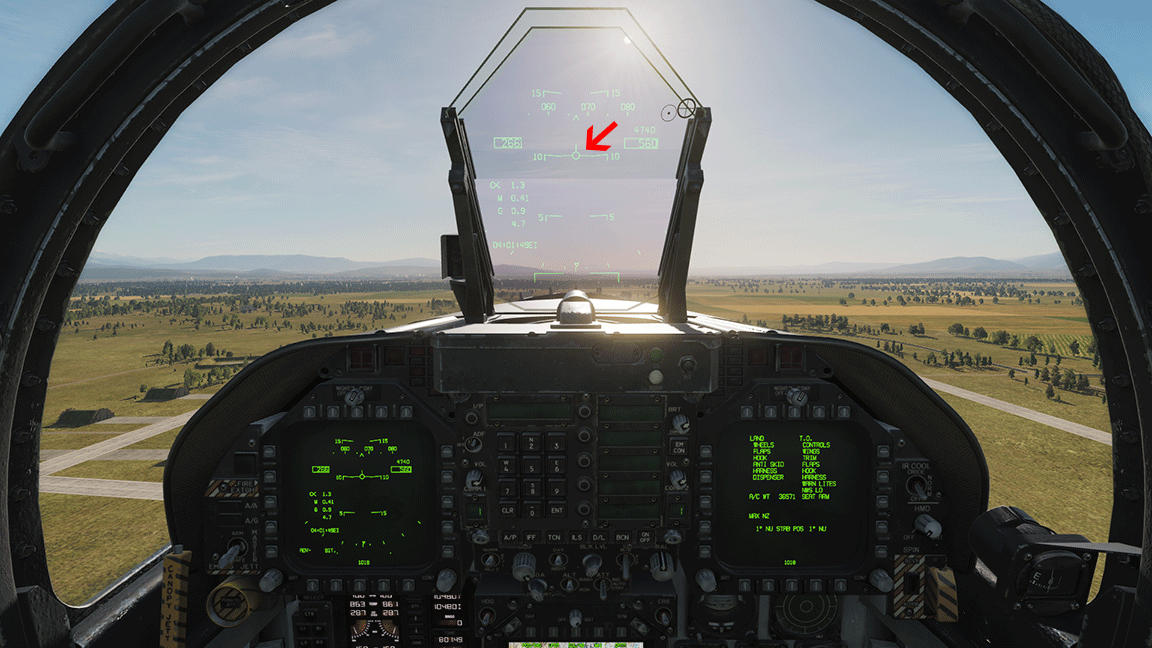
-
Just before reaching 5,000 feet, ease the stick forward to lower the nose.
- Aligning the flight path indicator with the 0° line to hold the 5,000 feet by . Reduce thrust to avoid speeding up and maintain 350 knots.
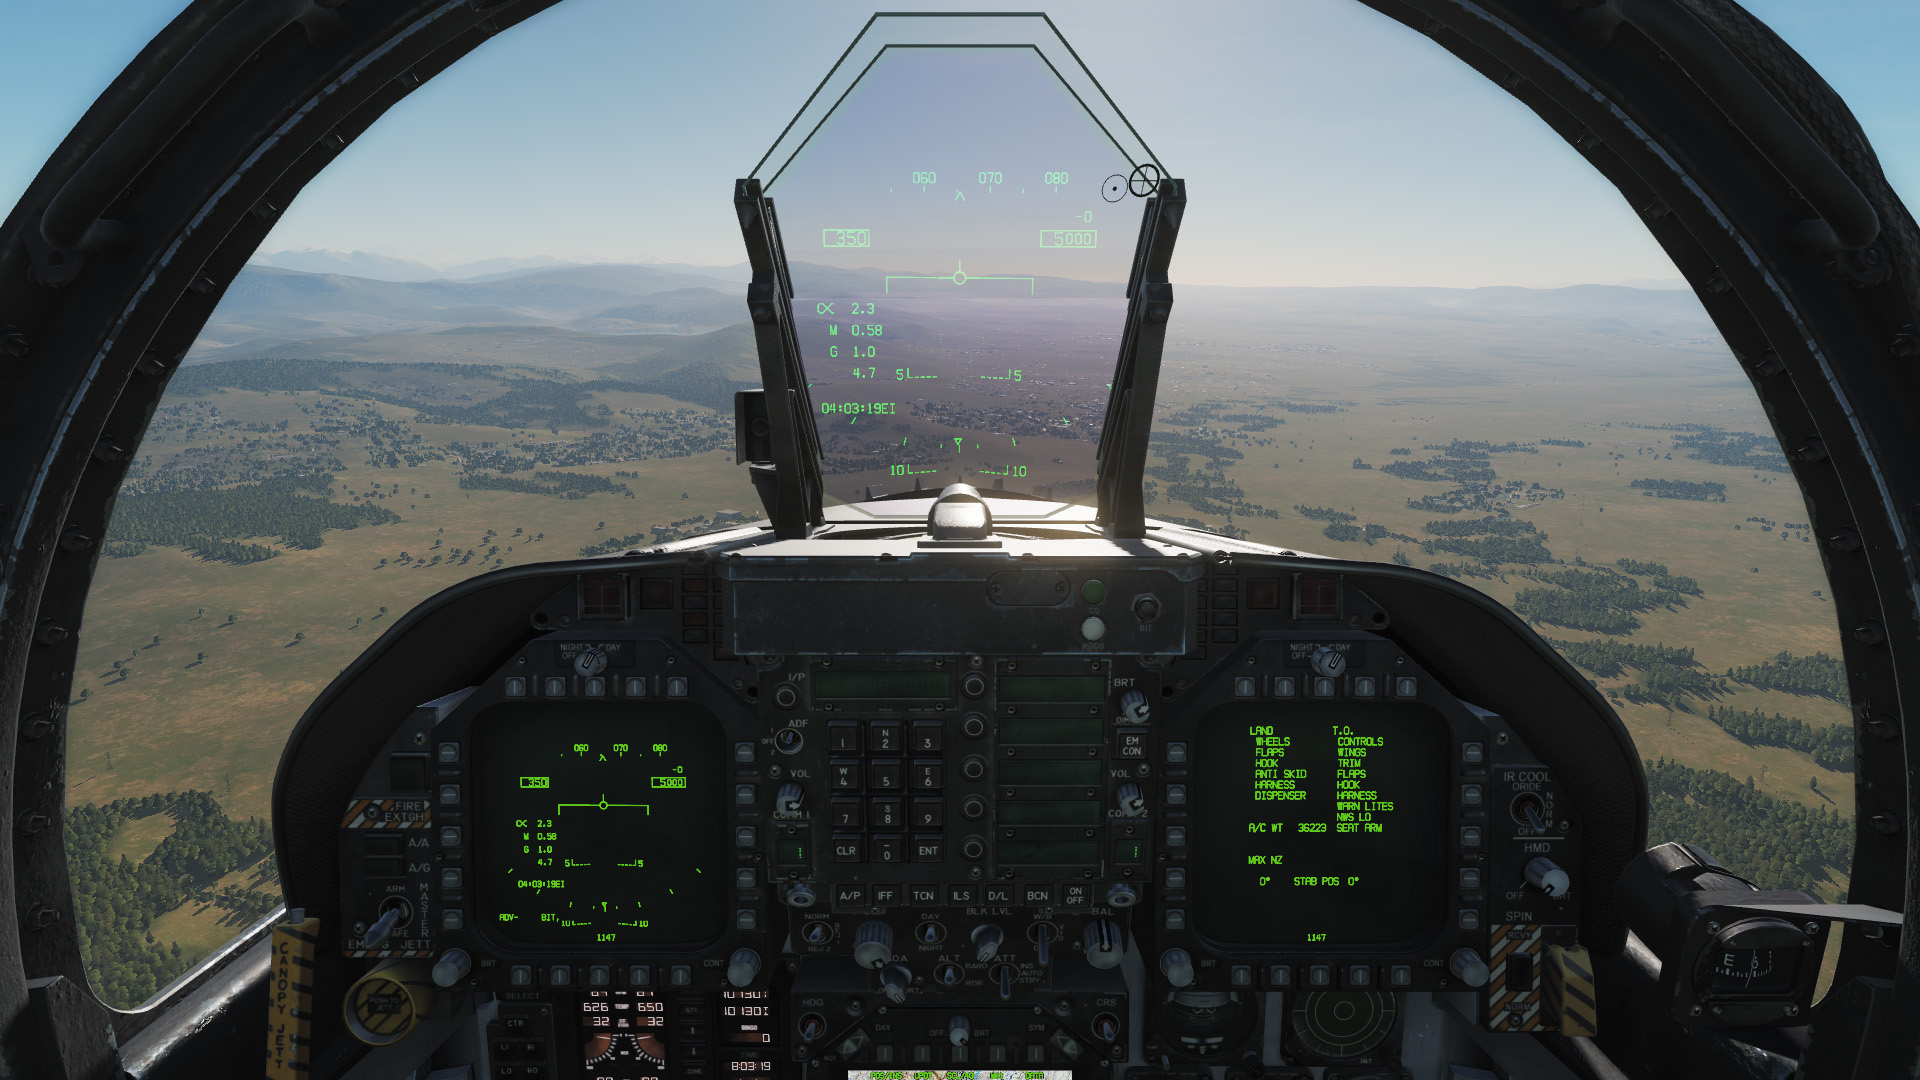
-
Fly straight for a while.
-
Now try to fly a right turn while maintaining speed and altitude. To do this, turn the plane to the right and pull the stick slightly. Note that the air resistance during manoeuvring will increase and you will have to use more thrust so as not slow down. Keep the flight path display on the 0° line
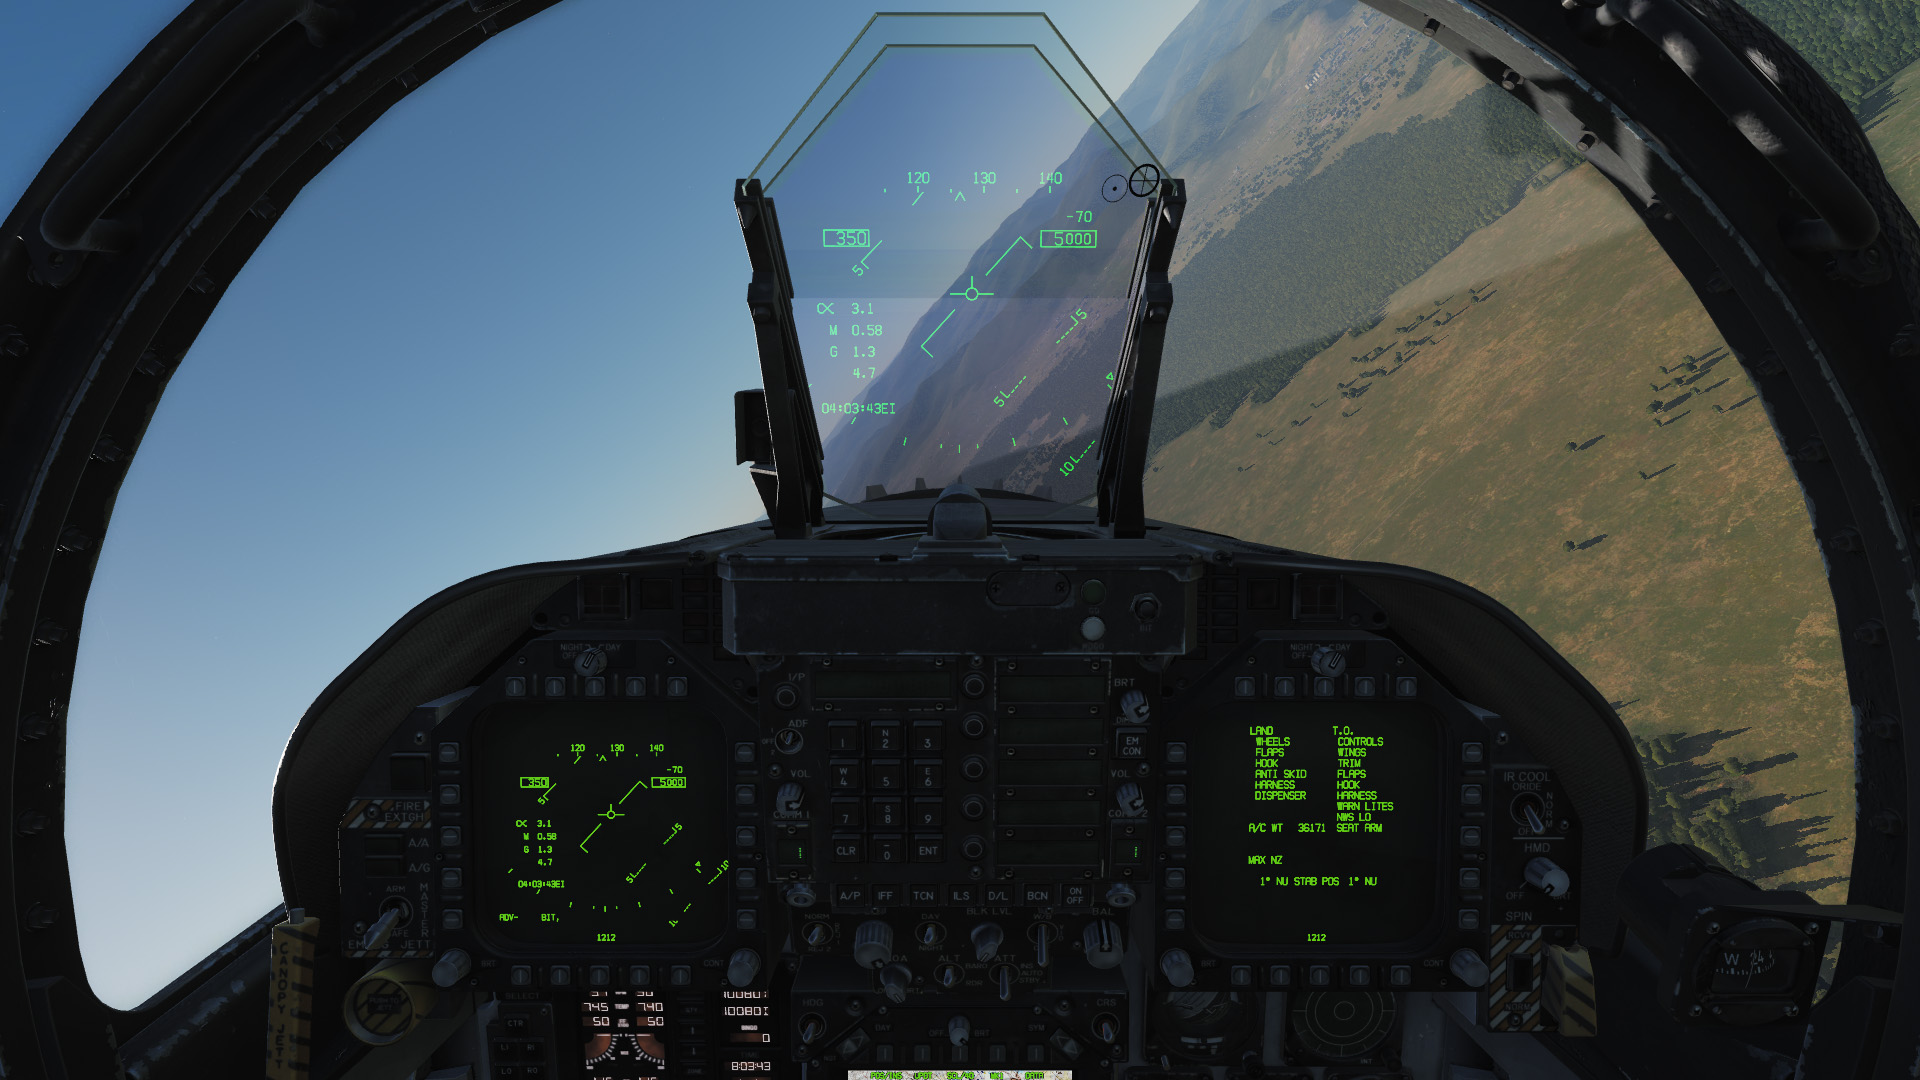
-
Now you can get used to the flight characteristics of the F/A-18C. Fly around a bit and experiment with the flight characteristics. Fly slow and fast manoeuvres with high and low angles of attack. Also try to fly very slowly and see how the plane reacts in turns. If you are overdoing it, it should be mentioned that you can eject with 3 x Ctrl + E


7. Flying the Plane
In order to get the flight characteristics, the mission Take-off and free flight. Take off from the runway and climb to 5000 feet.
We recommend that you first take a few flights. During this you should familiarise yourself with the machine and its flying characteristics.
You can try a few things at moderate speed and appropriate altitude. Work through the following list:
-
Climb and dive, i.e. fly up and down, sometimes gently, sometimes more aggressively, sometimes at slow speed and sometimes faster. How does the bird react?
-
Flt right, left turns, also at different speeds and roll rates.
-
Apply little to full rudder.
-
Combine rudder with aileron (slipping).
-
Test the reaction to power changes by increasing and decreasing thrust.
-
Try to fly as slowly as possible without losing control. At what speed does the audio warning signal start? At what speed will the F/A-18C sink? When does the shaking in the cockpit start? This is a sign that you are close to a stall.
All this should be tested to get an initial feeling for the plane. It's called "flying the plane".
Tip: Take the opportunity and adjust the joystick axes (curvature) a little bit if necessary to find a good handling with your hardware and this plane. This is a question of personal taste, but also a matter of practice and habituation. Note: As much curvature and central dead zone as necessary to allow small, sensitive control inputs, but as little as possible to avoid overreactions at the extreme deflection of the axles. +15 is a commonly used curvature.
As a specific preparation for the landing, it is best to test the flight characteristics again with partially and fully extended flaps and landing gear:
Now fly at a sufficient altitude of about 5,000 feet or even a little more or less again as slow as possible. At what speed can you no longer control the plane? So when does the stall start? The joystick feels doughy and the plane hardly reacts or delays your rudder movements. Remember these speeds to be prepared for them later. By lowering your nose and accelerating, you can usually end the stall quickly as long as you don't wait too long
You may have already started to spin or even hit the ground. Try to approach these manoeuvres progressively and so minimise destroying material and life unnecessarily.
Try this to prepare for landing:
- Lower the landing gear and flaps, align flight path indicator with the zero line and reduce speed.
- Try to maintain about 140 knots and Trim back so that the flight path indicator is in the middle of the E bracket and the orange circle of the AOA Indexer, to the left of the HUD, is glowing. If this works, you can already hold the correct angle of attack for landing.
The Training Mission Package includes the mission to practice landing and free flying. This is the quickest way to test your flight behaviour over and over again or to directly approach the landing.
8. Normal Landing
Every operation only ends successfully when the pilot and the machine reach the parking position without damage and can return the aircraft to the ground crew. To make sure that nothing is forgotten during landing, a procedure must be carried out again. This procedure begins with the radio call to the tower (ATC) and the declaration of intent to land.
This is followed by the approach and descent to IAF (Initial Approach Fix). This is a navigation point located a few miles from the runway. The goal is to arrive there at the appropriate altitude and speed and from there to land in a straight line (A stabilised Approach).
There are several possibilities to fly exactly to this invisible navigation point. But we take care of this in the advanced courses and explain the various approach procedures there.
However, all approach procedures end at a point before the runway. From then on, the same standard landing procedure is always performed. For the sake of simplicity, we will start at this point for the time being, without worrying about the approach procedures.
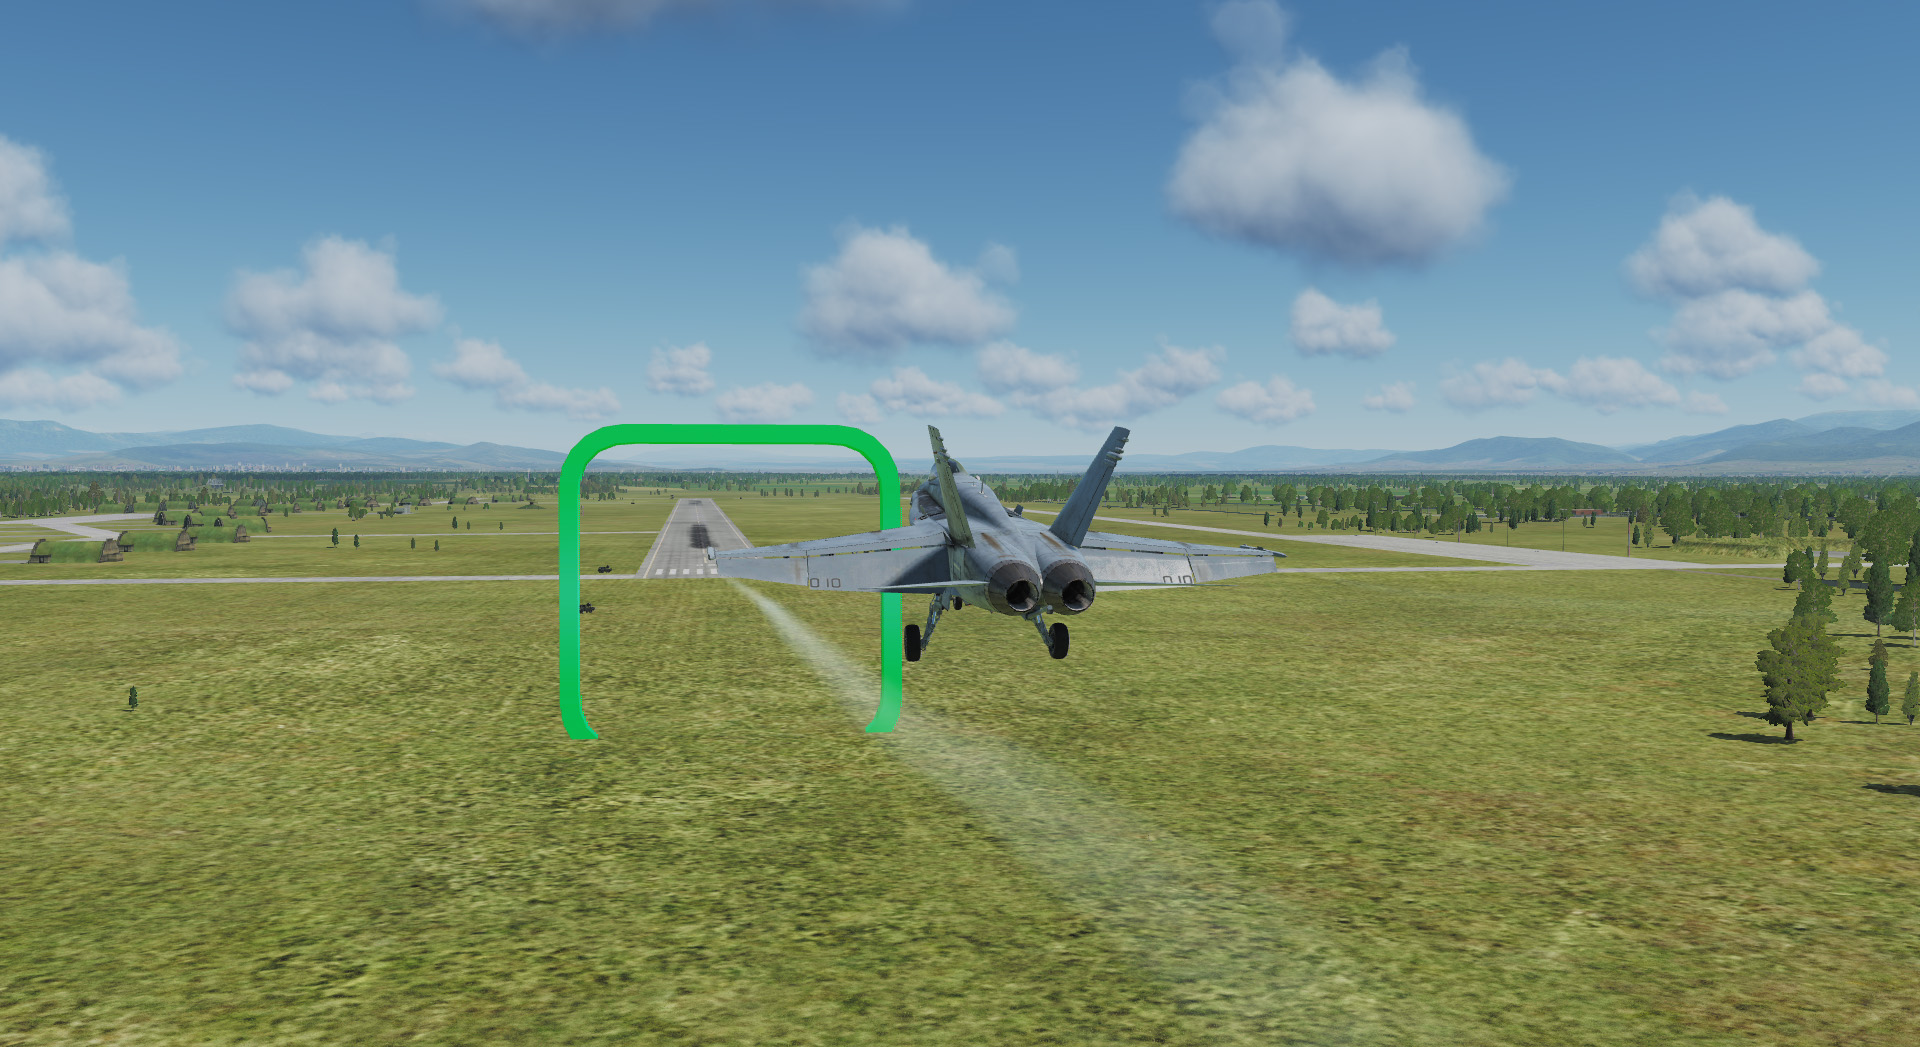
The F/A-18C (like many other aircraft) is designed to approach the airport on a 3° glide path. You will find a detailed description in the theory basic course in the section Standard landing with 3° glide path. In our training mission we have installed a visual aid in the form of green gates. They visually represent the 3° glide path. If you orientate yourself on them and follow the instructions below, this should work out quite well.
Exercise mission
It starts at a point 13 miles away from the airfield and at 3,400 feet altitude. Two miles ahead is the glide path at the same altitude. We have marked this point with the first green gate. Just fly towards it and work through the following list quickly. Once you reach the first gate, start descending to the next gate and continue working through the list.
This will freeze the aircraft in the air and stop it from moving. But unlike the normal pause, you can operate all systems and adjust everything at your leisure. When you are done, you switch off the active pause again and fly through the green gates.
Preparations
-
Radio the ATC of the destination airfield via VHF AM radio RAlt+# with the message of the landing intention (COMM1 Inbound). Normally this happens earlier, but to be allowed to land officially, you should do it now.
-
Now you should hear and see the following radio messages in the upper left corner

-
The answer includes information about which runway to use, the air pressure at the airfield (QFE) and that you should fly a few miles in a certain direction to get to the IAF point. The direction may vary depending on your current position. For this reason, the top of Figure 74 and the bottom of the cockpit picture shows 68.
You fly further and further through the gates towards the airport and reduce the speed.
Check the QFE that the ATC has reported to you and adjust it if necessary (Check QFE).

-
Switch on anti-collision lights and position lights (STROBE BRT / POSITION BRT).
- If required, also your formation lights (FORMATION BRT).

-
At some point in the course of the approach, the ATC reports again with the following message (COMM1 Request landing).

You answer with:
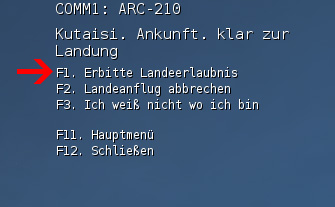

And you get another response:

-
Reduce speed and once you are below 250 knots, you can extend the landing gear (Check < 250 kts / GEAR DN)
-
Set the flaps fully down (FLAPS FULL).
-
Switch on the anti-skid braking system (ANTI SKID ON).
-
Switch on the landing lights (LDG LIGHT ON).
The preparations are now complete.
Descent
Start the descent at the first or at the latest at the second green gate on the landing course of 068°.
-
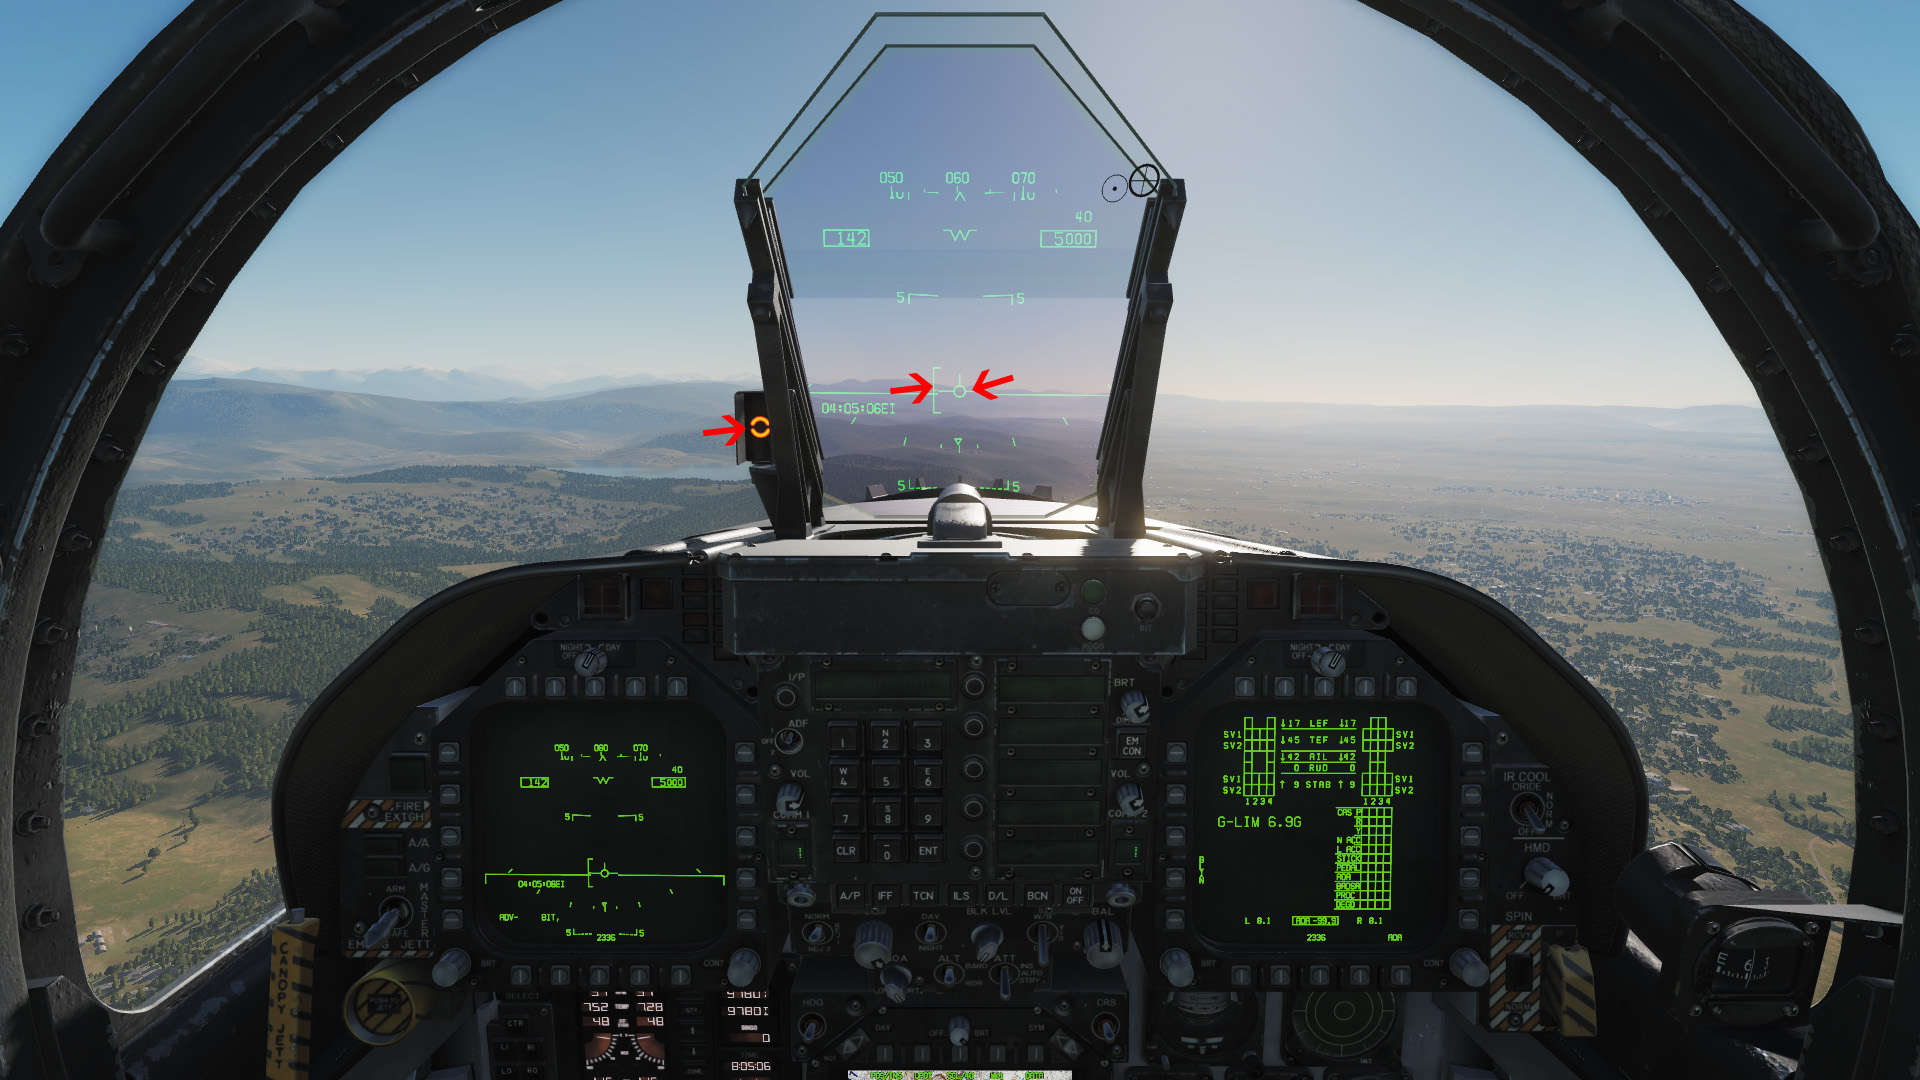
Place the flight path indicator (not the aircraft nose) on the runway using power changes. Compensate for deviations to the left or right, adding a little power each time a roll is required to compensate for th loss of lift.
-
The threshold of the runway must be at -3° (glide path) to you (in the gates).
-
Note the AOA (Angle Of Attack) indicator to the left of the HUD. The goal for each landing is for it to display only the orange "doughnut" in the middle. To do this, reduce or increase the pitch trim switch RCtrl + . or RCtrl + ; .
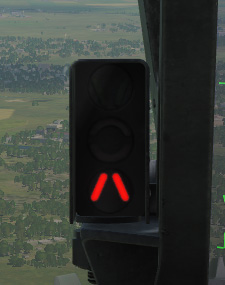
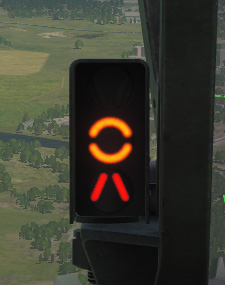
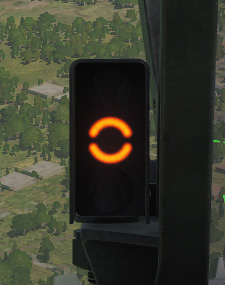
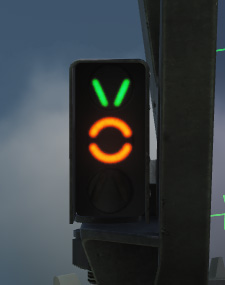
To fast
or
AOA to lowA little fast
or AOA is close
but still lowOn speed and
AOA is
perfectA little slow
or AOA is
a little highTo slow
or AOA
to high
-
Fly on the correct glide path (using power) and with the best possible AOA ( correcting with tiny trim blips ) towards the runway.
-
If your glide path is too steep (more than 3°), reduce power to set the flight path indicator to the ground in front of the runway. This will reduce your altitude and bring you closer to the correct glide path.
-
If you are too shallow (less than 3°), slightly increase thrust to set the flight path indicator beyond the runway threshold to get back up to the correct glide path.
-
-
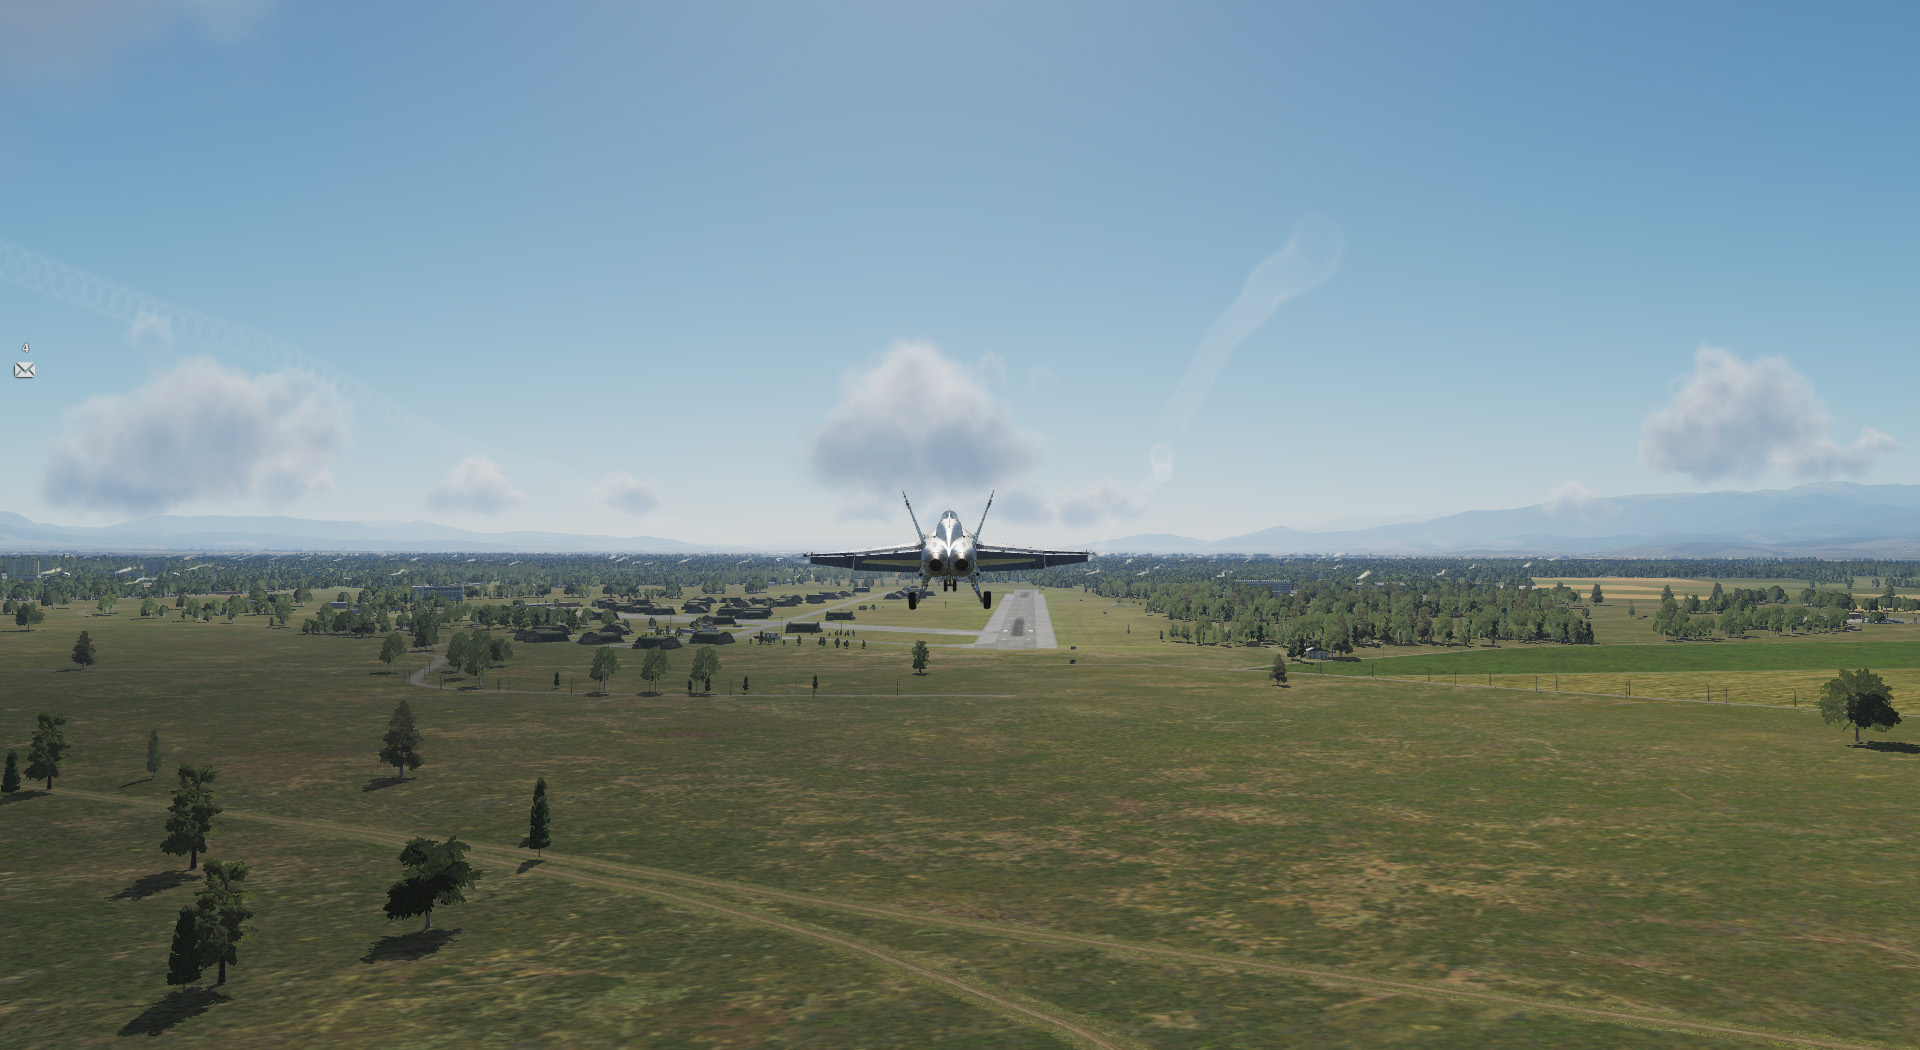
If your glide path and AOA are correct, maintain this attitude until you touch down just beyond the beginning of the runway.
-
When landing with the F/A-18C, a flare is not necessary and is not recommended. The F/A-18C's landing gear that will easily cope.
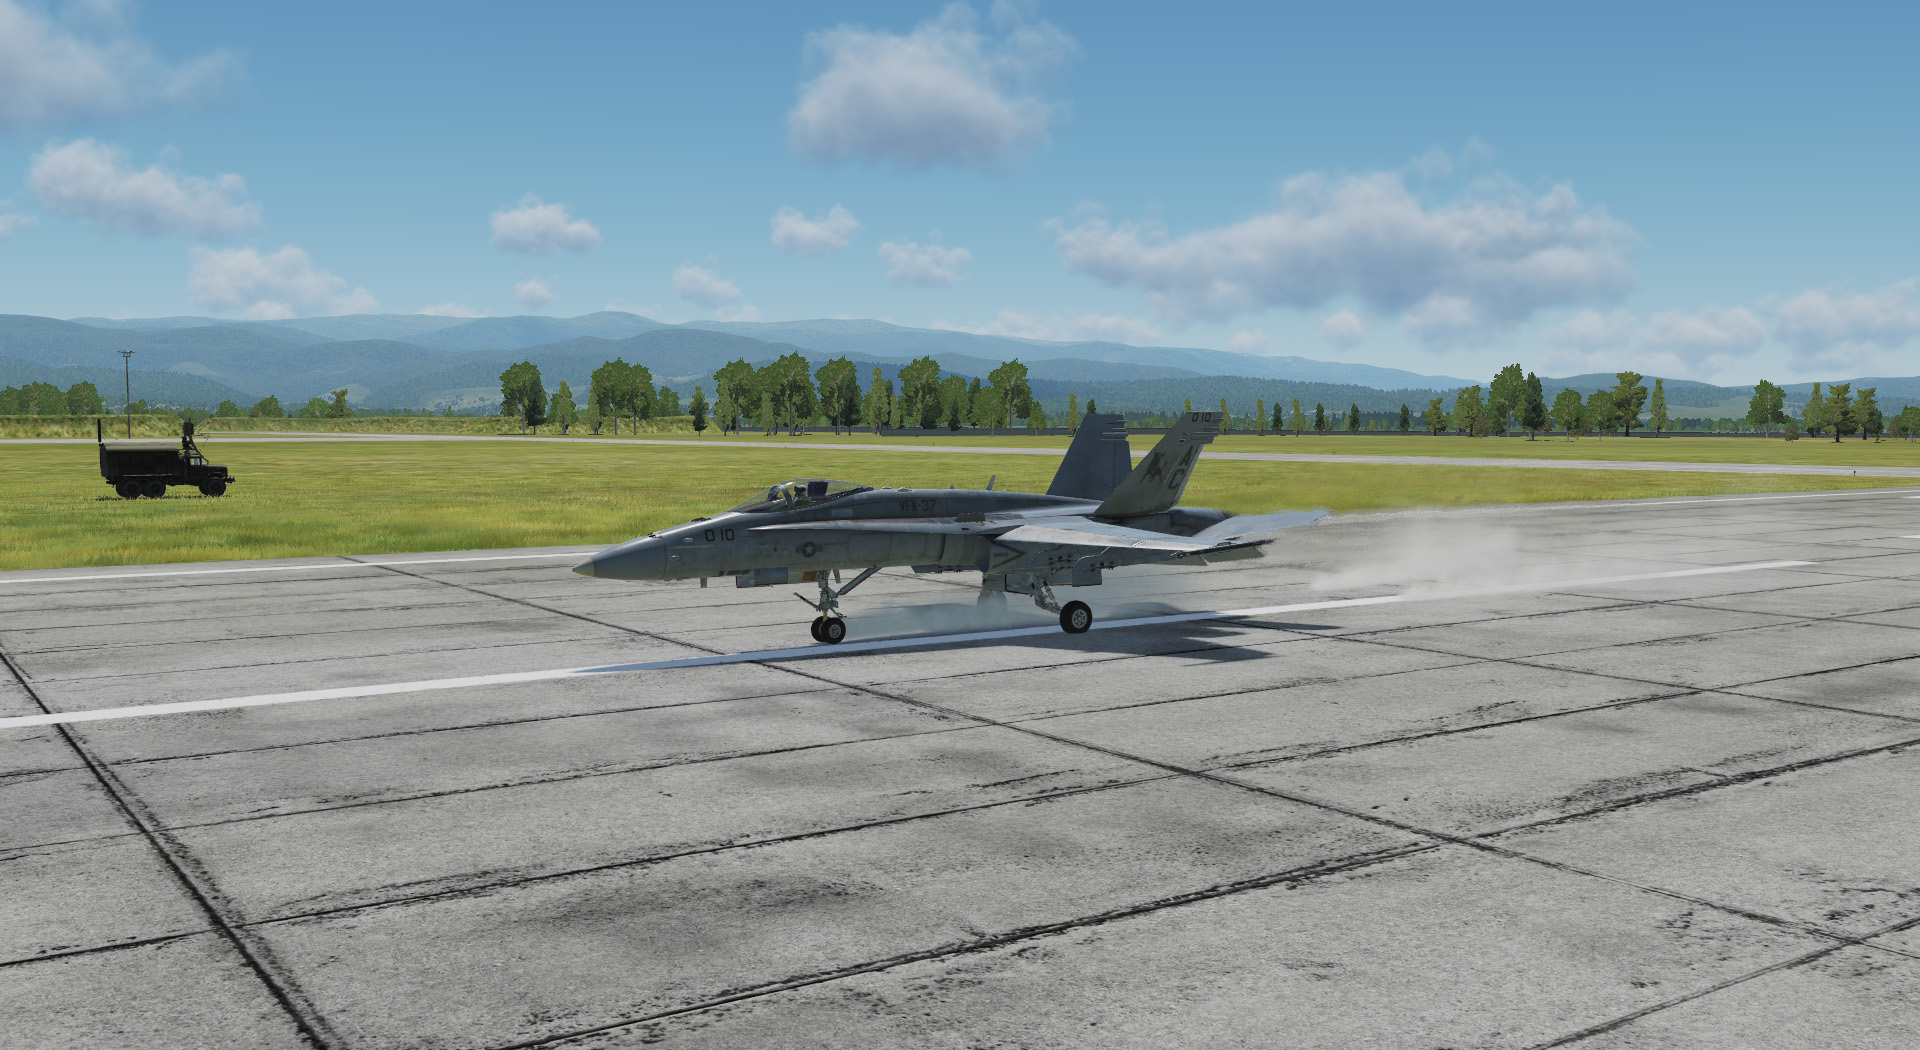
-
As soon as you touch down, set the throttle to Idle, apply the toe brakes W and, if you are flying online, report "<Callsign> Touchdown" via radio (OFS Teamspeak).
-
As the aircraft slows, the nose lowers and then brake to reduce speed more rapidly.
-
Hold the machine carefully with the rudder Y and X in the middle of the runway. The nose wheel control activates automatically as soon as weight is on the landing gear
-
Once you are slow enough, you can vacate the runway at the next exit.
-
By holding the S key you can set the nose wheel control to "HI" to use tighter turns. You must be very slow to avoid sliding over the nose wheel and damaging the tyres.
-
Having vacated the runway fully, come to a stop.
Now on to the After Landing Checks and taxi to the parking position in the next section.
9. Parking and shutdown
After landing, a few points must be worked through before the machine is handed over to the ground crew. Many virtual pilots skip the shutdown, but a successfully completed test includes the shutdown. The shutdown is divided into two checklists.
After Vacating the Runway
After Landing Checks
After you leave the runway, you brake and bring the plane to a standstill. Then you execute the following:
-
Flaps to automatic (FLAPS AUTO).

-
Taxi light on (TAXI ON)
-
Switch off the ejection seat (EJECTION SEAT SAFE).
-
Reset to Take-off trim and observe the ADV-TRIM note in the LDDI (T/O TRIM).


Now you taxi back in and go to the parking position.
At Parking Position
Before shutting down engines
-
Set parking brake (PARK BRK)
-
Shut down inertial navigation system (INS OFF).

-
Cage the Standby Artificial Horizon (CAGE SAI).

- Radar off (RADAR OFF).
-
Switch the Avionics off, including the UFC (UFC OFF).
-
And both Radio 1 and 2 off (COMM1 OFF / COMM2 OFF).
-
Switch off the external lights control knobs (POSITION OFF / FORMATION OFF).

-
Also the landing / taxi light off (LDG/TAXI OFF)
-
Open the canopy (CANOPY OPEN)

Engines Shutdown Checks
-
Disengage the nose wheel with S (NWS disengage).
-
Select flaps to FULL (FLAPS FULL).
NOTE
In real life, before switching off the engines, they should be operated at idle for 5 minutes to allow the engine temperatures to stabilise.
But we skip this waiting time.
-
Left thrust lever to OFF RAlt+End (LEFT ENG OFF),

-
DDIs, AMPCD and HUD off (LEFT DDI OFF / RIGHT DDI OFF / HUD OFF / AMPCD OFF).
- Right throttle lever to OFF RShift+End (RIGHT ENG OFF).
-
Switch off the battery (BATT OFF).
The ground crew can now take over the aircraft and the mission can be completed.
10. Fly the 10th aerodrome circuit
For practicing, the Mission Place round starts.
Standard Placement Round
The aerodrome circuit is a standardised procedure for the approach and departure of aircraft under visual flight rules (VFR visual flight rules).
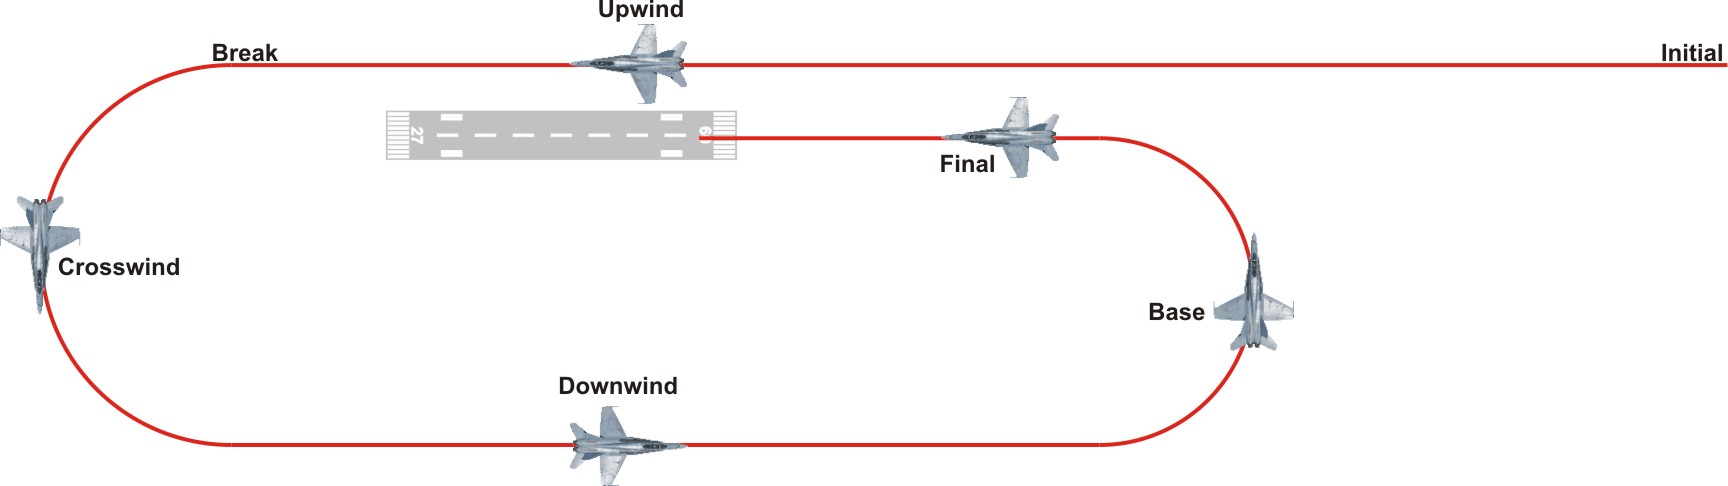
The aerodrome circuit and the approach with the F/A-18C is described in the following
Initial
The circuit begins at the initial point 3-5 nm before the runway. At this point you should have a height of 800 feet AGL (above ground level) and 350 knots. You fly with this height and speed slightly offset to the right towards the runway.
Upwind
With the upwind you fly right offset to the runway on 800 feet AGL past the airport. You will have a look at the airport to get an overview of the surroundings.
Break
As soon as we have passed the airport by about 1 nm, we initiate the break (180° curve to the crosswind). We take the thrust back completely and fly a left turn with 1% of the airspeed as turn acceleration, i.e. at 350 knots with 3.5 G. As we slow down, we also reduce the G-acceleration. At 300 knots, 3 G, and so on.
Crosswind
In crosswind (after about 90°) the landing gear and flaps are extended when we are below 250 knots. Meanwhile the turn is continued until we fly opposite to the landing direction (180°) in the downwind.
Downwind
Arriving in the downwind we reduce the altitude to 600 feet AGL and the speed for the appropriate AOA (Onspeed). We also go through the landing checklist and trim the aircraft for landing.
Base
When we pass the runway and have the landing threshold at our 7-8 o'clock position, we turn left again. This time with 30° bank angle and Onspeed AOA, i.e. landing speed and 7.4° to 8.8° angle of attack. During the lateral approach we keep an eye on the runway to be able to correct something if necessary so that we approach the runway accurately.
Final
After we have left the base leg, we are on final approach. We enter the descent, check our glide path (3°) and improve it if necessary. The remaining final approach is identical to the chapter "Normal Landing".
Touch-and-Go
If you want to practice the landing approach several times in a row, then use the touch-and-go method. In this case you give full thrust again immediately after touchdown and start climbing. You climb to 800 feet and turn left again into the downwind. From there the landing approach is repeated.

Here is a video of the process.