Simplified Procedures in Detail
3. Before Requesting Taxi Clearance
This is the next step after starting the engine and systems. This is carried out in the same training mission.
Before we get on the way to the runway, we have to make further system settings and check the configuration of the aircraft.
-
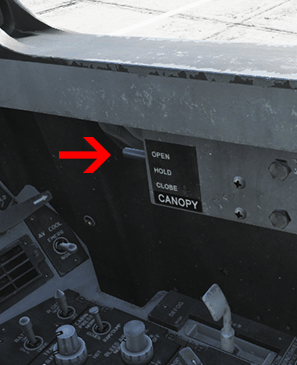
Close the canopy completely to reduce the turbine engine noise. This is done here for convenience, but is usually done at the Hold. The switch is located above the right console (CANOPY CLOSE).
-
To make the middle display easier to read, we hide the joystick Backspace.
-
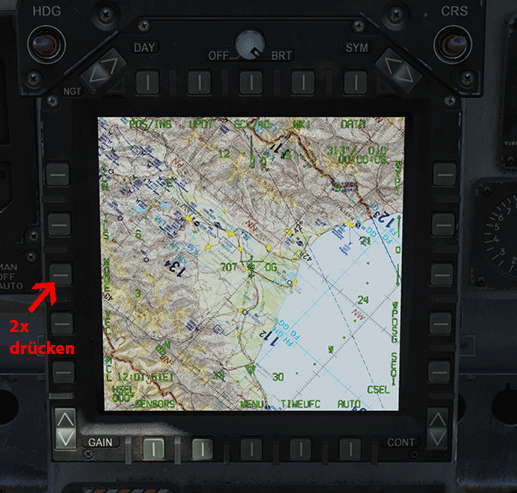
Switch off the chart in the AMPCD display by pressing PB03 (MODE) twice (AMPCD MAP OFF):
-
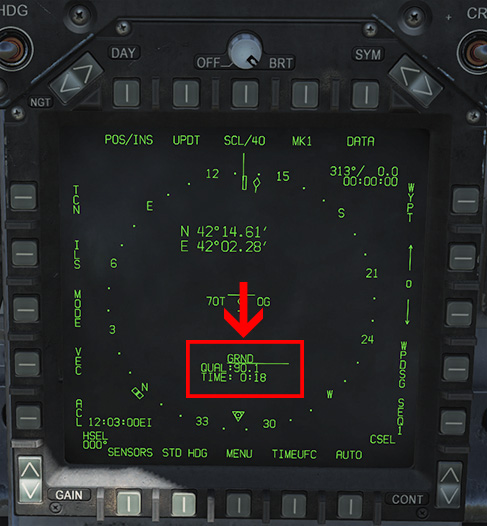
Now we see in the HSI (centre display) an indication of the INS state. At the top is the type of calibration type, underneath is the calibration quality number running backwards and beneath that is the time already taken.
-
As soon as the calibration is completed, an “OK” appears in the second line and the time taken.

-
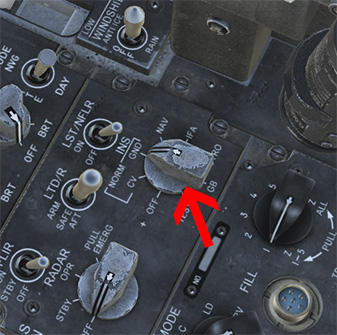
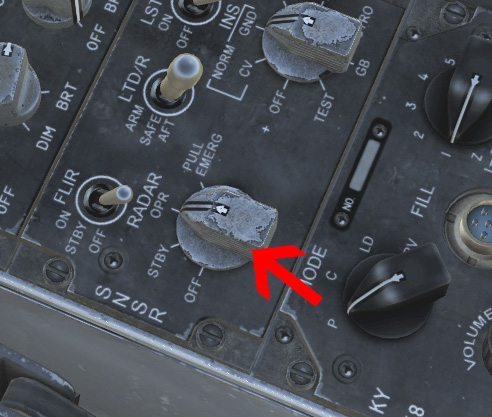
As the INS is calibrating, we can continue with the checks by switching on the Radar with the selection knob as shown in the following picture (RADAR OPR)
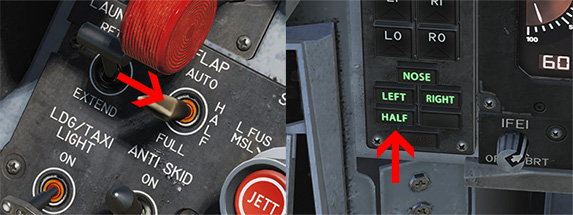
- We set the landing Flaps to HALF by right clicking. To the left of the IFEI (engine indicator) you can see the position of the landing flaps on the lights (FLAP HALF).
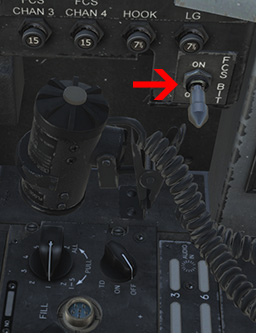
- Perform flight control system self test (BIT SELF TEST). To do this we have to press the FCS BIT switch on the right cockpit wall (above the right console) and operate the DDI at the same time.
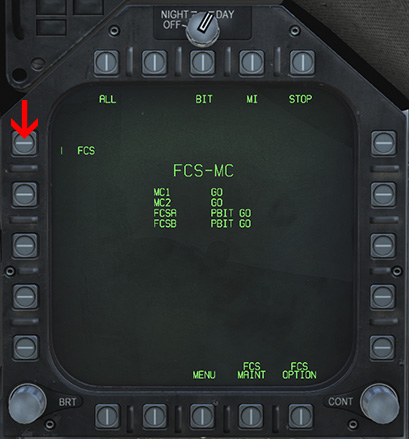
- Since we cannot operate both buttons at the same time with the mouse, we have to switch the FCS BIT switch with the key function Y. To do this we proceed as follows. We open the FCS-MC BIT subpage in the right DDI.
MENU -> SUPT MENU -> BIT -> FCS-MC
- Then we switch the FCS BIT switch with the Y key and keep it pressed (FCS BIT ON) while we click on FCS in the DDI (DDI FCS).
 |
 |
 |
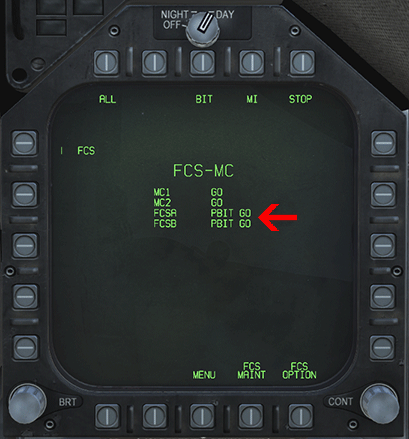
- Now we see in the DDI how the flight control system is tested. During the test the display shows FCSA IN TEST and FCSB IN TEST. After successful testing the display shows FCSA GO and FCSB GO (Check FCS RESULT).
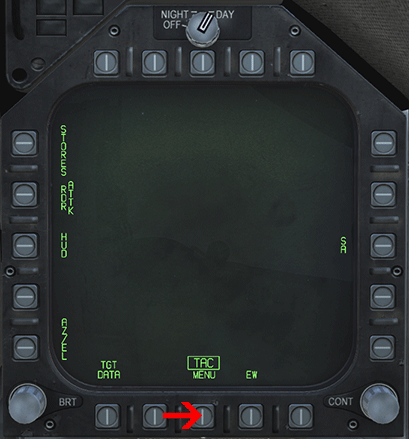
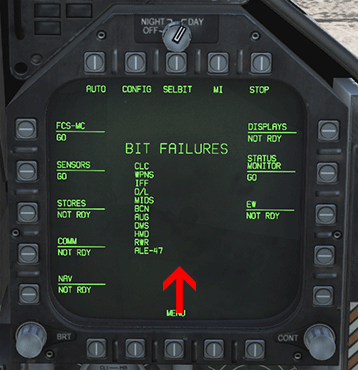
- BIT Note Check DEGD/FAIL. Press the MENU button (PB18) twice at the bottom center, then press the BIT button (PB08) at the top center (SHOW BIT PAGE).
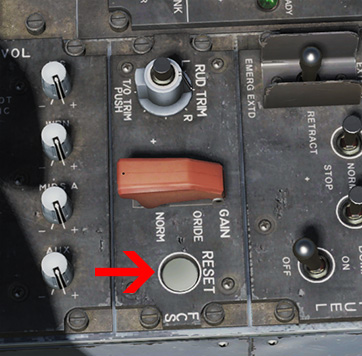
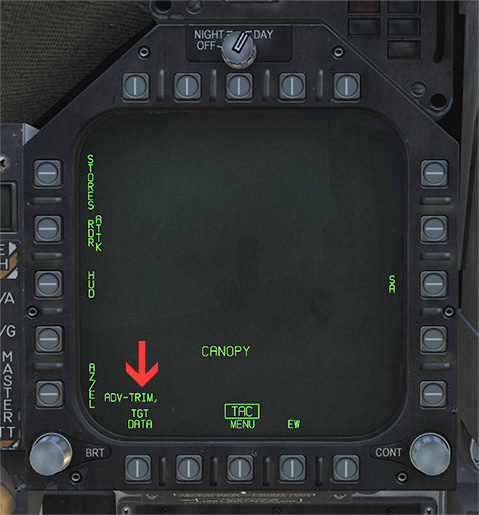
- We activate the Take-off Trim by pressing (left click) the centre button until the ADV-TRIM indicator is displayed in the left DDI. Then release the button again (T/O TRIM).

- Check Speed Brakes. Fully extend with LShift + B and fully retract with LStrg + B. With the F2 view you can switch to the outside view (SPEED BRAKE).

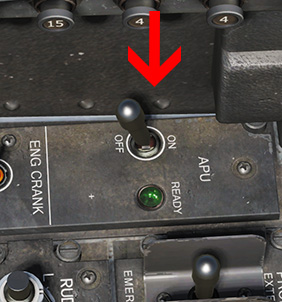
- Check if the APU has shut down. The APU will automatically shut down after a while if both engines are running (APU OFF).
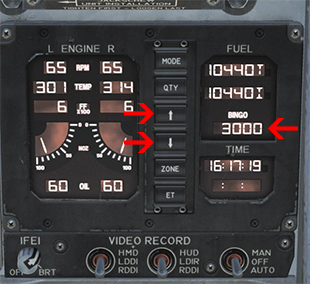
- Set fuel / BINGO. With both arrow keys in the IFEI you can adjust the BINGO FUEL in steps of 100. In our example it is set to 3000 pounds. When our remaining fuel reaches 3000 pounds we get a BINGO message (BINGO FUEL).
-
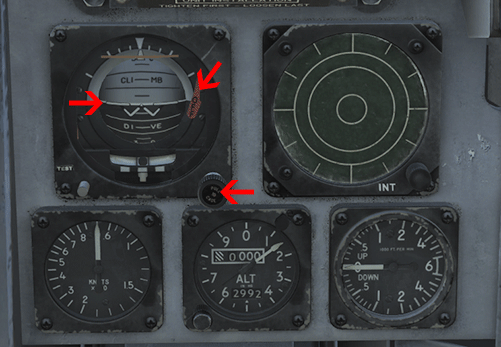
Now we adjust our barometric altimeter. We turn the knob at the bottom left of the altimeter as shown in the picture (turn the mouse wheel or left click and drag). We turn until the altimeter shows 0 feet. The pressure is difficult to read on the Altimeter so it is repeated in the HUD. This corresponds to the QFE (ALT QFE).
-
Setting the QFE is not quite correct, but for our mission (playout) it is sufficient and also easier. In most cases you set the QNH here. This will be explained in detail in the advanced course. If you are still interested, you can read in the theory basic course in the section QNH and QFE what the QNH/QFE is all about. Otherwise skip this part and continue with the next step.

- Activate SARI (Standby Attitude Reference Indicator, artificial horizon) and align to artificial horizon by turning the mouse wheel (SARI UNCAGE)
 |
|
So the most important checks are completed and we can continue with the taxi to the Hold.